LiveAPI 绘图与地图绘制教程
技术背景
Gemini 2 多模态实时 API 是 Google 推出的新一代模型接口,支持文本、音频、图像等多种模态的实时流式交互。传统 API 采用请求-响应模式,延迟较高,难以满足实时对话、语音助手等场景。Live API 基于 WebSocket 全双工通信,允许客户端与模型持续交换消息,实现低延迟、多轮、多模态的交互体验。本教程聚焦于工具调用(Function Calling),使模型能够动态调用外部工具(如搜索、代码执行、图表绘制、地图渲染),扩展模型能力,解决复杂任务。适用场景包括实时语音助手、交互式数据分析、地图导航等。主要限制包括:需要 WebSocket 支持、API 密钥管理、音频处理复杂度、工具调用需严格遵循模式定义。
核心原理
Live API 的核心是 WebSocket 长连接,客户端通过 wss://generativelanguage.googleapis.com/ws/google.ai.generativelanguage.v1beta.GenerativeService.BidiGenerateContent 建立连接,并在 URL 中携带 API 密钥。连接建立后,客户端发送 setup 消息配置模型、工具和响应模态(TEXT 或 AUDIO)。随后,客户端通过 client_content 消息发送用户输入,服务器以 serverContent 消息流式返回模型输出(文本或音频),以 toolCall 消息请求调用工具。客户端处理工具调用后,通过 tool_response 消息返回结果。整个交互是异步的,通过 asyncio 管理。音频数据以 PCM 格式编码,通过 base64 传输,客户端需缓冲并转换为 WAV 文件播放。工具定义采用 JSON Schema 格式,模型根据描述生成参数,客户端执行函数并返回结果。
架构分析
系统架构分为客户端和服务器两端。客户端核心组件包括:连接管理(quick_connect)、消息发送(send)、响应处理(handle_server_content、handle_tool_call)、音频缓冲(wave_file)和工具注册(tool_calls 字典)。服务器端为 Gemini 模型,负责理解用户输入、生成响应、决定是否调用工具。数据流:用户输入 -> WebSocket -> 模型 -> 流式响应(文本/音频)或工具调用 -> 客户端执行工具 -> 返回结果 -> 模型继续生成。关键设计决策:使用 contextlib.asynccontextmanager 管理连接生命周期,确保资源释放;使用 logger 控制调试信息;工具调用通过 responses 映射,支持函数或预定义结果,灵活扩展。
完整实战教程
##### 版权所有 2026 Google LLC.
# @title Licensed under the Apache License, Version 2.0 (the "License");
# you may not use this file except in compliance with the License.
# You may obtain a copy of the License at
#
# https://www.apache.org/licenses/LICENSE-2.0
#
# Unless required by applicable law or agreed to in writing, software
# distributed under the License is distributed on an "AS IS" BASIS,
# WITHOUT WARRANTIES OR CONDITIONS OF ANY KIND, either express or implied.
# See the License for the specific language governing permissions and
# limitations under the License.
Gemini 2.X - 使用多模态实时 API 的多工具

在本笔记本中,你将学习如何在 Gemini 2 多模态实时 API 中使用工具,包括图表工具、Google 搜索和代码执行。有关新功能的概述,请参阅 Gemini 2 文档。
本笔记本使用 Python 编写,并直接使用安全的 Websockets 协议,*不*使用 GenAI SDK。
如果你不需要代码,只想尝试多媒体流式传输,请使用 Google AI Studio 中的 Live API。
开始设置
%pip install -q 'websockets~=14.0' altair
设置你的 API 密钥
要运行以下单元格,你的 API 密钥必须存储在名为 GEMINI_API_KEY 的 Colab 密钥中。如果你还没有 API 密钥,或者不确定如何创建 Colab 密钥,请参阅 [身份验证]
 (有关示例,请参阅](../quickstarts/Authentication.ipynb) 快速入门。)
import os
from google.colab import userdata

GEMINI_API_KEY = userdata.get('GEMINI_API_KEY')
多模态实时 API 是 Gemini 2.0 模型引入的新功能。它不适用于前几代模型。
你还需要将客户端版本设置为 v1alpha。
uri = f"wss://generativelanguage.googleapis.com/ws/google.ai.generativelanguage.v1beta.GenerativeService.BidiGenerateContent?key={GEMINI_API_KEY}"
model = "models/gemini-2.5-flash-native-audio-preview-09-2025"
设置一些辅助函数
在与 API 交互之前,先定义一些本 codelab 中需要的辅助函数。
在本 notebook 中,你将缓冲流式 PCM 音频响应,因此创建一个上下文管理器,将 PCM 音频数据包装为带有相关音频参数的 wave 音频文件。这样,你就可以直接在 Colab 中播放音频。
import contextlib
import wave

@contextlib.contextmanager
def wave_file(filename, channels=1, rate=24000, sample_width=2):
  """Define a wave context manager using the audio parameters supplied."""
  with wave.open(filename, "wb") as wf:
    wf.setnchannels(channels)
    wf.setsampwidth(sample_width)
    wf.setframerate(rate)
    yield wf
使用自定义日志记录器,以便轻松切换日志级别,从而查看 API 的实时请求和响应。
import logging
logger = logging.getLogger("Live")
# Switch to "DEBUG" to see the in-flight requests & responses
logger.setLevel("INFO")
定义连接函数
这段代码定义了一些函数,用于连接(quick_connect)、执行并处理提示(run)以及处理特定的服务器响应(handle_tool_call、handle_server_content)。
这段代码使用了 websockets PyPI 包,特别是 14.0 版本中提供的异步接口,并且不适用于较旧的包版本。
import asyncio
import base64
import json
import time

from websockets.asyncio.client import connect
from IPython import display


async def setup(ws, modality, tools):
  """Perform a setup handshake to configure the conversation."""
  setup = {
      "setup": {
          "model": model,
          "tools": tools,
          "generation_config": {
              "response_modalities": [modality]
          }
      }
  }
  setup_json = json.dumps(setup)
  logger.debug(">>> " + setup_json)
  await ws.send(setup_json)

  setup_response = json.loads(await ws.recv())
  logger.debug("<<< " + json.dumps(setup_response))

async def send(ws, prompt):
  """Send a user content message (only text is supported)."""
  msg = {
    "client_content": {
      "turns": [{"role": "user", "parts": [{"text": prompt}]}],
      "turn_complete": True,
    }
  }
  json_msg = json.dumps(msg)
  logger.debug(">>> " + json_msg)
  await ws.send(json_msg)


def handle_server_content(wf, server_content):
  """Handle any server content messages, e.g. incoming audio or text."""
  audio = False
  model_turn = server_content.pop("modelTurn", None)
  if model_turn:
    text = model_turn["parts"][0].pop("text", None)
    if text:
      print(text, end='')

    inline_data = model_turn['parts'][0].pop('inlineData', None)
    if inline_data:
      print('.', end='')
      b64data = inline_data['data']
      pcm_data = base64.b64decode(b64data)
      wf.writeframes(pcm_data)
      audio = True

  turn_complete = server_content.pop('turnComplete', None)
  return turn_complete, audio


async def handle_tool_call(ws, tool_call, responses):
  """Process an incoming tool call request, returning a response."""
  logger.debug("<<< " + json.dumps(tool_call))
  for fc in tool_call['functionCalls']:

    if fc['name'] in responses:
      # Use a response from `responses` if provided.
      result_entry = responses[fc['name']]
      # If it's a function, actuall call it.
      if callable(result_entry):
        result = result_entry(**fc['args'])
    else:
      # Otherwise it's a stub, just say "OK"
      result = {'string_value': 'ok'}

    msg = {
      'tool_response': {
          'function_responses': [{
              'id': fc['id'],
              'name': fc['name'],
              'response': {'result': result}
          }]
        }
    }
    json_msg = json.dumps(msg)
    logger.debug(">>> " + json_msg)
    await ws.send(json_msg)


@contextlib.asynccontextmanager
async def quick_connect(modality='TEXT', tools=()):
  """Establish a connection and keep it open while the context is active."""
  async with connect(uri, additional_headers={"Content-Type": "application/json"}) as ws:
    await setup(ws, modality, tools)
    yield ws


audio_lock = time.time()

async def run(ws, prompt, responses=()):
  """Send the provided prompt and handle the streamed response."""
  print('>', prompt)
  await send(ws, prompt)

  audio = False
  filename = 'audio.wav'
  with wave_file(filename) as wf:
    async for raw_response in ws:
      response = json.loads(raw_response.decode())
      logger.debug("<<< " + str(response)[:150])

      server_content = response.pop("serverContent", None)
      if server_content:
        turn_complete, a = handle_server_content(wf, server_content)
        audio = audio or a

        if turn_complete:
          print()
          print('<Turn complete>')
          break

      tool_call = response.pop('toolCall', None)
      if tool_call:
        await handle_tool_call(ws, tool_call, responses)

  if audio:
    global audio_lock
    # Sleep before playing audio to make sure it doesn't play over an existing clip.
    if (delta := audio_lock - time.time()) > 0:
      print('Pausing for audio to complete...')
      await asyncio.sleep(delta + 1.0)  # include a buffer so there's a breather

    display.display(display.Audio(filename, autoplay=True))
    audio_lock = time.time() + (wf.getnframes() / wf.getframerate())
使用 API
单轮示例
现在,让我们看看你定义的所有部分如何在一个简单示例中协同工作。你将向 API 发送一个提示,并观察响应。
此示例使用 quick_connect 上下文管理器创建与 API 的连接。只要你在异步 with 块内,连接就保持活动状态,并可通过 ws 变量访问。然后使用 run 函数发送提示并处理 API 的响应。
发出一个简单请求以理解上述代码的工作原理。通过 quick_connect 使用上下文管理器创建连接,在上下文活动期间,WebSocket 连接存储在 ws 中,并传递给后续执行提示的 run 调用。
请注意,你可以将模态从 AUDIO 更改为 TEXT,并调整提示。
tools = [
    {'google_search': {}},
    {'code_execution': {}},
]

async def go():
  async with quick_connect(tools=tools, modality="TEXT") as ws:
    await run(ws, "Please find the last 5 Denis Villeneuve movies and look up their runtimes and the year published.")

logger.setLevel('INFO')
await go()
复杂多工具示例
现在定义额外的工具。通过定义模式(在 altair_fns 中)、执行函数(render_altair)并使用 tool_calls 映射将两者连接起来,添加一个用于图表的工具。
这里使用的图表工具是 Vega-Altair,一个“用于 Python 的声明式统计可视化库”。Altair 支持使用 JSON 持久化图表,您将将其作为工具公开,以便 Gemini 模型可以生成图表。
前面定义的辅助代码会尽快运行,但音频需要一些时间播放,因此您可能会在音频播放之前看到后续轮次的输出。
import altair as alt
from google.api_core import retry


def apply_altair_theme(altair_json: str, theme: str) -> str:
  chart = alt.Chart.from_json(altair_json)
  with alt.themes.enable(theme):
    themed_altair_json = chart.to_json()
  return themed_altair_json


@retry.Retry()
def render_altair(altair_json: str, theme: str = "default"):
  themed_altair_json = apply_altair_theme(altair_json, theme)
  chart = alt.Chart.from_json(themed_altair_json)
  chart.display()

  return {'string_value': 'ok'}


altair_fns = [
  {
    'name': 'render_altair',
    'description': 'Displays an Altair chart in JSON format.',
    'parameters': {
      'type': 'OBJECT',
      'properties': {
        'altair_json': {
            'type': 'STRING',
            'description': 'JSON STRING representation of the Altair chart to render. Must be a string, not a json object',
        },
        'theme': {
            'type': 'STRING',
            'description': 'Altair theme. Choose from one of "dark", "ggplot2", "default", "opaque".',
        },
      },
    },
  },
]

tool_calls = {
    'render_altair': render_altair,
}
现在,将所有内容整合到一个聊天对话中。以下代码打开一个流式会话(使用 quick_connect),每次 run 调用都会发送文本提示,读取流式响应(如果是音频则进行缓冲),处理任何服务器响应(如工具调用),最后在收到结束轮次信号后返回。
通过在 quick_connect 会话中按顺序执行多次 run 调用,您正在执行一个多轮、流式的对话。一旦代码到达 quick_connect 块的末尾,会话即终止。
tools = [
    {'google_search': {}},
    {'code_execution': {}},
    {'function_declarations': altair_fns},
]

async def go():
  async with quick_connect(tools=tools, modality="AUDIO") as ws:

    # Google Search
    await run(ws, "Please find the last 5 Denis Villeneuve movies and find their runtimes.")
    # Code execution
    await run(ws, "Can you write some code to work out which has the longest and shortest runtimes?")
    # Tool use
    await run(ws, "Now can you plot them in a line chart showing the year on the x-axis and runtime on the y-axis?", responses=tool_calls)
    # Tool use - this step takes user input, so you can ask the model to tweak the chart to your liking.
    # Try changing to dark mode, or lay out the data differently.
    await run(ws, input('Any requests? > '), responses=tool_calls)


logger.setLevel('INFO')
await go()
地图示例
在此示例中,您将使用 Google Maps Static API 在对话期间在地图上绘制。您需要 确保您的 API 密钥已启用 Google Maps Static API。它可以与您用于 Gemini API 的密钥相同,也可以是一个新密钥,只要启用了 Static Maps API 即可。
在 Colab Secrets 中添加密钥,或直接在代码中添加(MAPS_API_KEY = 'AIza...')。
from google.colab import userdata
MAPS_API_KEY = userdata.get('MAPS_API_KEY')
以下单元格默认隐藏,但需要运行。它包含 draw_map 函数的函数模式,以及如何使用 Google Maps API 绘制标记的一些文档。
请注意,模型需要生成一组相当复杂的参数才能调用 draw_map,包括定义地图的中心点、整数缩放级别以及自定义标记样式和位置。
# @title Map tool schema (run this cell)

map_fns = [
  {
    'name': 'draw_map',
    'description': 'Render a Google Maps static map using the specified parameters. No information is returned.',
    'parameters': {
      'type': 'OBJECT',
      'properties': {
        'center': {
            'type': 'STRING',
            'description': 'Location to center the map. It can be a lat,lng pair (e.g. 40.714728,-73.998672), or a string address of a location (e.g. Berkeley,CA).',
        },
        'zoom': {
            'type': 'NUMBER',
            'description': 'Google Maps zoom level. 1 is the world, 20 is zoomed in to building level. Integer only. Level 11 shows about a 15km radius. Level 9 is about 30km radius.'
        },
        'path': {
            "type": "STRING",
            'description': """The path parameter defines a set of one or more locations connected by a path to overlay on the map image. The path parameter takes set of value assignments (path descriptors) of the following format:

path=pathStyles|pathLocation1|pathLocation2|... etc.

Note that both path points are separated from each other using the pipe character (|). Because both style information and point information is delimited via the pipe character, style information must appear first in any path descriptor. Once the Maps Static API server encounters a location in the path descriptor, all other path parameters are assumed to be locations as well.

Path styles
The set of path style descriptors is a series of value assignments separated by the pipe (|) character. This style descriptor defines the visual attributes to use when displaying the path. These style descriptors contain the following key/value assignments:

weight: (optional) specifies the thickness of the path in pixels. If no weight parameter is set, the path will appear in its default thickness (5 pixels).
color: (optional) specifies a color either as a 24-bit (example: color=0xFFFFCC) or 32-bit hexadecimal value (example: color=0xFFFFCCFF), or from the set {black, brown, green, purple, yellow, blue, gray, orange, red, white}.

When a 32-bit hex value is specified, the last two characters specify the 8-bit alpha transparency value. This value varies between 00 (completely transparent) and FF (completely opaque). Note that transparencies are supported in paths, though they are not supported for markers.

fillcolor: (optional) indicates both that the path marks off a polygonal area and specifies the fill color to use as an overlay within that area. The set of locations following need not be a "closed" loop; the Maps Static API server will automatically join the first and last points. Note, however, that any stroke on the exterior of the filled area will not be closed unless you specifically provide the same beginning and end location.
geodesic: (optional) indicates that the requested path should be interpreted as a geodesic line that follows the curvature of the earth. When false, the path is rendered as a straight line in screen space. Defaults to false.
Some example path definitions:

Thin blue line, 50% opacity: path=color:0x0000ff80|weight:1
Solid red line: path=color:0xff0000ff|weight:5
Solid thick white line: path=color:0xffffffff|weight:10
These path styles are optional. If default attributes are desired, you may skip defining the path attributes; in that case, the path descriptor's first "argument" will consist instead of the first declared point (location).

Path points
In order to draw a path, the path parameter must also be passed two or more points. The Maps Static API will then connect the path along those points, in the specified order. Each pathPoint is denoted in the pathDescriptor separated by the | (pipe) character.
""",
        },
        'markers': {
            "type": "ARRAY",
            "items": {
                "type": "STRING"
            },
            # Copied from https://developers.google.com/maps/documentation/maps-static/start#Markers
            'description': """The markers parameter defines a set of one or more markers (map pins) at a set of locations. Each marker defined within a single markers declaration must exhibit the same visual style; if you wish to display markers with different styles, you will need to supply multiple markers parameters with separate style information.

The markers parameter takes set of value assignments (marker descriptors) of the following format:

markers=markerStyles|markerLocation1| markerLocation2|... etc.

The set of markerStyles is declared at the beginning of the markers declaration and consists of zero or more style descriptors separated by the pipe character (|), followed by a set of one or more locations also separated by the pipe character (|).

Because both style information and location information is delimited via the pipe character, style information must appear first in any marker descriptor. Once the Maps Static API server encounters a location in the marker descriptor, all other marker parameters are assumed to be locations as well.

Marker styles
The set of marker style descriptors is a series of value assignments separated by the pipe (|) character. This style descriptor defines the visual attributes to use when displaying the markers within this marker descriptor. These style descriptors contain the following key/value assignments:

size: (optional) specifies the size of marker from the set {tiny, mid, small}. If no size parameter is set, the marker will appear in its default (normal) size.
color: (optional) specifies a 24-bit color (example: color=0xFFFFCC) or a predefined color from the set {black, brown, green, purple, yellow, blue, gray, orange, red, white}.

Note that transparencies (specified using 32-bit hex color values) are not supported in markers, though they are supported for paths.

label: (optional) specifies a single uppercase alphanumeric character from the set {A-Z, 0-9}. (The requirement for uppercase characters is new to this version of the API.) Note that default and mid sized markers are the only markers capable of displaying an alphanumeric-character parameter. tiny and small markers are not capable of displaying an alphanumeric-character.
""",
        }
      },
      "required": [
        "center",
        "zoom",
      ]

    },
  },
]
现在定义 draw_map 函数,并将 google_search 添加为本对话中使用的工具。这将允许模型查找可能受欢迎的餐厅。
from urllib.parse import urlencode

import altair as alt
from google.api_core import retry
import requests


def draw_map(center, zoom, path: str = "", markers: list[str] = ()):
  logger.debug(f'MAPS: {center=} {zoom=} {path=} {markers=}')
  q = {
      'key': MAPS_API_KEY,
      'size': '512x512',
      'center': center,
      'zoom': zoom,
  }

  if path:
    q['path'] = path

  qs = list(q.items())

  for marker in markers:
    qs.append(('markers', marker))

  url = f'https://maps.googleapis.com/maps/api/staticmap?{urlencode(qs)}'
  display.display(display.Image(url=url))
  logger.debug(f"Map URL: {url}")

  return {'string_value': f'ok'}


tool_calls = {
    'draw_map': draw_map,
}

tools = [
    {'google_search': {}},
    {'function_declarations': map_fns},
]
最后,定义并运行对话。
async def go():
  async with quick_connect(tools=tools, modality="TEXT") as ws:

    # Google Search + Tools (Maps)
    await run(ws, "Please look up and mark 3 Sydney restaurants that are currently trending on a map.", responses=tool_calls)
    # Code execution + Tools
    await run(ws, "Now write some code to randomly pick one to eat at tonight and zoom in to that one on the map.", responses=tool_calls)


logger.setLevel('INFO')
await go()
第一张图片的输出看起来会像这样。如果你的略有不同,不用担心,因为有很多受欢迎的餐厅,也有很多种地图样式。如果你希望的话,随时可以要求模型提供更具体的指导。
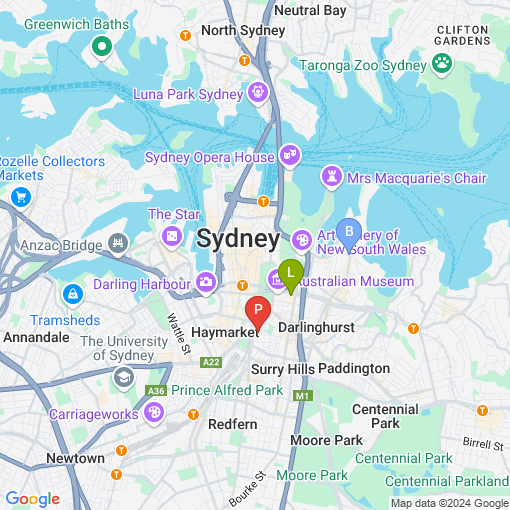
带代码执行的地图
在此示例中,您将使用之前定义的 Google Maps 工具,并挑战模型生成颜色渐变,并用它在地图上直观地表示数据。此任务需要代码执行,因此也将其作为工具包含在内。
具体来说,您将要求模型绘制澳大利亚的首府城市,并使用 Google Maps 标记在澳大利亚周围以圆形方向应用两种颜色之间的渐变。
from urllib.parse import urlencode

import altair as alt
from google.api_core import retry


tool_calls = {
    'draw_map': draw_map,
}

tools = [
    {'code_execution': {}},
    {'function_declarations': map_fns},
]

async def go():
  async with quick_connect(tools=tools, modality="TEXT") as ws:

    # Code exec and tool use. No search.
    await run(ws, "Plot markers on every capital city in Australia using a gradient between "
                  "Orange and Green. Plan out your steps first, then follow the plan.", responses=tool_calls)

    await run(ws, "Awesome! Can you ensure the gradient is applied smoothly in a circular direction "
                  "around the country?", responses=tool_calls)


logger.setLevel('INFO')
await go()
最终图像应该看起来像这样。
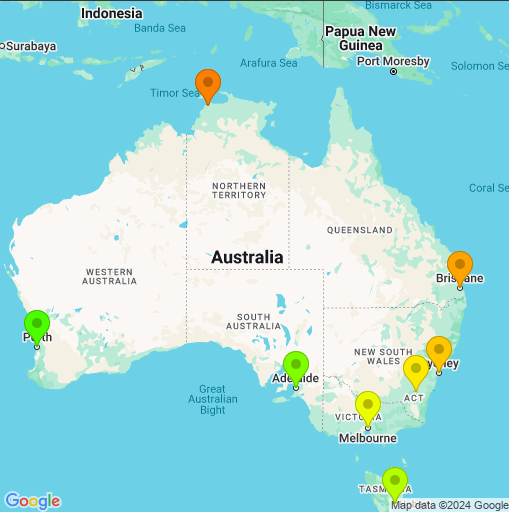 在这个例子中,性能取决于你的反馈,才能让输出变得完美。这个例子展示了一段假设对话的前两个步骤,但你可以继续与模型迭代,直到结果符合你的需求。
后续步骤
<a name="next_steps"></a>
本指南展示了通过 WebSocket 使用多模态 Live API 的更高级用法。
- 要尝试多模态流式传输,请使用 Google AI Studio 中的 Live API - 无需编写代码。
- 查看 使用 Python SDK 的 Live API 入门 或 使用 websockets 的入门指南。
- 尝试其他 grounding 示例。
- 尝试 Live API 教程中的工具使用,了解 Gemini 实时工具使用功能的演练。
或者,查看 Cookbook 示例 中展示的其他 Gemini 功能。
常见问题
常见错误:1. API 密钥未设置或无效,导致连接失败(401)。解决:确保 GEMINI_API_KEY 正确,且已启用相应 API。2. WebSocket 连接超时,可能是网络问题或密钥权限不足。解决:检查网络,确认密钥有效。3. 工具调用参数不符合模式,模型生成错误参数导致函数执行失败。解决:严格定义参数模式,并在函数中增加参数校验。4. 音频播放异常,可能是 PCM 数据格式错误或采样率不匹配。解决:确认 wave_file 参数(channels=1, rate=24000, sample_width=2)与 API 返回一致。5. 多轮对话中状态丢失,因为每次 run 调用后连接可能关闭。解决:确保在同一个 quick_connect 上下文中执行所有 run。6. 日志级别设置不当,无法调试。解决:将 logger.setLevel('DEBUG') 查看详细请求响应。
企业应用扩展
生产环境优化:1. 使用连接池复用 WebSocket,避免频繁握手。2. 实现重连机制,处理网络波动。3. 对音频流进行实时处理,如降噪、回声消除。4. 工具调用增加超时和重试策略(如 @retry.Retry())。5. 使用异步非阻塞 I/O 提升并发能力。6. 对 API 密钥进行加密存储,避免硬编码。7. 监控 API 调用量和延迟,进行成本控制。8. 扩展更多工具,如数据库查询、文件操作等,增强模型能力。9. 结合前端框架(如 React)实现实时交互界面。10. 考虑使用 gRPC 替代 WebSocket 以获得更低延迟。
总结
本教程面向有编程基础的开发者,深入讲解如何通过 WebSocket 协议直接调用 Gemini 2 多模态实时 API,实现文本、音频、工具调用(Google 搜索、代码执行、Altair 图表、Google Maps)的流式交互。文章从环境配置、连接建立、消息处理到多轮对话,逐步剖析核心代码,并强调工具定义、参数模式、响应处理等关键设计。通过实际示例,读者将掌握构建实时 AI 应用的方法,并了解常见错误排查与生产优化策略。
- --
内容来源与验证
- 内容等级:PREMIUM_A
- 质量等级:S_CANDIDATE
- 难度:高级
- 验证等级:V1
- 原文作者:
- 原文日期:
- 来源许可:Apache-2.0
- 来源版本:
24039748ad6447e0db157e7ef4def4fac31ee9ba - 查看原文
站内还有更多完整实战教程
加入会员,解锁全部教程、完整代码与持续更新内容。
加入会员