使用Claude托管代理构建SRE事件响应代理
技术背景
在传统SRE运维中,生产告警(如凌晨3点的PagerDuty通知)需要值班人员手动拉取日志、查找运行手册、定位配置错误并提交修复,整个过程耗时且容易出错。随着AI代理技术的发展,可以自动化第一轮调查和修复准备,但需要确保代理拥有正确的上下文(如日志、代码、运行手册)并保留人类最终决策权。Claude托管代理提供了可扩展的基础设施、沙箱环境、安全组件和内置工具,使得构建这样的系统成为可能。本教程旨在展示如何将托管代理与外部系统(如PagerDuty、GitHub、Slack)集成,实现事件响应自动化,同时保持安全性和可观测性。
核心原理
核心原理是使用Claude托管代理作为事件响应的大脑,通过API触发会话,代理在沙箱环境中使用内置工具(bash、read、edit等)调查日志和基础设施代码,通过技能获取团队运行手册约定,通过自定义工具与外部系统交互(如打开PR、请求审批)。关键设计决策包括:1)将技能作为渐进式披露的上下文,避免系统提示过长;2)自定义工具由应用程序执行,实现人工审批门控;3)使用资源挂载数据,确保代理工作区有所需文件;4)通过事件轮询处理代理的异步操作。数据流为:webhook触发会话→代理读取日志→识别故障→查找运行手册→编辑代码→调用自定义工具打开PR→请求审批→等待人工决策→合并PR。
架构分析
系统架构分为四层:1)触发层:PagerDuty webhook通过API调用创建会话并发送告警;2)代理层:Claude托管代理,配置系统提示、技能和工具集,在沙箱中运行;3)工具层:内置工具(bash、read、edit)用于调查,自定义工具(open_pull_request、request_approval、merge_pull_request)由应用程序处理,实现外部交互和人工审批;4)资源层:通过Files API上传日志、基础设施代码和运行手册,挂载到会话工作区。生产环境中,资源层可替换为GitHub仓库克隆,工具层可替换为GitHub MCP服务器,审批通过Slack按钮实现。架构设计强调安全性和可观测性:破坏性操作(合并PR)必须经过人工审批,所有步骤记录在控制台会话中。
完整实战教程
简介
当生产警报在凌晨3点触发时,必须有人拉取日志、找到正确的运行手册、追踪配置错误、打开PR并获得批准。代理可以为你完成第一轮工作,并在你坐到键盘前准备好等待审查的修复方案——只要它拥有正确的上下文,并且由人类做出最终决定。
Claude托管代理为你提供了可扩展的基础设施、沙箱和安全组件,让你轻松构建这样的系统。在本教程中,你将把它们串联起来:
- 一个模拟的PagerDuty webhook通过一次API调用触发你的Claude托管代理。
- 一个技能教会代理你团队的运行手册约定,使其知道去哪里查找。
- 内置的
bash/read/edit工具让代理在沙箱中调查日志和基础设施代码。 - 自定义工具让代理打开拉取请求,并在合并前请求人工批准——你的代码处理这些调用,因此你决定“打开PR”实际做什么。
- Anthropic控制台自动记录每个步骤,为你提供完整的可观测性。
以下所有内容仅需ANTHROPIC_API_KEY即可运行。PagerDuty、GitHub和Datadog均使用本地fixtures模拟,以便你专注于托管代理的各个部分;结尾部分展示如何将每个模拟替换为真实服务。
你将学到什么
- 上传技能并将其附加到Claude托管代理
- 将内置工具集与应用程序处理的自定义工具混合使用
- 从webhook负载启动会话
- 将破坏性操作置于人工审批之后
- 在控制台中读取完整的会话追踪
前提条件
在环境中设置ANTHROPIC_API_KEY,然后安装依赖:
%pip install -q "anthropic>=0.91.0" python-dotenv
import json
import os
import time
from pathlib import Path

from anthropic import Anthropic
from dotenv import load_dotenv
from utilities import wait_for_idle_status

load_dotenv()
client = Anthropic()
MODEL = os.getenv("COOKBOOK_MODEL", "claude-opus-4-6")
FIXTURE = Path("example_data/sre")
1. 上传一个 runbook 技能
技能 是平台挂载到代理上下文中的一个小型文件系统包,采用渐进式披露:代理首先看到一行描述,仅在相关时才读取正文。这是存放团队约定(不应放在系统提示中)的好地方。
下面的示例技能编码了一条规则——*在接触基础设施之前先查阅 runbook*——就像真实团队剧本那样。你只需通过 Skills API 上传一次,并在每个需要它的代理上通过 ID 引用它。
# A real skill is usually a folder on disk (SKILL.md plus any helper
# scripts or reference docs) that you zip and upload. For this tutorial
# the SKILL.md is small enough to keep inline.
RUNBOOK_SKILL = """\
---
name: incident-runbooks
description: How to triage production incidents using the team runbooks.
---

# Incident runbooks

When an alert references a service, locate that service's recent logs
and identify the failure signature (the repeating error class, exit
code, or status pattern).

Consult the team runbooks before proposing any fix. Runbooks are
organised by failure signature — for example `oom.md`, `5xx.md`,
`latency.md`. Each one lists the triage steps for that class of
failure and the configuration that usually needs to change.

Any fix to infrastructure code must be opened as a pull request that
cites the runbook you followed. Do not patch live resources directly.
"""

skill = client.beta.skills.create(
    display_title="incident-runbooks",
    files=[("incident-runbooks/SKILL.md", RUNBOOK_SKILL.encode(), "text/markdown")],
)
print(f"skill: {skill.id} (version {skill.latest_version})")
2. 创建代理
代理的 tools 列表结合了三种能力:
agent_toolset_20260401— 内置的bash、read、grep、edit等工具,在沙箱*内部*运行。代理使用这些工具进行调查。- 步骤 1 中的 runbook 技能。
- 三个自定义工具 —
open_pull_request、request_approval和merge_pull_request— 代理可以调用这些工具,但*你的应用程序*执行它们。它们是代理访问沙箱外部系统的方式,也是你将人工介入流程的方式。
系统提示仅包含角色设定和工作流程。警报本身作为第一个用户事件到达,因此同一个代理可以处理任何事件。
SRE_SYSTEM_PROMPT = """\
You are an on-call SRE agent. Each user message is a PagerDuty alert
payload. Triage it to root cause and ship the minimal safe fix.

The session workspace contains the recent logs, the infrastructure
repo, and the team runbooks for the alerting service. Explore it to
find what you need.

Workflow for every alert:
1. Read the logs and identify the failure signature.
2. Find the root cause in the infrastructure repo, save a copy of the
   original file, edit it in place, then produce a unified diff with
   `diff -u`.
3. open_pull_request(title, body, diff) with the fix.
4. request_approval(summary) and wait for the human's decision.
5. Only if the result is "approved", merge_pull_request(pr_number).
   Otherwise stop and report.

Never call merge_pull_request unless request_approval returned
"approved". Keep the fix minimal — do not refactor unrelated config.
"""

agent = client.beta.agents.create(
    name="cookbook-sre-responder",
    model=MODEL,
    system=SRE_SYSTEM_PROMPT,
    skills=[{"type": "custom", "skill_id": skill.id, "version": skill.latest_version}],
    tools=[
        {
            "type": "agent_toolset_20260401",
            "default_config": {
                "enabled": True,
                "permission_policy": {"type": "always_allow"},
            },
            "configs": [
                {"name": "web_search", "enabled": False},
                {"name": "web_fetch", "enabled": False},
            ],
        },
        {
            "type": "custom",
            "name": "open_pull_request",
            "description": "Open a pull request against the infra repo with the proposed fix.",
            "input_schema": {
                "type": "object",
                "properties": {
                    "title": {"type": "string"},
                    "body": {"type": "string"},
                    "diff": {"type": "string", "description": "Unified diff of the change."},
                },
                "required": ["title", "body", "diff"],
            },
        },
        {
            "type": "custom",
            "name": "request_approval",
            "description": "Ask the on-call human to approve the proposed PR before merging.",
            "input_schema": {
                "type": "object",
                "properties": {
                    "summary": {"type": "string"},
                },
                "required": ["summary"],
            },
        },
        {
            "type": "custom",
            "name": "merge_pull_request",
            "description": "Merge an approved pull request.",
            "input_schema": {
                "type": "object",
                "properties": {
                    "pr_number": {"type": "integer"},
                },
                "required": ["pr_number"],
            },
        },
    ],
)
print(f"agent: {agent.id} v{agent.version}")
3. 创建环境并挂载数据
智能体需要在其工作区中三样东西来进行调查:最近的服务日志、基础设施仓库和团队运行手册。通过 Files API 上传每个文件,并将它们列为 resources,以便它们被挂载到每个会话中,路径与系统提示期望的一致。一个 limited 网络连接的云环境就足够了,因为智能体只需要自己的文件系统。
为了保持此笔记本仅凭 ANTHROPIC_API_KEY 即可运行,基础设施“仓库”是一个带有过低 memory: 128Mi 限制的单一清单。在生产环境中,您将用 github_repository 资源替换该上传,该资源会将真实仓库直接克隆到沙箱中:
{
    "type": "github_repository",
    "url": "https://github.com/your-org/infra",
    "authorization_token": os.environ["GITHUB_TOKEN"],
    "checkout": {"type": "branch", "name": "main"},
    "mount_path": "infra",
}
env = client.beta.environments.create(
    name="cookbook-sre-env",
    config={"type": "cloud", "networking": {"type": "limited"}},
)


def upload(path: Path, mime: str) -> str:
    with path.open("rb") as f:
        return client.beta.files.upload(file=(path.name, f, mime)).id


log_id = upload(FIXTURE / "logs/checkout-svc.log", "text/plain")
manifest_id = upload(FIXTURE / "infra/k8s/checkout-deploy.yaml", "text/yaml")
runbook_id = upload(FIXTURE / "runbooks/oom.md", "text/markdown")

RESOURCES = [
    {"type": "file", "file_id": log_id, "mount_path": "logs/checkout-svc.log"},
    {"type": "file", "file_id": manifest_id, "mount_path": "infra/k8s/checkout-deploy.yaml"},
    {"type": "file", "file_id": runbook_id, "mount_path": "runbooks/oom.md"},
]
print(f"environment: {env.id}")
4. 处理事件告警
下面的处理器是你需要部署的一个函数——一个 Flask 或 FastAPI 路由,当事件触发时,你的告警系统会调用它。它创建一个引用代理和环境的会话,挂载数据,并将告警 JSON 作为第一个 user.message 事件发送。此示例使用 PagerDuty V3 webhook 负载,但任何能 POST JSON 的寻呼机都以相同方式工作;这里你直接使用 fixture 调用处理器。
def handle_pagerduty_webhook(payload: dict) -> str:
    incident = payload["event"]["data"]
    session = client.beta.sessions.create(
        environment_id=env.id,
        agent={"type": "agent", "id": agent.id, "version": agent.version},
        resources=RESOURCES,
        title=f"[{incident['service']['summary']}] {incident['title']}",
    )
    client.beta.sessions.events.send(
        session.id,
        events=[
            {
                "type": "user.message",
                "content": [{"type": "text", "text": json.dumps(payload, indent=2)}],
            }
        ],
    )
    return session.id


with (FIXTURE / "alert.json").open() as f:
    alert = json.load(f)

session_id = handle_pagerduty_webhook(alert)
print(f"session: {session_id}")
5. 处理代理的自定义工具调用
这是内置工具和自定义工具协同工作的地方。代理的 read/bash/edit 调用在容器上运行,并以 agent.tool_use 的形式出现在事件日志中——这是调查过程,你只需打印它。但当代理调用你的自定义工具之一时,会话进入 idle 状态,stop_reason.type == "requires_action",等待*你的应用程序*以 user.custom_tool_result 响应。
下面的循环轮询 events.list,通过写入本地列表(即 GitHub 模拟)内联回答 open_pull_request 和 merge_pull_request,但当 request_approval 到达时返回,因为那需要人工介入。
在生产环境中,“需要人工”通常意味着*发布到 Slack*:将代理的摘要放入值班频道,附上批准按钮,并在有人点击时发送结果。slack_data_bot cookbook 展示了该功能的 Bolt 接线;这里你将在下一个单元格内联批准,以便笔记本保持自包含。
prs: list[dict] = []
pending_approvals: list[dict] = []
seen_events: set[str] = set()


def handle_custom_tool(name: str, args: dict) -> dict:
    if name == "open_pull_request":
        n = len(prs) + 1
        prs.append({"number": n, "merged": False, **args})
        print(f"\n── PR #{n}: {args['title']} ──")
        return {"pr_number": n, "url": f"mock://infra/pull/{n}"}
    if name == "merge_pull_request":
        prs[args["pr_number"] - 1]["merged"] = True
        return {"merged": True}
    raise ValueError(f"unhandled tool {name}")


def run_until_approval_or_end(session_id: str) -> str | None:
    """Poll the session's event log, servicing custom tools, until either
    a request_approval call arrives (return its event_id so the caller
    can respond) or the agent ends its turn (return None)."""
    custom_calls: dict[str, object] = {}
    responded: set[str] = set()
    while True:
        idle_stop = None
        for ev in client.beta.sessions.events.list(session_id):
            if ev.id in seen_events:
                continue
            seen_events.add(ev.id)
            if ev.type == "agent.message":
                for block in ev.content:
                    if block.type == "text":
                        print(block.text, end="")
            elif ev.type == "agent.tool_use":
                print(f"\n  [{ev.name}]")
            elif ev.type == "agent.custom_tool_use":
                custom_calls[ev.id] = ev
                print(f"\n→ {ev.name}")
            elif ev.type == "session.status_idle":
                idle_stop = ev.stop_reason
            elif ev.type == "session.status_terminated":
                return None
        if idle_stop is None:
            time.sleep(1.0)
            continue
        if idle_stop.type == "end_turn":
            return None
        if idle_stop.type == "requires_action":
            for event_id in idle_stop.event_ids:
                if event_id in responded:
                    continue
                call = custom_calls[event_id]
                if call.name == "request_approval":
                    pending_approvals.append({"event_id": event_id, **call.input})
                    return event_id
                result = handle_custom_tool(call.name, call.input)
                client.beta.sessions.events.send(
                    session_id,
                    events=[
                        {
                            "type": "user.custom_tool_result",
                            "custom_tool_use_id": event_id,
                            "content": [{"type": "text", "text": json.dumps(result)}],
                        }
                    ],
                )
                responded.add(event_id)
        time.sleep(1.0)


approval_event_id = run_until_approval_or_end(session_id)
代理已读取日志,通过技能将 OOMKilled 签名与 runbooks/oom.md 匹配,在 infra/k8s/checkout-deploy.yaml 中找到了 128Mi 内存限制,进行了编辑,开启了 PR,现在正在等待您的操作。这是会发送到您的 #oncall Slack 频道中的消息:
pr = prs[0]
print(pr["body"], "\n")
print(pr["diff"])
print("\n" + "─" * 60)
print("APPROVAL REQUESTED:", pending_approvals[0]["summary"])
6. 批准并让智能体合并
将 "approved" 作为 request_approval 的结果发送回去。智能体会恢复执行,调用 merge_pull_request,然后结束其回合。在 Slack 版本中,此发送发生在你的按钮点击处理程序中——负载是相同的。
client.beta.sessions.events.send(
    session_id,
    events=[
        {
            "type": "user.custom_tool_result",
            "custom_tool_use_id": approval_event_id,
            "content": [{"type": "text", "text": json.dumps({"decision": "approved"})}],
        }
    ],
)

run_until_approval_or_end(session_id)
print(f"\n\nPR #{pr['number']} merged: {prs[0]['merged']}")
7. 在控制台中查看运行记录
由于调查是以托管代理会话的形式运行的,上述每个步骤——文件读取、bash 差异比较、清单编辑、三次自定义工具调用以及你发送的批准——都会作为会话中的事件持久化保存。在 控制台 的 托管代理 → 会话 下打开它,即可查看完整的审计跟踪,无需额外插桩:
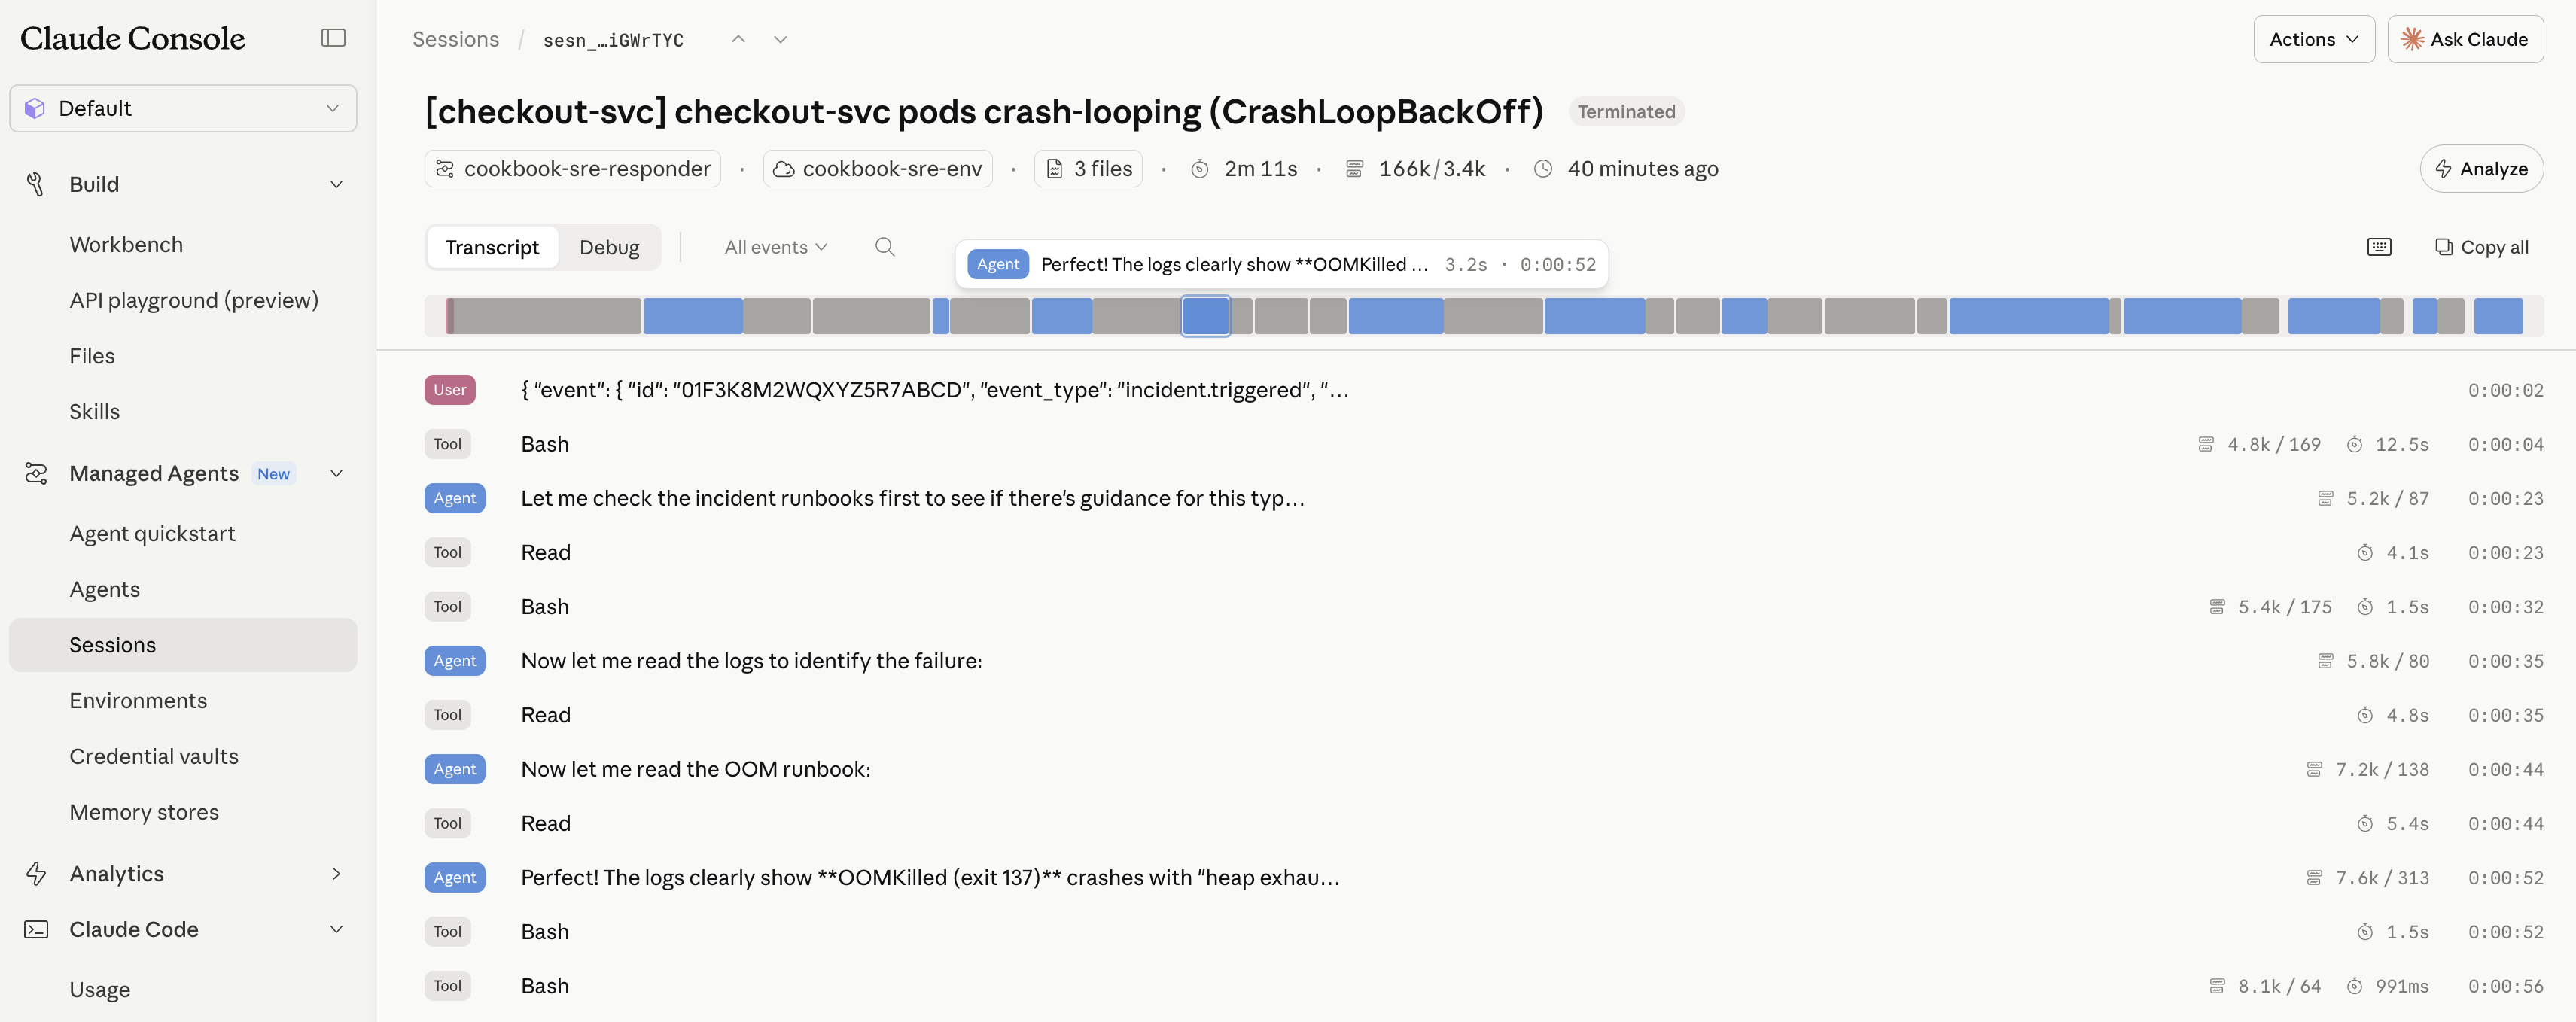 ### 清理
归档会话以及你创建的资源。
wait_for_idle_status(client, session_id)
client.beta.sessions.archive(session_id)
client.beta.environments.archive(env.id)
client.beta.agents.archive(agent.id)
client.beta.skills.versions.delete(skill.latest_version, skill_id=skill.id)
client.beta.skills.delete(skill.id)
print("archived")
后续步骤:生产环境接线
从笔记本到值班,需要三处替换。
在 Slack 中审批。 当 request_approval 到达时,将其发布到值班频道,附带 Block Kit 按钮,并从操作处理程序返回 user.custom_tool_result。slack_data_bot 食谱 涵盖了 Bolt 应用的设置;审批相关的部分很小:
def post_for_approval(session_id, event_id, summary):
    slack.client.chat_postMessage(
        channel=ONCALL_CHANNEL,
        text=summary,
        blocks=[
            {"type": "section", "text": {"type": "mrkdwn", "text": summary}},
            {"type": "actions", "elements": [
                {"type": "button", "text": {"type": "plain_text", "text": "Approve"},
                 "action_id": "approve", "value": f"{session_id}:{event_id}"},
                {"type": "button", "text": {"type": "plain_text", "text": "Reject"},
                 "action_id": "reject", "value": f"{session_id}:{event_id}"},
            ]},
        ],
    )

@slack.action("approve")
def on_approve(ack, body):
    ack()
    session_id, event_id = body["actions"][0]["value"].split(":")
    client.beta.sessions.events.send(
        session_id,
        events=[{"type": "user.custom_tool_result",
                 "custom_tool_use_id": event_id,
                 "content": [{"type": "text",
                              "text": json.dumps({"decision": "approved"})}]}],
    )
要完全去掉轮询循环,请在 session.requires_action 上注册一个 Console webhook——当代理暂停时,平台会立即调用你的端点,然后你从那里发布到 Slack。
用 GitHub 代替模拟。 去掉 open_pull_request / merge_pull_request 自定义工具,改为给代理提供 GitHub MCP 服务器,并将令牌存储在保险库中,这样它永远不会出现在你的代码中。 CMA_operate_in_production.ipynb 逐步介绍了每个用户的凭据。
agent = client.beta.agents.create(
    ...,
    mcp_servers=[{"type": "url", "name": "github",
                  "url": "https://api.githubcopilot.com/mcp/"}],
    tools=[{"type": "agent_toolset_20260401", ...},
           {"type": "mcp_toolset", "server_name": "github"},
           {"type": "custom", "name": "request_approval", ...}],
)
session = client.beta.sessions.create(..., vault_ids=[github_vault.id])
使用实时日志代替固定文件。 通过环境配置传递 DD_API_KEY / DD_APP_KEY,让代理从 bash 中 curl Datadog Logs API,而不是读取挂载的文件。
另请参阅 Agent SDK 站点可靠性代理,了解使用本地 Agent SDK 而非托管 Managed Agents 运行时解决相同问题的方法。
你学到了什么
- 从任何外部事件触发会话——来自 PagerDuty webhook 的一次 API 调用即可启动整个运行。
- 附加一个 技能 来为代理提供你团队的约定。
- 使用 资源 挂载数据:
github_repository用于代码,file用于日志和运行手册。 - 使用 自定义工具 回调你的应用,并通过
requires_action将操作置于人工审批之后。 - 在 控制台 会话视图中免费获得完整的审计跟踪。
将模拟替换为 GitHub MCP、Slack 审批按钮和实时日志,即可用于值班。
常见问题
常见错误:1)API密钥未设置或权限不足,导致创建代理或上传技能失败;2)资源挂载路径与系统提示不一致,代理找不到文件;3)自定义工具调用未正确处理,导致代理卡在requires_action状态;4)轮询循环未处理所有事件类型,导致遗漏关键事件;5)审批结果格式错误,代理无法解析。排查方法:检查API错误信息,确认资源路径,打印事件日志,使用wait_for_idle_status确保会话空闲。生产环境优化:使用webhook替代轮询,减少延迟;使用GitHub MCP替代自定义工具,简化代码;使用Vault存储令牌,增强安全性;使用实时日志API替代固定文件,提高时效性。
企业应用扩展
生产环境扩展:1)将审批流程接入Slack,使用Block Kit按钮,通过action handler发送审批结果;2)使用GitHub MCP服务器替代自定义PR工具,通过vault存储令牌;3)使用Datadog API获取实时日志,通过环境变量传递API密钥;4)注册Console webhook,在requires_action时立即通知,避免轮询;5)可参考Agent SDK站点可靠性代理,使用本地Agent SDK实现类似功能。
总结
本教程指导开发者使用Claude托管代理构建SRE事件响应代理,实现从PagerDuty告警到自动修复的完整流程。通过上传技能、创建代理、挂载资源、处理webhook、自定义工具调用及人工审批,展示了如何将AI代理集成到生产运维中。教程强调人工审批环节,确保安全,并提供了生产环境替换方案,如Slack审批、GitHub MCP和实时日志。适合有编程基础、希望学习AI工程实践的开发者。
- --
内容来源与验证
- 内容等级:PREMIUM_A
- 质量等级:S_CANDIDATE
- 难度:中级
- 验证等级:V1
- 原文作者:gaganb-ant
- 原文日期:2026-04-10
- 来源许可:MIT
- 来源版本:
3b84b4f9cb93521013f8af65a4199cfb18dec352 - 查看原文
站内还有更多完整实战教程
加入会员,解锁全部教程、完整代码与持续更新内容。
加入会员