通过API触发工作区代理:完整指南
技术背景
工作区代理允许团队在ChatGPT中封装可重复的工作流程,包括指令、上下文、应用操作和审批。API触发机制使外部系统(如CRM、工单系统)能够启动这些工作流,实现业务自动化。传统同步API要求调用方等待结果,但代理运行可能耗时较长,因此采用异步模式:API仅确认触发已接受,实际结果由代理写入目标应用。此模式适用于非技术所有者维护指令、源系统驱动工作、结果持久化到连接应用的场景。主要限制包括:无法在HTTP响应中获取最终输出、需要目标应用存储结果、依赖代理配置正确性。
核心原理
核心原理是事件驱动异步执行。源系统发送HTTP POST请求到/v1/workspace_agents/{trigger_id}/trigger端点,携带input文本和可选conversation_key。API验证令牌和权限后,将运行排队,立即返回202 Accepted。代理随后根据保存的指令、应用权限和审批设置执行工作流,将结果写入指定目标(如频道、文档)。关键设计决策包括:使用Idempotency-Key保证重试幂等性;conversation_key维持多轮对话上下文;认证使用工作区代理访问令牌而非平台API密钥。数据流为:源事件→构建纯文本输入→触发API→代理执行→目标写入。
架构分析
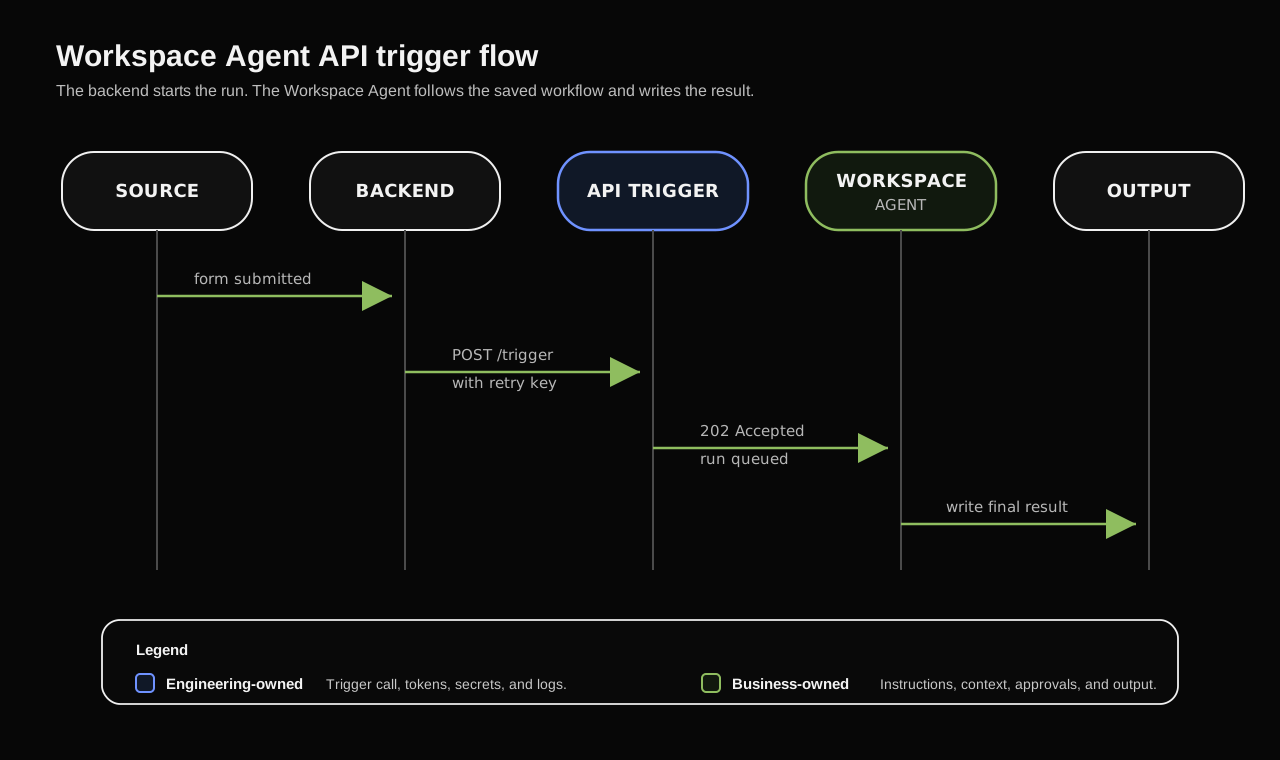
系统分为三层:源系统(后端、定时任务)、API网关(ChatGPT API)、工作区代理(含指令、应用连接、审批策略)。源系统负责生成事件并调用触发端点;API网关处理认证、路由和幂等性;代理执行实际工作,通过已连接的应用(如Slack、Google Docs)写入结果。设计思想是分离关注点:业务团队在ChatGPT中维护代理逻辑,工程团队保持触发接口稳定。关键组件包括:API通道(提供agtch_触发器ID)、访问令牌(Admin生成)、目标应用连接。架构图显示后端启动运行,代理遵循保存的工作流并写入结果。
完整实战教程
通过API触发工作区代理
工作区代理让团队能够在ChatGPT中保存可重复的工作:指令、关联上下文、应用操作、审批和输出格式。API触发允许另一个系统在ChatGPT之外开始工作时启动该保存的工作流。
在本笔记本中,您将发送一个源事件,确认触发已被接受,并在代理的目标位置验证结果。API启动运行。指令、应用权限和审批设置控制接下来发生的事情。
*API触发的运行是异步的。端点将运行排队,但不会返回完成的代理响应。*
你将构建什么
最终,你将拥有一个已保存的工作区代理、一个带有 agtch_... 触发器 ID 的 API 通道,以及一个可以针对你的代理实时运行的 Python 触发器调用。
前提条件
在运行实时触发单元格之前,你需要:
| 你需要 | 使用本文档 |
| --- | --- |
| 在支持的 ChatGPT 工作区中启用工作区代理,并拥有创建和共享代理的权限 | ChatGPT 工作区代理指南 |
| 一个已保存的工作区代理,且至少有一个它可以写入的目标 | 创建和管理工作区代理 |
| 该代理上的 API 通道及其 agtch_... 触发器 ID | 触发工作区代理运行 |
| 具有工作区代理范围的工作区代理访问令牌 | 使用工作区代理访问令牌进行身份验证 |
| 一个可以发送 HTTPS POST 请求的笔记本或后端环境 | 本笔记本使用 Python 标准库,无需 OpenAI 平台 SDK。 |
一个重要的异步细节:HTTP 请求会在代理完成之前返回。目标可以是代理可以写入的任何已连接应用或界面,例如频道、文档、电子邮件或工单。
请查看帮助中心以了解当前的套餐和区域可用性。
架构
源系统决定工作何时开始。工作区代理根据其指令、上下文、应用和审批来决定保存的工作流如何运行。
<p align="center">
 </p>
</p>
*后端启动运行。代理遵循保存的工作流并写入结果。*
1. 编写代理指令
API 触发器仅启动运行。工作区代理指令告诉代理接下来要做什么。
| 指令决定 | 应用设置决定 |
| --- | --- |
| 使用哪个目标 | 应用是否可以访问该目标 |
| 写入什么输出 | 写入操作是否可用 |
| 是立即执行还是先询问 | 写入前是否需要批准 |
对于此演示,指令应保持狭窄:读取源事件,向目标写入一次更新,并包含请求 ID 以便验证。
<p align="center">
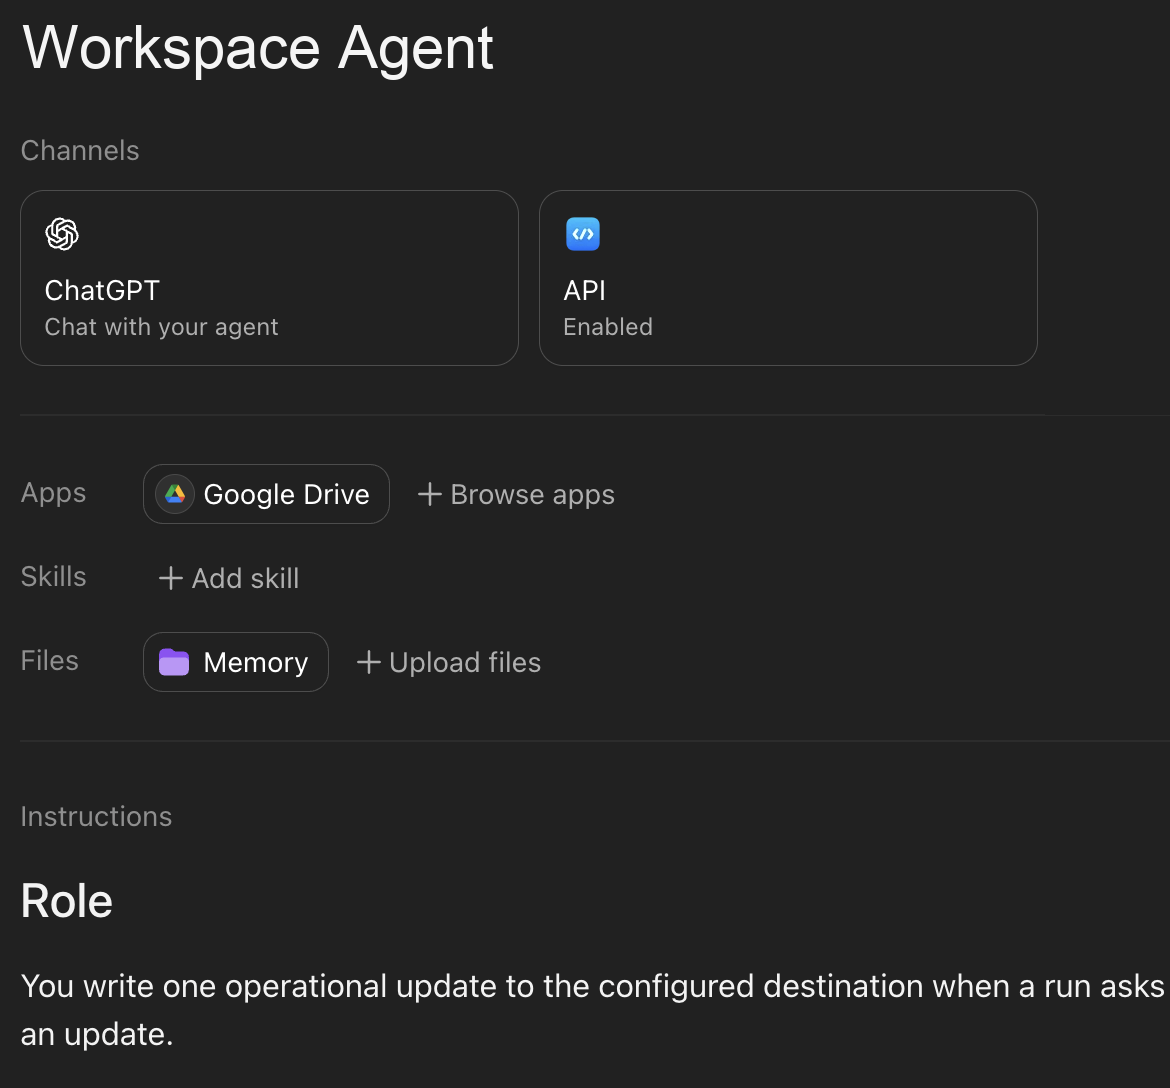 *使用说明部分来明确目标、写入行为和审批期望。*
agent_builder_prompt = """
Create a Workspace Agent that writes API-triggered updates to the configured destination.

When the agent receives an API-triggered run:
1. Find the request ID, source system, output destination, and update text in the input.
2. Write one short update to that destination if the connected app allows it.
3. Start the update with: Workspace Agent API demo received: <Request ID>
4. Include the source system, submitted timestamp, and update text if present.
5. After the write succeeds, stop.

Use the exact destination named in the input or saved in these instructions.
Do not assume the API-triggered run has a current chat, channel, thread, or document context.
If write approval is required, request approval. If the destination is unavailable, say that the output destination could not be reached.
""".strip()

print(agent_builder_prompt)
在添加 API 触发器之前,先在预览中测试确切的行为。粘贴一条包含请求 ID、目的地和更新文本的示例消息。如果预览无法写入目的地,API 触发器也无法写入。
2. 连接一个输出目标
选择一个低风险的目标,让代理可以写入:频道、文档、电子邮件、工单或其他已连接的应用。配置应用连接,并在测试 API 触发器之前决定写入是否需要审批。
自动批准的写入适用于低风险的演示目标。风险较高的写入应保持审批门控。
| 认证模型 | 使用场景 | 注意事项 |
| --- | --- | --- |
| 最终用户账户 | 每个运行代理的人应使用自己的应用权限 | API 触发的工作流可能需要调用者具有正确的应用访问权限 |
| 代理拥有的账户 | 工作流需要一致的共享连接,例如团队频道、共享文档或共享收件箱 | 尽可能使用服务账户。除非你了解风险,否则避免使用个人账户 |
api_output_instructions = """
When triggered by API, write one short update to the configured destination.
Always include the request ID from the trigger input.

Start the update with: Workspace Agent API demo received: <Request ID>
Include the source system, submitted timestamp, and update text if present.
Use the exact destination named in the input or saved in these instructions.
Do not assume the API-triggered run has a current chat, channel, thread, or document context.
If writes are auto-approved for this destination, write immediately. If approval is required, request approval.
After the write succeeds, stop.
""".strip()

print(api_output_instructions)
3. 添加 API 通道
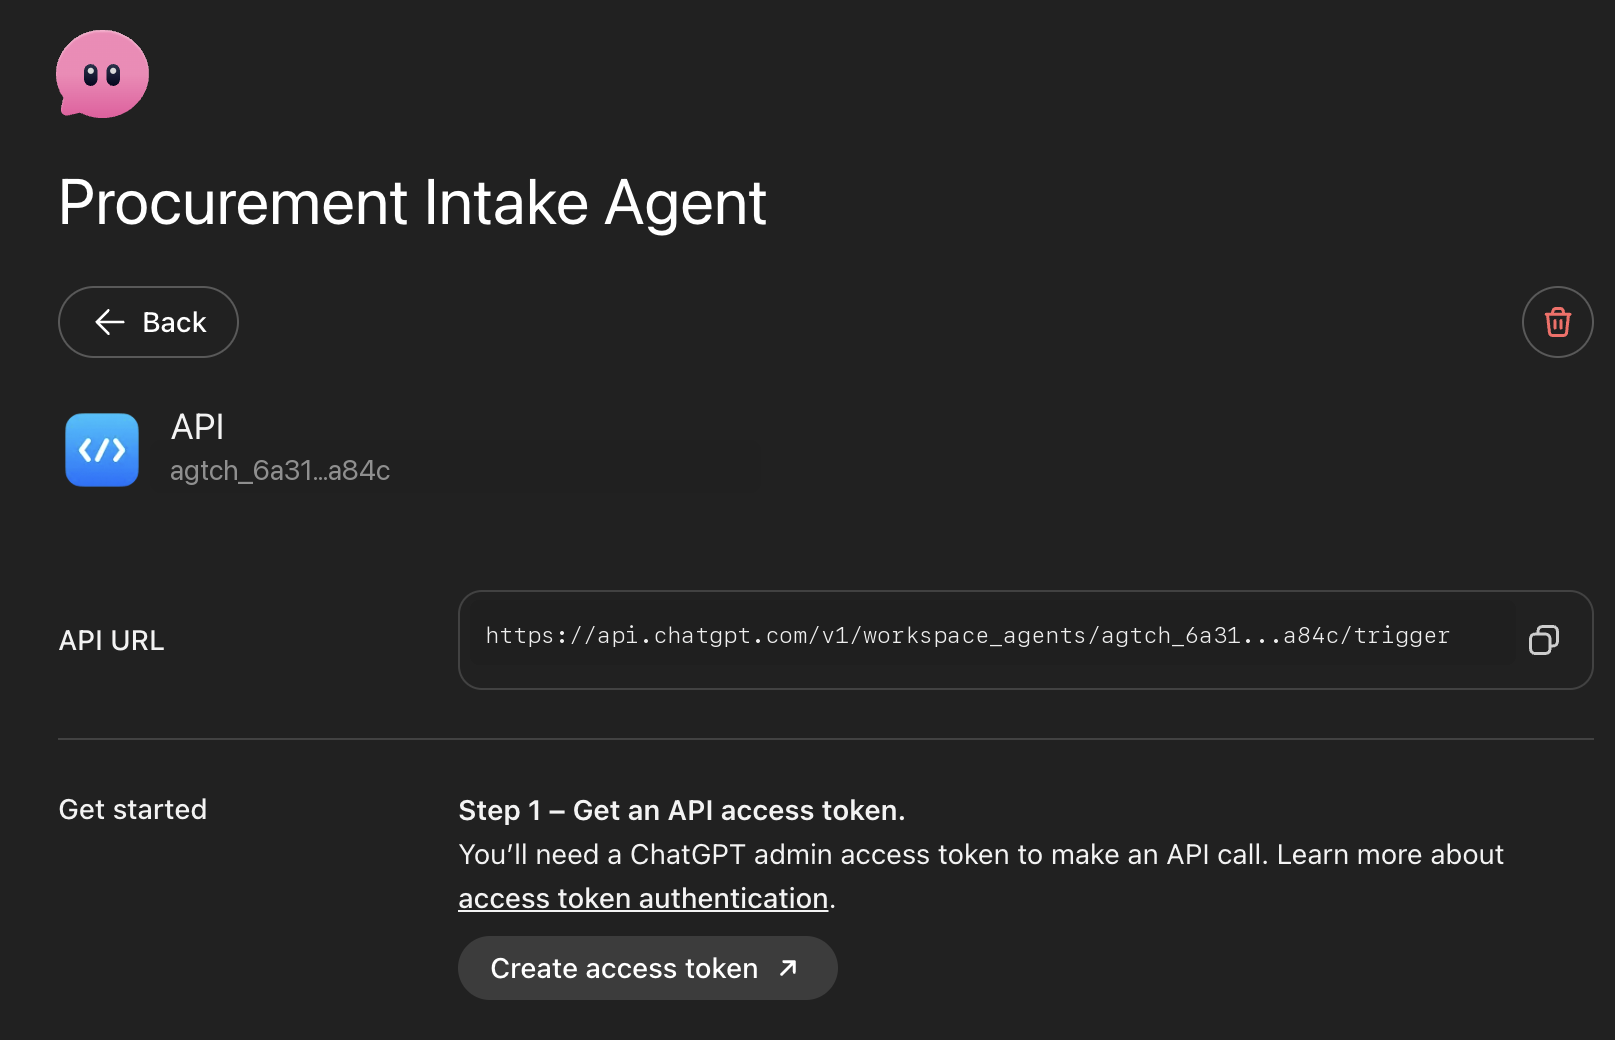
在 Workspace Agent 构建器中打开该 Agent。添加一个 API 通道,保存 Agent,复制触发器 ID,并确认该 ID 以 agtch_ 开头。
与将使用访问令牌调用 API 的用户共享该 Agent。触发器 ID 放在 API 路径中。它与 Agent 名称不同。
<p align="center">
 </p>
</p>
*在触发端点中使用此 API 通道 ID。*
4. 配置实时通话
你需要两个值:
| 值 | 来源 |
| --- | --- |
| API 触发器 ID | 代理的 API 通道。以 agtch_... 开头。 |
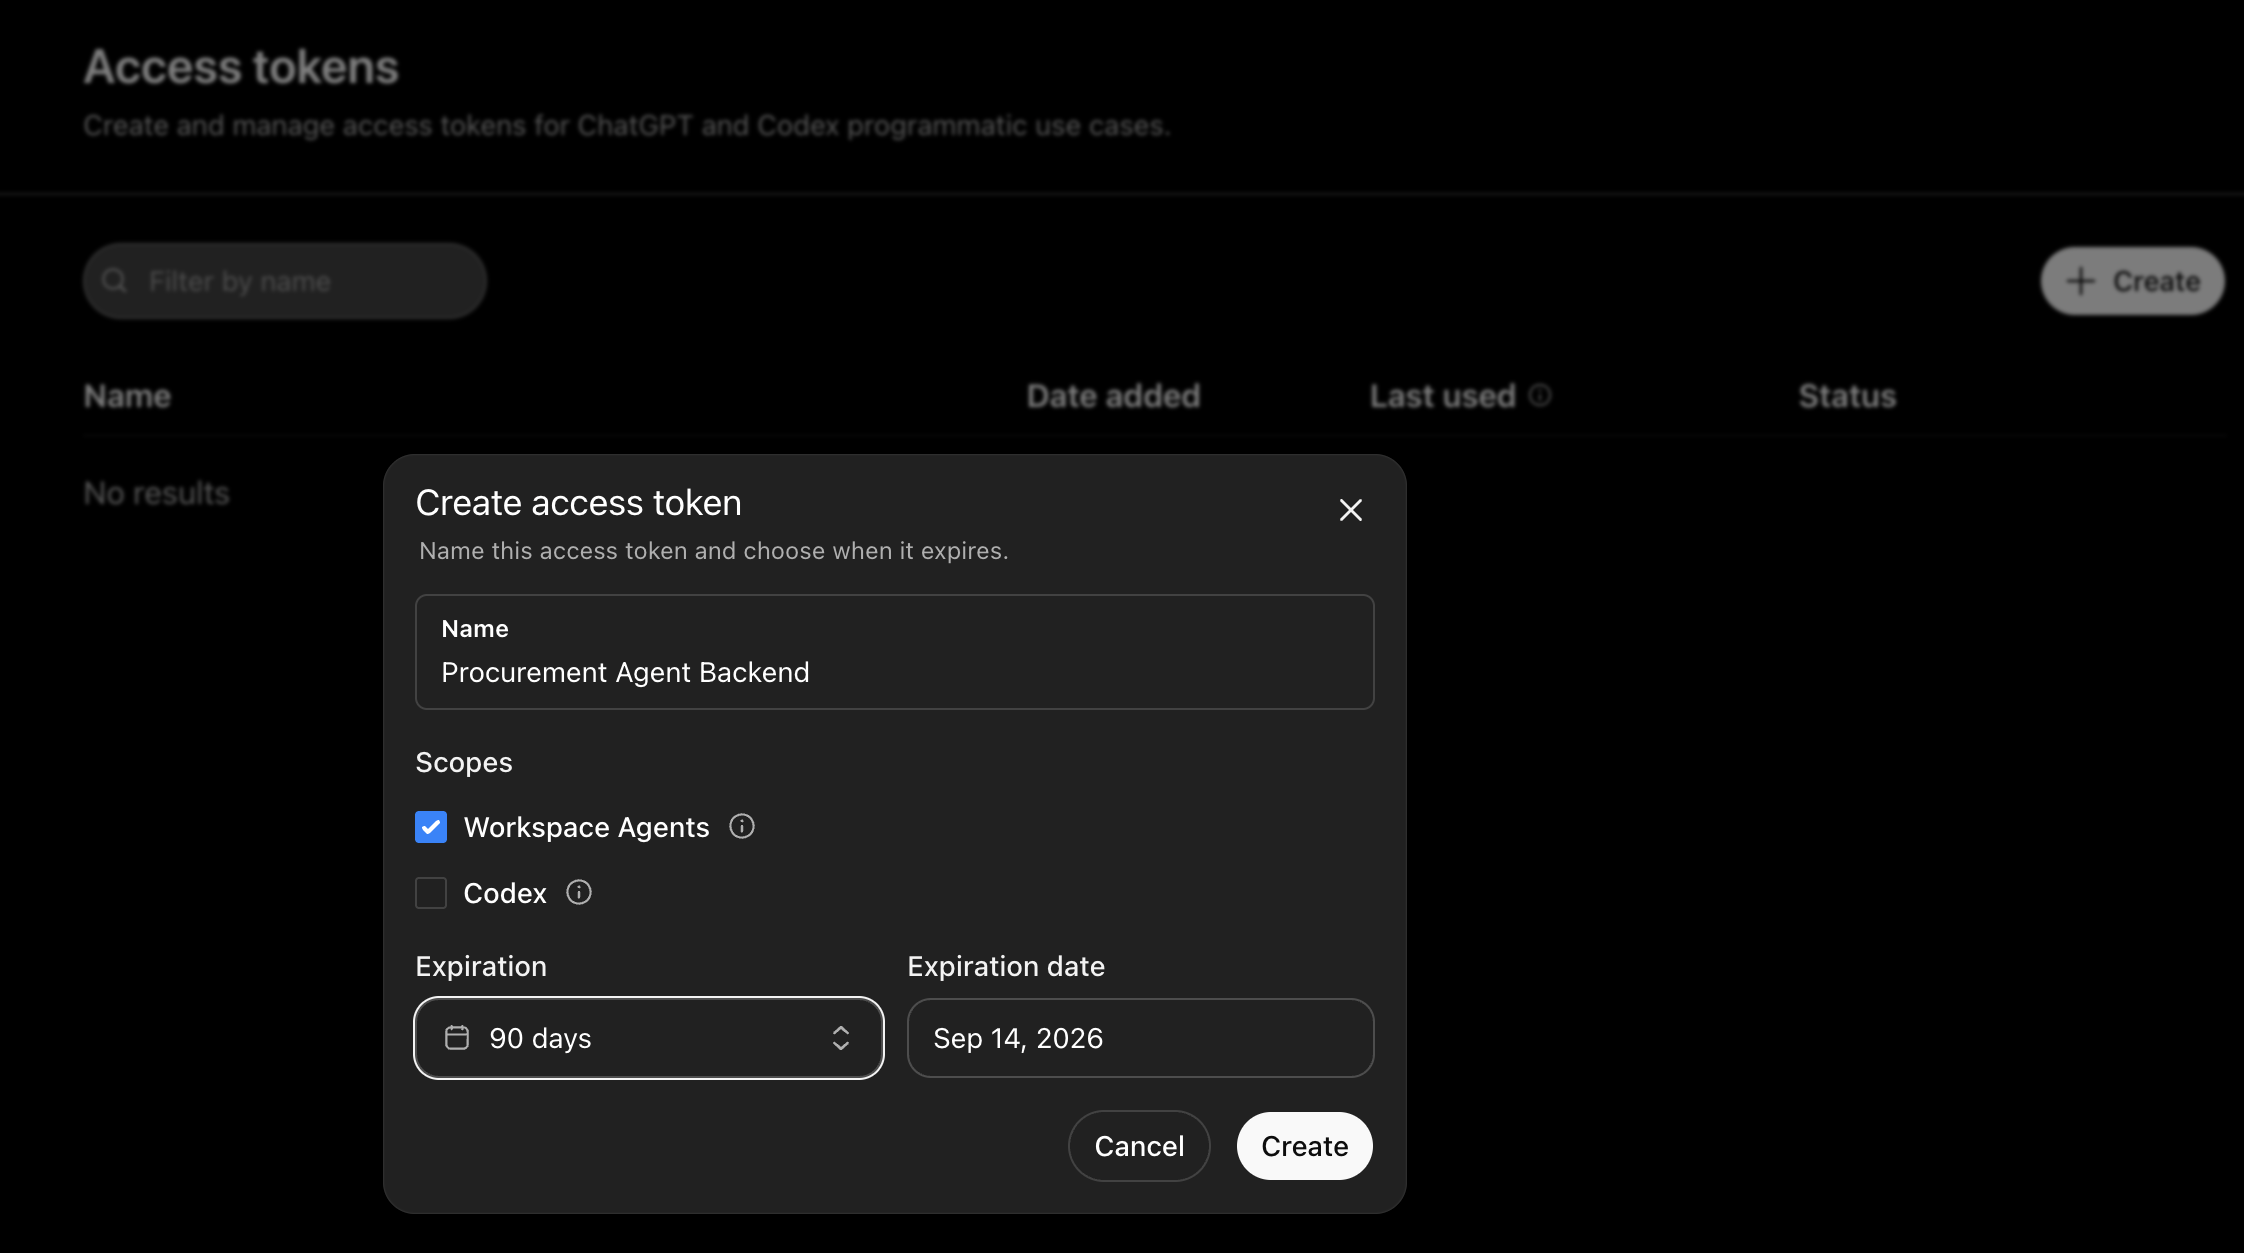
| 工作区代理访问令牌 | ChatGPT Admin > Access tokens,具有工作区代理作用域。 |
使用 https://api.chatgpt.com 的工作区代理访问令牌,而不是 OpenAI 平台 API 密钥。令牌所有者必须能够运行共享代理,否则 API 返回 403 Forbidden。
<p align="center">
 </p>
</p>
*将令牌作为机密信息存储。不要将其粘贴到笔记本代码中。*
对于实时运行,请在打开笔记本之前导出这些值:
export WORKSPACE_AGENT_TRIGGER_ID="agtch_..."
export WORKSPACE_AGENT_ACCESS_TOKEN="<workspace-agent-access-token>"
export WORKSPACE_AGENT_OUTPUT_DESTINATION="output-destination"

jupyter notebook  # or jupyter lab
WORKSPACE_AGENT_OUTPUT_DESTINATION 是可选的。它标记触发输入中的目标;访问仍然来自代理所连接的应用。
import json
import os
import textwrap
import urllib.error
import urllib.request
from datetime import datetime, timezone


def read_env(name: str, default: str = "") -> tuple[str, str]:
    value = os.environ.get(name, "").strip()
    if value:
        return value, "environment"
    return default, "default" if default else "missing"


TRIGGER_ID, trigger_id_source = read_env("WORKSPACE_AGENT_TRIGGER_ID")
ACCESS_TOKEN, access_token_source = read_env("WORKSPACE_AGENT_ACCESS_TOKEN")
OUTPUT_DESTINATION, output_destination_source = read_env(
    "WORKSPACE_AGENT_OUTPUT_DESTINATION",
    "the agent's configured destination",
)
API_BASE = "https://api.chatgpt.com/v1"

print(f"Trigger ID configured: {bool(TRIGGER_ID)} ({trigger_id_source})")
print(f"Access token configured: {bool(ACCESS_TOKEN)} ({access_token_source})")
print(f"Output destination label: {OUTPUT_DESTINATION} ({output_destination_source})")

if ACCESS_TOKEN.startswith("sk-"):
    print("Warning: this looks like an OpenAI Platform API key. Create a ChatGPT Workspace Agent access token from Admin > Access tokens instead.")

if OUTPUT_DESTINATION == "the agent's configured destination":
    print("Tip: set WORKSPACE_AGENT_OUTPUT_DESTINATION when you want the API input to name a specific destination.")
5. 发送一个源事件
保持第一个输入很小:源系统发送一个事件,工作区代理会向其目标写入一次更新。
run_stamp = datetime.now(timezone.utc).strftime("%Y%m%d%H%M%S")

source_event = {
    "request_id": f"DEMO-{run_stamp}",
    "submitted_at": datetime.now(timezone.utc).isoformat(),
    "source_system": "notebook demo",
    "update_text": "The API trigger reached the Workspace Agent and asked it to write this update.",
    "output_destination": OUTPUT_DESTINATION,
}

source_event
在调用触发器端点之前,将源事件映射为纯文本。API 将事件传递给代理。代理保存的指令、应用权限和审批设置控制写入操作。
def build_agent_input(event: dict) -> str:
    return textwrap.dedent(f"""
    Request ID: {event['request_id']}
    Source system: {event['source_system']}
    Submitted at: {event['submitted_at']}
    Output destination: {event['output_destination']}
    Update text: {event['update_text']}

    Please write this update to the configured destination.
    Start with exactly: Workspace Agent API demo received: {event['request_id']}
    """).strip()


agent_input = build_agent_input(source_event)
print(agent_input)
当多个事件应继续同一个代理对话时,使用 conversation_key,例如同一请求的多次更新。
对于重试,请发送 Idempotency-Key 头。仅在重试同一源事件时复用相同的键。
conversation_key = f"workspace-agent-api-demo-{source_event['request_id']}"
idempotency_key = f"workspace-agent-api-demo-{source_event['request_id']}-v1"

payload = {
    "conversation_key": conversation_key,
    "input": agent_input,
}

print(json.dumps(payload, indent=2))
print("Idempotency-Key:", idempotency_key)
6. 从 API 触发 agent
端点:
POST https://api.chatgpt.com/v1/workspace_agents/{id}/trigger
必填和推荐请求字段:
| 位置 | 字段 | 必填 | 描述 |
| --- | --- | --- | --- |
| 路径 | id | 是 | 来自代理 API 通道的 API 触发器 ID,格式为 agtch_... |
| 请求头 | Authorization | 是 | 使用工作区代理访问令牌的 Bearer 凭据 |
| 请求头 | Content-Type | 是 | 使用 application/json |
| 请求头 | Idempotency-Key | 推荐 | 用于重试相同源事件的稳定键 |
| 请求体 | input | 是 | 作为触发器输入传递给代理的消息文本 |
| 请求体 | conversation_key | 否 | 调用方定义的稳定 ID,用于继续同一代理对话 |
def trigger_workspace_agent(trigger_id: str, access_token: str, payload: dict, idempotency_key: str) -> dict:
    url = f"{API_BASE}/workspace_agents/{trigger_id}/trigger"
    body = json.dumps(payload).encode("utf-8")
    request = urllib.request.Request(
        url,
        data=body,
        method="POST",
        headers={
            "Authorization": f"Bearer {access_token}",
            "Content-Type": "application/json",
            "Idempotency-Key": idempotency_key,
        },
    )

    try:
        with urllib.request.urlopen(request, timeout=30) as response:
            return {"ok": True, "status": response.status, "error": None}
    except urllib.error.HTTPError as exc:
        error_body = exc.read().decode("utf-8", errors="replace")
        try:
            parsed_error = json.loads(error_body).get("error", {})
        except json.JSONDecodeError:
            parsed_error = {"message": error_body}
        return {"ok": False, "status": exc.code, "error": parsed_error}


def print_trigger_error(result: dict) -> None:
    status = result.get("status")
    error = result.get("error") or {}
    message = error.get("message", "Unknown error")
    code = error.get("code")

    print(f"Workspace Agent trigger failed: HTTP {status}")
    print("Message:", message)
    if code:
        print("Code:", code)

    if status == 401:
        print()
        print("Fix: create a fresh ChatGPT Workspace Agent access token from Admin > Access tokens with the Workspace Agents scope.")
        print("Do not use an OpenAI Platform API key from platform.openai.com for this endpoint.")
    elif status == 403:
        print()
        print("Fix: the token is valid, but the token owner cannot trigger this agent. Share the agent with that user or use a token from an allowed owner.")
    elif status == 404:
        print()
        print("Fix: confirm the API channel trigger ID starts with agtch_ and belongs to an agent visible to the token owner.")
    elif status == 409:
        print()
        print("Fix: save/publish the agent and confirm the API channel is active and runnable.")


if not TRIGGER_ID or not ACCESS_TOKEN:
    print("No live request sent.")
    print("Set WORKSPACE_AGENT_TRIGGER_ID and WORKSPACE_AGENT_ACCESS_TOKEN before starting the kernel.")
else:
    result = trigger_workspace_agent(TRIGGER_ID, ACCESS_TOKEN, payload, idempotency_key)
    if not result["ok"]:
        print_trigger_error(result)
    else:
        status = result["status"]
        print("HTTP status:", status)
        assert status == 202, f"Expected 202 Accepted, got {status}"
        print("Trigger accepted. Look in the configured destination for the result.")
        print("Search for request ID:", source_event["request_id"])
        print("Expected output destination:", source_event["output_destination"])
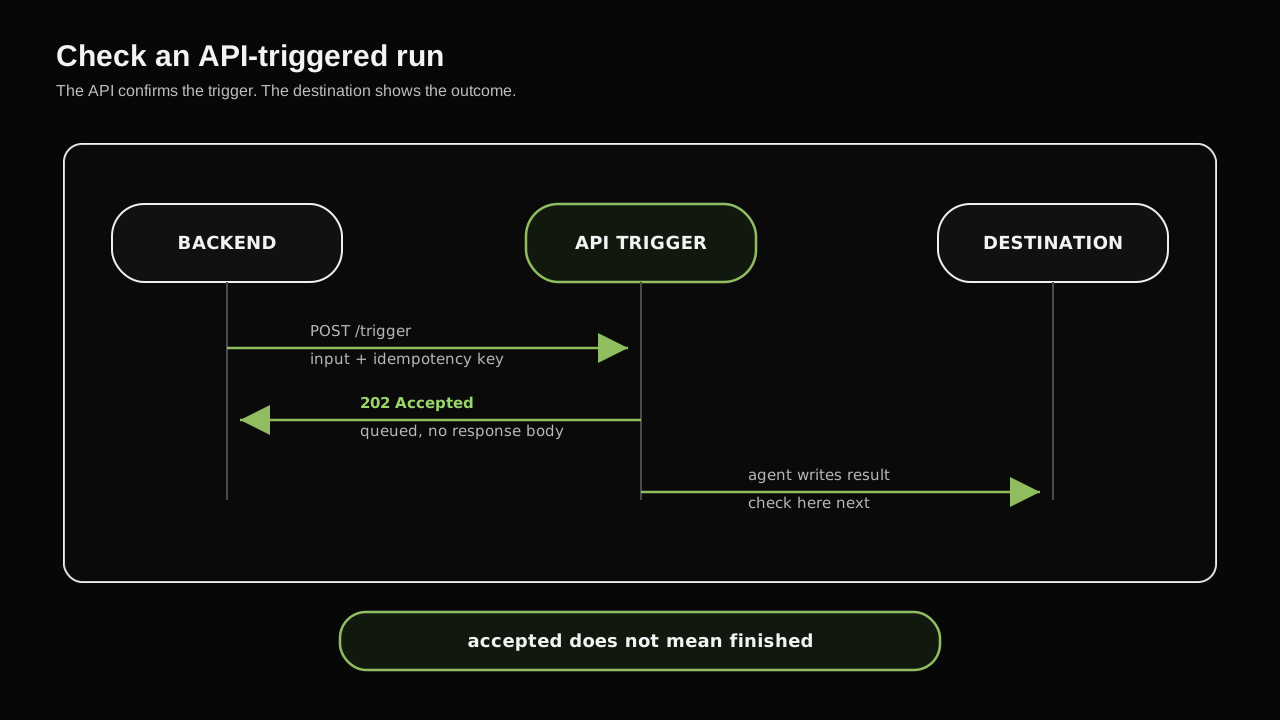
202 Accepted 确认触发器已被接受处理。这并不意味着代理已完成。API 不返回正文、公共运行 ID 或最终代理输出。
对于首次实时运行,请关注三件事:HTTP 状态:202、唯一的请求 ID,以及目标位置中以 Workspace Agent API demo received: 开头的更新。
如果触发器成功但未写入任何内容,请调试代理配置,而不是 HTTP 请求。通常缺少以下之一:目标指令、应用权限、应用身份验证或预期的审批设置。
对于重复的笔记本测试,请保持生成的请求 ID 和幂等键唯一。对同一源事件重复使用相同的 Idempotency-Key 可能会返回原始已接受的结果,而不是将新运行加入队列。
7. 为后端工作进程调整调用
上面的实时调用是最小测试。下面的辅助函数将相同的请求结构封装给后端工作进程、定时任务或工作流引擎。
保持 conversation_key 和 Idempotency-Key 对于同一源事件稳定,以便重试不会排队重复运行。
def build_backend_trigger_request(event: dict) -> dict:
    """Create the Workspace Agent trigger request from a source-system event."""
    request_id = event["request_id"]
    return {
        "trigger_id": TRIGGER_ID,
        "payload": {
            "conversation_key": f"workspace-agent-api-demo-{request_id}",
            "input": build_agent_input(event),
        },
        "idempotency_key": f"workspace-agent-api-demo-{request_id}-v1",
    }


def handle_source_event(event: dict, *, live: bool = False) -> dict:
    """Preview or send the backend trigger call."""
    trigger_request = build_backend_trigger_request(event)
    result = {
        "request_id": event["request_id"],
        "conversation_key": trigger_request["payload"]["conversation_key"],
        "idempotency_key": trigger_request["idempotency_key"],
        "queued": False,
        "status": None,
    }

    if live:
        if not TRIGGER_ID or not ACCESS_TOKEN:
            raise RuntimeError("Set WORKSPACE_AGENT_TRIGGER_ID and WORKSPACE_AGENT_ACCESS_TOKEN before live=True.")
        trigger_result = trigger_workspace_agent(
            trigger_request["trigger_id"],
            ACCESS_TOKEN,
            trigger_request["payload"],
            trigger_request["idempotency_key"],
        )
        result["status"] = trigger_result["status"]
        result["queued"] = trigger_result["ok"] and trigger_result["status"] == 202
        if not trigger_result["ok"]:
            result["error"] = trigger_result["error"]

    return result


backend_preview = handle_source_event(source_event, live=False)
print(json.dumps(backend_preview, indent=2))
在生产环境中,记录源请求ID、触发器ID、幂等键、时间戳和HTTP状态。不要记录访问令牌或敏感的请求详情。
8. 验证目标操作
API 不会返回完整的响应,因此请在代理的目标位置验证操作。检查触发输入中指定的确切目标名称,或代理指令中保存的目标名称。
<p align="center">
 </p>
</p>
*HTTP 响应告诉你触发器已收到。在目标位置验证实际工作是否完成。*
在配置的目标位置中,搜索由实时触发器单元格打印的生成的请求 ID。更新应以以下内容开头:
Workspace Agent API demo received: DEMO-20260618010101
此时,端到端路径已正常工作:触发器、令牌、共享、指令、应用权限和审批行为。
如果触发器成功但未显示输出,请首先检查以下各项:
| 检查项 | 验证内容 |
| --- | --- |
| 预览 | 粘贴确切的 agent_input 文本,并确认代理写入目标位置 |
| 目标位置 | 在启动内核之前,将 WORKSPACE_AGENT_OUTPUT_DESTINATION 设置为确切的目标名称 |
| 权限 | 确认已连接的应用在 API 触发的运行期间可以写入该目标位置 |
| 审批 | 如果演示应自动写入,请确认写入操作已自动批准 |
| 访问权限 | 确认令牌所有者可以运行代理,并且保存的 API 通道处于活动状态 |
接下来,将 source_event 替换为任何后端事件。API 调用保持不变。代理所有者更新 ChatGPT 中的指令、目标位置和审批行为。
在发布之前,运行一个小型测试矩阵:
| 测试 | 预期结果 |
| --- | --- |
| 正常路径 | Agent 将 Workspace Agent API demo received: <request_id> 写入配置的目标 |
| 缺少请求 ID | Agent 要求提供请求 ID,并且不写入模糊的更新 |
| 使用相同幂等键重试 | API 返回原始接受的结果,而不是排队第二个触发事件 |
| 来自未共享用户的令牌 | API 返回 403 Forbidden |
| 错误的触发器 ID | API 返回 404 Not Found |
| Agent 或目标不可运行 | API 返回 409 Conflict |
错误处理
触发端点可能返回以下状态:
| 状态 | 含义 | 处理方法 |
| --- | --- | --- |
| 202 Accepted | 请求已被接受处理 | 在配置的目标位置验证结果 |
| 401 Unauthorized | 令牌缺失、过期、被撤销、无效或凭据类型错误 | 从 Admin > Access tokens 创建具有 Workspace Agents 范围的 ChatGPT Workspace Agent 访问令牌。不要使用 OpenAI 平台 API 密钥 |
| 403 Forbidden | 令牌有效但无法触发此代理 | 与调用者共享代理,或使用来自被允许用户的令牌 |
| 404 Not Found | 触发 ID 不存在或调用者不可见 | 确认 API 通道中的 agtch_ ID |
| 409 Conflict | 代理或 API 通道不可运行 | 保存/发布代理并确认 API 通道处于活动状态 |
| 202 Accepted,但无输出 | 触发成功,但代理未写入目标位置 | 检查指令、应用认证、目标权限和写入批准设置 |
对于瞬时网络故障,对同一源事件使用相同的 Idempotency-Key 重试。对于不同的源事件,生成新的幂等键。
生产检查清单
在扩展到试点之外之前,请锁定以下四项:
| 领域 | 检查项 |
| --- | --- |
| 认证 | 存储并轮换访问令牌。使用能够明确运行归属的令牌所有者。 |
| 访问权限 | 仅与允许的用户或组共享代理。确认连接的应用程序可以写入目标位置。 |
| 行为 | 在代理指令中明确指定目标、输出格式和审批行为。 |
| 操作 | 包含源事件ID,监控非202响应,并留意缺失的输出。 |
仅自动批准低风险写入。保持敏感写入的审批门控,直到与业务负责人审查工作流。
何时使用此模式
当业务拥有的 Workspace Agent 应执行工作,但由另一个系统启动时,使用 API 触发器。
| 使用此模式的情况 | 使用其他方法的情况 |
| --- | --- |
| 非技术所有者应维护工作流指令。 | 调用方需要在 HTTP 响应中获取完整答案。 |
| 工作从表单、工单、CRM 记录、计划任务或后端事件开始。 | 源系统需要低延迟的同步行为。 |
| 结果可以写入连接的应用程序、频道、文档或电子邮件。 | 没有持久化的目标来存储代理输出。 |
| 指令和审批设置可以安全地控制写入行为。 | 工作流影响大且缺乏审查、审计或回滚路径。 |
这就是所有权划分:业务团队在 ChatGPT 中优化代理,而工程团队保持源系统触发器的稳定。
适配此模式
当工作从 ChatGPT 外部开始,但应通过可复用的工作区代理运行时,使用相同的模式:
| 工作流 | 源事件 | 代理输出 |
| --- | --- | --- |
| 会议跟进 | 会议录音或文字记录就绪 | 行动项和跟进草稿 |
| 日历驱动准备 | 找到 Google 日历事件或即将召开的会议日程 | 简报文档或准备摘要 |
| 入站线索资格认定 | CRM 线索或表单提交 | 账户摘要和销售任务 |
| 支持升级 | 创建高优先级工单 | 升级摘要和后续步骤 |
| 员工支持 | 打开帮助台工单 | 分诊答案或升级路径 |
| 每周报告 | 定时任务发现新记录 | 摘要文档或团队更新 |
从一个狭窄的工作流、一个清晰的源事件和一个输出目的地开始。在代理行为一致后,再添加更多目的地、更丰富的上下文或额外的审批门控操作。
延伸阅读
常见问题
常见错误及排查:1) 401 Unauthorized:令牌无效或类型错误,需从Admin创建工作区代理访问令牌,勿用平台API密钥。2) 403 Forbidden:令牌有效但无权触发代理,需共享代理或更换令牌所有者。3) 404 Not Found:触发器ID错误或不可见,确认以agtch_开头。4) 409 Conflict:代理未保存或API通道未激活,需保存并激活。5) 202但无输出:检查代理指令、应用权限、审批设置。调试步骤:先预览代理行为,确认目标可达;检查环境变量;验证令牌权限;使用幂等键重试。生产优化:使用服务账户、轮换令牌、监控非202响应、记录请求ID和状态。
企业应用扩展
此模式可适配多种工作流:会议录音触发行动项生成、日历事件驱动简报准备、CRM线索触发资格认定、工单升级生成摘要、定时任务生成周报。扩展时保持源事件结构清晰,代理指令狭窄,逐步增加目的地和审批门控。生产环境应实施:令牌安全存储与轮换、代理共享权限最小化、指令明确输出格式、监控和日志记录。对于高影响操作,保持审批门控。可结合OpenAI Cookbook中的其他示例,如销售会议准备代理,深化应用。
总结
本文深入讲解如何通过API触发ChatGPT工作区代理,实现外部系统启动异步工作流。内容涵盖代理指令编写、输出目标连接、API通道配置、实时调用实现、错误处理及生产优化。重点强调异步特性、认证模型、幂等性设计,并提供完整Python代码示例和调试策略,帮助开发者构建稳定、可维护的AI自动化集成。
- --
内容来源与验证
- 内容等级:PREMIUM_A
- 质量等级:S_CANDIDATE
- 难度:中级
- 验证等级:V1
- 原文作者:neilh-oai
- 原文日期:2026-06-18
- 来源许可:MIT
- 来源版本:
0d644a244557c7d2cacdc2a29739897ba4c6f19a - 查看原文
站内还有更多完整实战教程
加入会员,解锁全部教程、完整代码与持续更新内容。
加入会员