使用Claude进行保险支持工单分类:从70%到95%+准确率的完整指南
技术背景
在保险行业中,每天产生大量支持工单,手动分类耗时且易出错。传统机器学习方法依赖大量标注数据,难以适应复杂业务规则和快速变化的类别定义。LLM 凭借强大的语义理解和少样本学习能力,成为解决此类问题的理想选择。本教程旨在帮助开发者掌握如何利用 Claude 构建可解释、高精度的分类系统,适用于数据稀缺或业务规则复杂的场景。
核心原理
核心原理包括:1)提示工程:通过结构化 XML 提示和预填充控制输出格式,确保分类结果可靠;2)RAG:将训练样本嵌入向量空间,检索与查询最相似的示例作为少样本上下文,增强模型对细微差别的区分能力;3)思维链:要求模型在输出分类前进行逐步推理,提升对模糊案例的判断准确率。数据流为:工单文本→向量检索→增强提示→Claude 推理→类别标签。
架构分析
系统架构分为四层:数据层(TSV 训练/测试集)、检索层(VectorDB 类,使用 VoyageAI 嵌入和余弦相似度搜索)、推理层(Claude API 调用,集成提示模板和 RAG/CoT 逻辑)、评估层(并发评估框架和混淆矩阵可视化)。关键设计决策包括:使用 XML 标签结构化提示以提升解析可靠性;通过 stop_sequences 和预填充强制输出简洁标签;采用线程池并发调用 API 加速评估;缓存查询嵌入减少 API 调用。
完整实战教程
使用 Claude 进行分类:保险支持工单分类器
在本指南中,你将构建一个高精度的分类系统,将保险支持工单归入 10 个类别。你将学习如何通过结合提示工程、检索增强生成(RAG)和思维链推理,将分类准确率从 70% 逐步提升至 95% 以上。
读完本指南后,你将理解如何设计能够处理复杂业务规则、适应有限训练数据并提供可解释结果的分类系统。
先决条件
- Python 3.11+ 及基本熟悉度
- Anthropic API 密钥(在此获取)
- VoyageAI API 密钥(可选 - 嵌入已预先计算)
- 理解分类问题
设置
首先,我们将安装所需的包
- anthropic
- voyageai
- pandas
- matplotlib
- sklearn
- numpy
我们还将从环境中加载 API 密钥并设置模型名称。
%%capture
%pip install -U anthropic voyageai pandas numpy matplotlib scikit-learn
# Setup our environment
import os

import anthropic

MODEL = "claude-haiku-4-5"
client = anthropic.Anthropic(
    # This is the default and can be omitted
    api_key=os.getenv("ANTHROPIC_API_KEY"),
)
使用 Claude 进行分类
大型语言模型(LLM)已经彻底改变了分类领域,特别是在传统机器学习系统面临挑战的领域。LLM 在处理以复杂业务规则和低质量或有限训练数据为特征的分类问题方面已经展示了显著的成功。此外,LLM 能够为其行为提供自然语言解释和理由,增强了分类过程的可解释性和透明度。通过利用 LLM 的力量,我们可以构建超越传统机器学习方法能力的分类系统,并在数据稀缺或业务需求复杂的情况下表现出色。
在本指南中,我们将探讨如何利用 LLM 来处理高级分类任务。我们将涵盖以下关键组件和步骤:
- 数据准备:我们将从准备训练和测试数据开始。训练数据将用于构建分类模型,而测试数据将用于评估其性能。适当的数据准备对于确保分类系统的有效性至关重要。
- 提示工程:提示工程在利用 LLM 进行分类方面起着至关重要的作用。我们将设计一个提示模板,定义用于分类的提示的结构和格式。提示模板将包含用户查询、类别定义以及来自向量数据库的相关示例。通过精心设计提示,我们可以引导 LLM 生成准确且与上下文相关的分类。
- 实现检索增强生成(RAG):为了增强分类过程,我们将使用向量数据库来存储和高效检索训练数据的嵌入。向量数据库支持相似性搜索,使我们能够为给定查询找到最相关的示例。通过用检索到的示例增强 LLM,我们可以提供额外的上下文并提高生成分类的准确性。
- 测试与评估:一旦我们的分类系统构建完成,我们将使用转换后的测试数据严格测试其性能。我们将遍历测试查询,使用分类函数对每个查询进行分类,并将预测类别与预期类别进行比较。通过分析分类结果,我们可以评估系统的有效性并确定改进领域。
问题定义:保险支持工单分类器
*注意:本示例中使用的问题定义、数据和标签均由 Claude 3 Opus 合成生成*
在保险行业中,客户支持对于确保客户满意度和留存率起着至关重要的作用。保险公司每天收到大量支持工单,涵盖账单、保单管理、理赔协助等广泛主题。手动对这些工单进行分类既耗时又低效,导致响应时间延长,并可能影响客户体验。
类别定义
- 账单查询
- 关于发票、费用、收费和保费的问题
- 要求澄清账单明细
- 关于支付方式和到期日的查询
- 保单管理
- 保单变更、更新或取消的请求
- 关于保单续保和复效的问题
- 关于增加或移除保障选项的查询
- 理赔协助
- 关于理赔流程和提交程序的问题
- 请求协助提交理赔文件
- 关于理赔状态和赔付时间线的查询
- 保障说明
- 关于特定保单类型承保范围的问题
- 要求澄清保障限额和除外责任
- 关于免赔额和自付费用的查询
- 报价与方案
- 新保单报价和价格比较的请求
- 关于可用折扣和捆绑选项的问题
- 关于从其他保险公司转投的查询
- 账户管理
- 登录凭证或密码重置的请求
- 关于在线账户功能和特性的问题
- 关于更新联系信息或个人信息的查询
- 账单争议
- 关于意外或错误收费的投诉
- 退款或保费调整的请求
- 关于滞纳金或催收通知的查询
- 理赔争议
- 关于被拒赔或赔付不足的投诉
- 要求重新审议理赔决定
- 关于对理赔结果提出申诉的查询
- 保单比较
- 关于不同保单选项之间差异的问题
- 请求帮助在保障级别之间做决定
- 关于保单与竞争对手产品比较的查询
10. 一般咨询
- 关于公司联系方式或营业时间的问题
- 关于产品或服务的一般信息请求
- 无法明确归入其他类别的查询
加载和准备数据
现在我们已经定义了问题和类别,接下来加载带标签的训练和测试数据。我们将读取 TSV 文件,将其转换为结构化格式,并准备测试集用于评估。
训练数据包含 68 个带标签的示例,稍后我们将用于检索增强生成(RAG)。测试集也包含 68 个示例,我们将用于评估分类方法。
我们将使用以下数据集:
./data/test.tsv./data/train.tsv
import pandas as pd

data = {
    "train": [],
    "test": [],
}


# Helper function to convert a DataFrame to a list of dictionaries
def dataframe_to_dict_list(df):
    return df.apply(lambda x: {"text": x["text"], "label": x["label"]}, axis=1).tolist()


# Read the TSV file into a DataFrame
test_df = pd.read_csv("./data/test.tsv", sep="\t")
data["test"] = dataframe_to_dict_list(test_df)

train_df = pd.read_csv("./data/train.tsv", sep="\t")
data["train"] = dataframe_to_dict_list(train_df)


# Understand the labels in the dataset
labels = list(set(train_df["label"].unique()))

# Print the first training example and the number of training examples
print(data["train"][0], len(data["train"]))

# Create the test set
X_test = [example["text"] for example in data["test"]]
y_test = [example["label"] for example in data["test"]]

# Print the length of the test set
print(len(X_test), len(y_test))
评估框架
在构建分类器之前,我们先搭建一个评估框架来衡量它们的性能。我们将创建两个关键函数:
evaluate(X, y, classifier, batch_size):使用并发执行在所有测试样本上运行你的分类器以提升速度,然后计算准确率指标并生成混淆矩阵。batch_size参数控制并发 API 请求的数量。
plot_confusion_matrix(cm, labels):可视化混淆矩阵,展示哪些类别之间容易相互混淆,帮助识别分类器的薄弱环节。
这个框架让我们能够通过实证方式比较不同的分类方法,不仅了解整体准确率,还能理解哪些具体类别具有挑战性。
速率限制:MAXIMUM_CONCURRENT_REQUESTS 默认设置为 1。如果你拥有更高的使用层级,可以提高此值以加速评估。请参阅速率限制文档了解你所处使用层级的限制。
import concurrent.futures

import matplotlib.pyplot as plt
import numpy as np
from sklearn.metrics import classification_report, confusion_matrix

MAXIMUM_CONCURRENT_REQUESTS = 5


def plot_confusion_matrix(cm, labels):
    # Visualize the confusion matrix
    fig, ax = plt.subplots(figsize=(8, 8))
    im = ax.imshow(cm, cmap="Blues")

    # Add colorbar
    ax.figure.colorbar(im, ax=ax)

    # Set tick labels and positions
    ax.set_xticks(np.arange(len(labels)))
    ax.set_yticks(np.arange(len(labels)))
    ax.set_xticklabels(labels, rotation=45, ha="right")
    ax.set_yticklabels(labels)

    # Add labels to each cell
    thresh = cm.max() / 2.0
    for i in range(len(labels)):
        for j in range(len(labels)):
            ax.text(
                j,
                i,
                cm[i, j],
                ha="center",
                va="center",
                color="white" if cm[i, j] > thresh else "black",
            )

    # Set labels and title
    plt.xlabel("Predicted Labels")
    plt.ylabel("True Labels")
    plt.title("Confusion Matrix")
    plt.tight_layout()
    plt.show()


def evaluate(X, y, classifier, batch_size=MAXIMUM_CONCURRENT_REQUESTS):
    # Initialize lists to store the predicted and true labels
    y_true = []
    y_pred = []

    # Store results with their original index to maintain order
    results = [None] * len(X)

    # Create a ThreadPoolExecutor with limited workers
    with concurrent.futures.ThreadPoolExecutor(max_workers=batch_size) as executor:
        # Submit tasks one at a time, but executor will only run batch_size concurrently
        future_to_index = {executor.submit(classifier, x): i for i, x in enumerate(X)}

        # Process results as they complete
        for future in concurrent.futures.as_completed(future_to_index):
            index = future_to_index[future]
            predicted_label = future.result()
            results[index] = predicted_label

    # Extract predictions and true labels in order
    y_pred = results
    y_true = y

    # Normalize y_true and y_pred
    y_true = [label.strip() for label in y_true]
    y_pred = [label.strip() for label in y_pred]

    # Calculate the classification metrics
    report = classification_report(y_true, y_pred, labels=labels, zero_division=1)
    cm = confusion_matrix(y_true, y_pred, labels=labels)
    print(report)
    plot_confusion_matrix(cm, labels)
基线:随机分类器
为了建立性能基线并验证我们的评估框架能正常工作,让我们从一个随机分类器开始,它为每张工单随机选择一个类别。
这为我们提供了性能的下界:任何真实的分类方法都应该显著优于随机猜测(在 10 个类别的情况下,随机猜测的准确率大约为 10%)。这个基线有助于我们量化上下文工程实际带来的价值。
import random


def random_classifier(text):
    return random.choice(labels)
print("Evaluating the random classification method on the test set...")
evaluate(X_test, y_test, random_classifier)
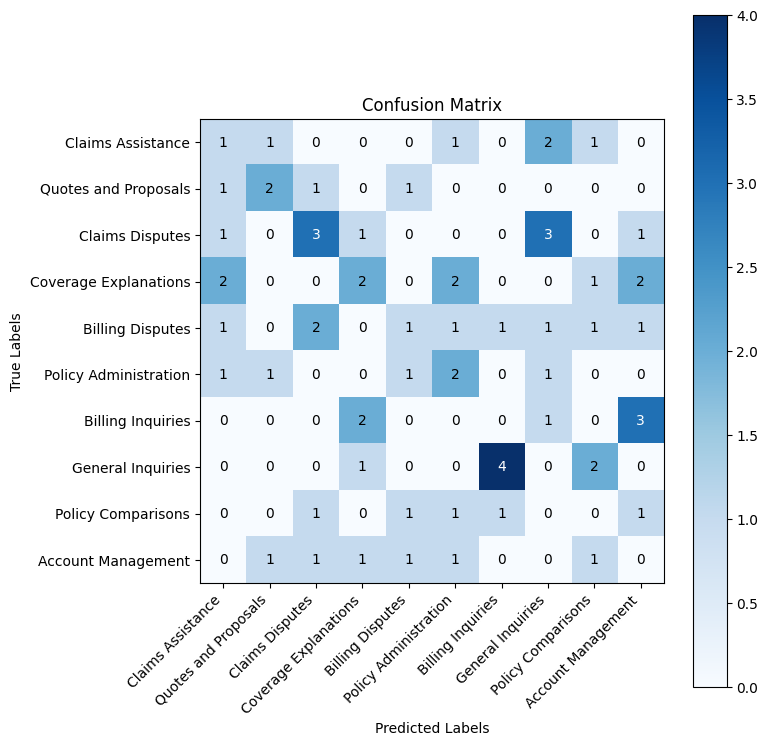
正如随机猜测所预期的那样,混淆矩阵显示预测分散在所有类别中,没有有意义的模式。对角线(正确预测)显示每个类别只有1-4个正确分类,而错误则随机分布。
这证实了我们约10%准确率的基线——在10个类别下纯粹是偶然表现。任何结构化的分类方法都应显示出更强的对角线模式,表明模型实际上在学习类别区分,而不是在猜测。
简单分类测试
现在让我们使用 Claude 构建一个简单的分类器。
首先,我们将以 XML 格式对类别进行编码。这将使 Claude 更容易理解信息。使用 XML 编码信息是一种通用的提示策略,更多信息请参见此处
import textwrap

categories = textwrap.dedent("""<category>
    <label>Billing Inquiries</label>
    <content> Questions about invoices, charges, fees, and premiums Requests for clarification on billing statements Inquiries about payment methods and due dates
    </content>
</category>
<category>
    <label>Policy Administration</label>
    <content> Requests for policy changes, updates, or cancellations Questions about policy renewals and reinstatements Inquiries about adding or removing coverage options
    </content>
</category>
<category>
    <label>Claims Assistance</label>
    <content> Questions about the claims process and filing procedures Requests for help with submitting claim documentation Inquiries about claim status and payout timelines
    </content>
</category>
<category>
    <label>Coverage Explanations</label>
    <content> Questions about what is covered under specific policy types Requests for clarification on coverage limits and exclusions Inquiries about deductibles and out-of-pocket expenses
    </content>
</category>
<category>
    <label>Quotes and Proposals</label>
    <content> Requests for new policy quotes and price comparisons Questions about available discounts and bundling options Inquiries about switching from another insurer
    </content>
</category>
<category>
    <label>Account Management</label>
    <content> Requests for login credentials or password resets Questions about online account features and functionality Inquiries about updating contact or personal information
    </content>
</category>
<category>
    <label>Billing Disputes</label>
    <content> Complaints about unexpected or incorrect charges Requests for refunds or premium adjustments Inquiries about late fees or collection notices
    </content>
</category>
<category>
    <label>Claims Disputes</label>
    <content> Complaints about denied or underpaid claims Requests for reconsideration of claim decisions Inquiries about appealing a claim outcome
    </content>
</category>
<category>
    <label>Policy Comparisons</label>
    <content> Questions about the differences between policy options Requests for help deciding between coverage levels Inquiries about how policies compare to competitors' offerings
    </content>
</category>
<category>
    <label>General Inquiries</label>
    <content> Questions about company contact information or hours of operation Requests for general information about products or services Inquiries that don't fit neatly into other categories
    </content>
</category>""")
构建简单分类器
现在让我们使用 Claude 构建第一个真正的分类器。simple_classify 函数演示了三种关键的提示工程技巧:
- 结构化提示模板:我们以清晰的 XML 格式提供类别定义和支持工单,使 Claude 易于解析信息。
- 通过预填充控制输出:通过以
<category>开始助手的响应并设置stop_sequences=["</category>"],我们强制 Claude 仅输出类别标签——没有解释或额外文本。这使得响应解析可靠且确定。
- 确定性分类:设置
temperature=0.0确保对相同输入产生一致的预测,这对分类任务至关重要。
def simple_classify(X):
    prompt = (
        textwrap.dedent("""
    You will classify a customer support ticket into one of the following categories:
    <categories>
        {{categories}}
    </categories>

    Here is the customer support ticket:
    <ticket>
        {{ticket}}
    </ticket>

    Respond with just the label of the category between category tags.
    """)
        .replace("{{categories}}", categories)
        .replace("{{ticket}}", X)
    )
    response = client.messages.create(
        messages=[
            {"role": "user", "content": prompt},
            {"role": "assistant", "content": "<category>"},
        ],
        stop_sequences=["</category>"],
        max_tokens=4096,
        temperature=0.0,
        model=MODEL,
    )

    # Extract the result from the response
    result = response.content[0].text  # pyright: ignore[reportAttributeAccessIssue]
    return result.strip()
print("Evaluating the simple classification method on the test set...")
evaluate(X_test, y_test, simple_classify)
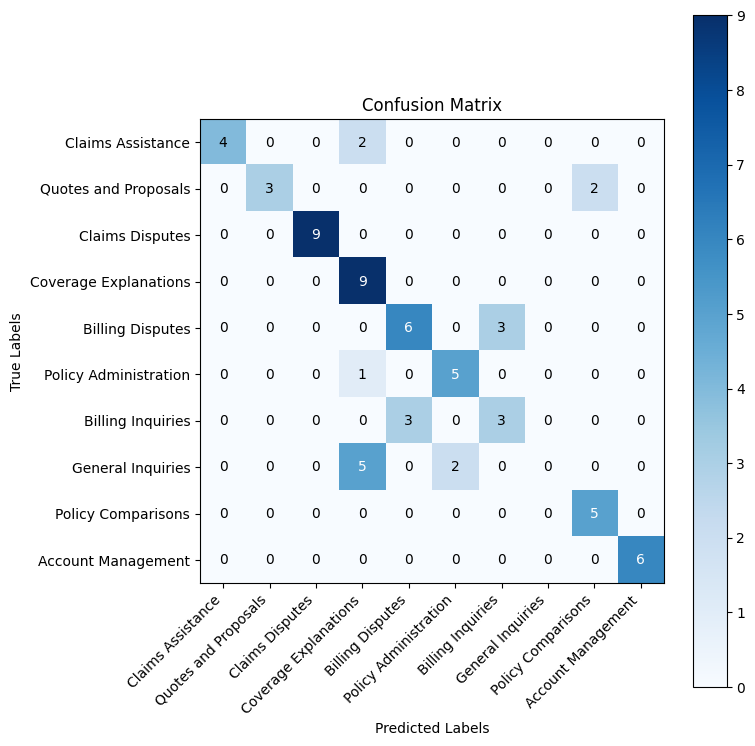
好多了!混淆矩阵显示出强烈的对角线模式,大多数类别都达到了较高的准确率。
这个约 70% 的整体准确率显著优于随机猜测,但相似类别之间的混淆表明 Claude 需要更多上下文才能做出更精细的区分。
为了解决这些混淆模式,我们将通过向 Claude 提供训练数据中的相关示例来添加检索增强生成(RAG)。其工作原理如下:
- 嵌入训练示例:使用 VoyageAI 的嵌入模型将所有 68 个训练工单转换为向量嵌入
- 语义搜索:对于每个新工单,基于余弦相似度找到 5 个最相似的训练示例
- 增强提示词:将这些相似示例包含在分类提示词中,以引导 Claude
这种方法对分类特别有效,因为:
- 相似的过往示例有助于 Claude 区分语义上接近的类别
- 少样本学习无需微调即可提高准确率
- 检索是动态的——每个查询都能获得最相关的示例
我们将构建一个简单的 VectorDB 类,使用 VoyageAI 的嵌入模型来处理嵌入存储和相似度搜索。
import json
import os
import pickle

import numpy as np
import voyageai


class VectorDB:
    def __init__(self, api_key=None):
        if api_key is None:
            api_key = os.getenv("VOYAGE_API_KEY")
        self.client = voyageai.Client(api_key=api_key)
        self.embeddings = []
        self.metadata = []
        self.query_cache = {}
        self.db_path = "./data/vector_db.pkl"

    def load_data(self, data):
        # Check if the vector database is already loaded
        if self.embeddings and self.metadata:
            print("Vector database is already loaded. Skipping data loading.")
            return
        # Check if vector_db.pkl exists
        if os.path.exists(self.db_path):
            print("Loading vector database from disk.")
            self.load_db()
            return

        texts = [item["text"] for item in data]

        # Embed more than 128 documents with a for loop
        batch_size = 128
        result = [
            self.client.embed(texts[i : i + batch_size], model="voyage-2").embeddings
            for i in range(0, len(texts), batch_size)
        ]

        # Flatten the embeddings
        self.embeddings = [embedding for batch in result for embedding in batch]
        self.metadata = [item for item in data]
        self.save_db()
        # Save the vector database to disk
        print("Vector database loaded and saved.")

    def search(self, query, k=5, similarity_threshold=0.75):
        query_embedding = None
        if query in self.query_cache:
            query_embedding = self.query_cache[query]
        else:
            query_embedding = self.client.embed([query], model="voyage-2").embeddings[0]
            self.query_cache[query] = query_embedding

        if not self.embeddings:
            raise ValueError("No data loaded in the vector database.")

        similarities = np.dot(self.embeddings, query_embedding)
        top_indices = np.argsort(similarities)[::-1]
        top_examples = []

        for idx in top_indices:
            if similarities[idx] >= similarity_threshold:
                example = {
                    "metadata": self.metadata[idx],
                    "similarity": similarities[idx],
                }
                top_examples.append(example)

                if len(top_examples) >= k:
                    break
        self.save_db()
        return top_examples

    def save_db(self):
        data = {
            "embeddings": self.embeddings,
            "metadata": self.metadata,
            "query_cache": json.dumps(self.query_cache),
        }
        with open(self.db_path, "wb") as file:
            pickle.dump(data, file)

    def load_db(self):
        if not os.path.exists(self.db_path):
            raise ValueError(
                "Vector database file not found. Use load_data to create a new database."
            )

        with open(self.db_path, "rb") as file:
            data = pickle.load(file)

        self.embeddings = data["embeddings"]
        self.metadata = data["metadata"]
        self.query_cache = json.loads(data["query_cache"])
我们可以定义向量数据库并加载训练数据。
对于没有关联信用卡的账户,VoyageAI 有 3RPM 的速率限制。为了方便演示,我们将利用缓存。
vectordb = VectorDB()
vectordb.load_data(data["train"])
RAG 增强分类器
现在让我们用检索增强生成来重建分类器。rag_classify 函数通过以下方式增强简单分类器:
- 检索相似示例:对于每张工单,我们在向量数据库中搜索 5 个语义上最相似的训练示例
- 格式化为少样本示例:我们将这些示例组织为带有
<query>和<label>标签的 XML 格式,向 Claude 展示相似工单是如何被分类的 - 增强提示词:我们在要求 Claude 对新工单进行分类之前,将这些示例注入到提示词中
这种少样本学习方法通过展示使用相似语言的工单应如何分类的具体示例,帮助 Claude 更好地区分相似类别。例如,如果测试工单提到“意外收费”,检索过去“账单争议”与“账单咨询”的示例有助于 Claude 理解其中的细微差别。
让我们看看这能在上一轮运行中容易混淆的类别上将准确率提升多少。
def rag_classify(X):
    rag = vectordb.search(X, 5)
    rag_string = ""
    for example in rag:
        rag_string += textwrap.dedent(f"""
        <example>
            <query>
                "{example["metadata"]["text"]}"
            </query>
            <label>
                {example["metadata"]["label"]}
            </label>
        </example>
        """)
    prompt = (
        textwrap.dedent("""
    You will classify a customer support ticket into one of the following categories:
    <categories>
        {{categories}}
    </categories>

    Here is the customer support ticket:
    <ticket>
        {{ticket}}
    </ticket>

    Use the following examples to help you classify the query:
    <examples>
        {{examples}}
    </examples>

    Respond with just the label of the category between category tags.
    """)
        .replace("{{categories}}", categories)
        .replace("{{ticket}}", X)
        .replace("{{examples}}", rag_string)
    )
    response = client.messages.create(
        messages=[
            {"role": "user", "content": prompt},
            {"role": "assistant", "content": "<category>"},
        ],
        stop_sequences=["</category>"],
        max_tokens=4096,
        temperature=0.0,
        model="claude-haiku-4-5",
    )

    # Extract the result from the response
    result = response.content[0].text.strip()
    return result
print("Evaluating the RAG method on the test set...")
evaluate(X_test, y_test, rag_classify)
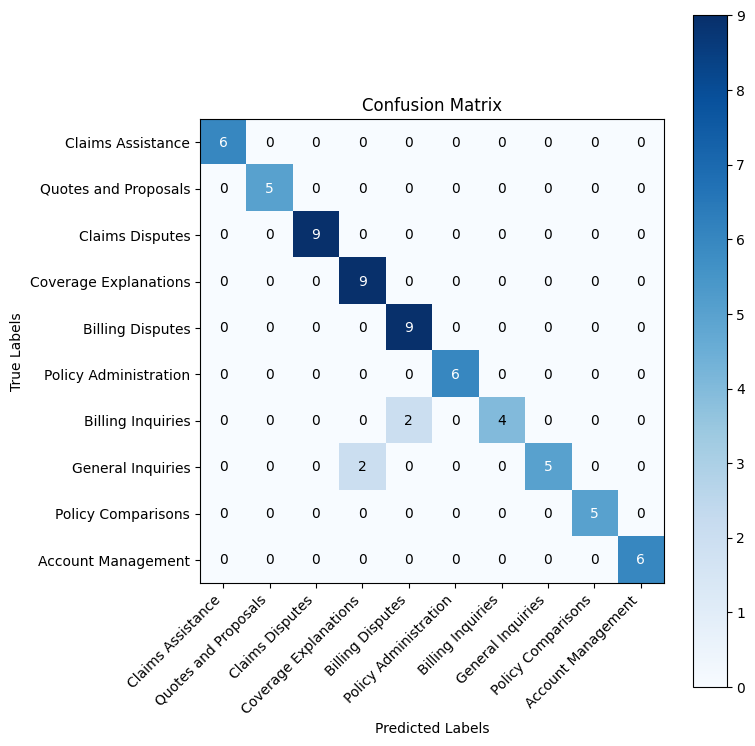
RAG 结果分析
RAG 将我们的准确率从约 70% 提升到了 94%。混淆矩阵显示出更强的对角线,大多数类别现在都达到了完美或接近完美的准确率。
少数剩余的错误表明,即使有相关示例,一些边缘情况仍然存在歧义。这正是思维链推理能够帮助 Claude 更仔细地思考这些细微差别的地方。
使用思维链推理的 RAG
思维链(CoT)提示要求 Claude 在做出分类决策之前“大声思考”。
这种显式的推理过程有助于 Claude 捕捉到直接分类时可能被忽略的细微差别。例如,区分“我对账单有疑问”(账单咨询)和“这笔收费似乎有误”(账单争议)需要理解意图和语气——这正适合通过逐步分析来处理。
rag_chain_of_thought_classify 函数添加了一个 <scratchpad> 部分,Claude 在输出最终的 <category> 之前会在此进行推理。
def rag_chain_of_thought_classify(X):
    rag = vectordb.search(X, 5)
    rag_string = ""
    for example in rag:
        rag_string += textwrap.dedent(f"""
        <example>
            <query>
                "{example["metadata"]["text"]}"
            </query>
            <label>
                {example["metadata"]["label"]}
            </label>
        </example>
        """)
    prompt = (
        textwrap.dedent("""
    You will classify a customer support ticket into one of the following categories:
    <categories>
        {{categories}}
    </categories>

    Here is the customer support ticket:
    <ticket>
        {{ticket}}
    </ticket>

    Use the following examples to help you classify the query:
    <examples>
        {{examples}}
    </examples>

    First you will think step-by-step about the problem in scratchpad tags.
    You should consider all the information provided and create a concrete argument for your classification.

    Respond using this format:
    <response>
        <scratchpad>Your thoughts and analysis go here</scratchpad>
        <category>The category label you chose goes here</category>
    </response>
    """)
        .replace("{{categories}}", categories)
        .replace("{{ticket}}", X)
        .replace("{{examples}}", rag_string)
    )
    response = client.messages.create(
        messages=[
            {"role": "user", "content": prompt},
            {"role": "assistant", "content": "<response><scratchpad>"},
        ],
        stop_sequences=["</category>"],
        max_tokens=4096,
        temperature=0.0,
        model=MODEL,
    )

    # Extract the result from the response
    result = response.content[0].text.split("<category>")[1].strip()
    return result
print("Evaluating the RAG method with Chain of Thought on the test set...")
evaluate(X_test, y_test, rag_chain_of_thought_classify)
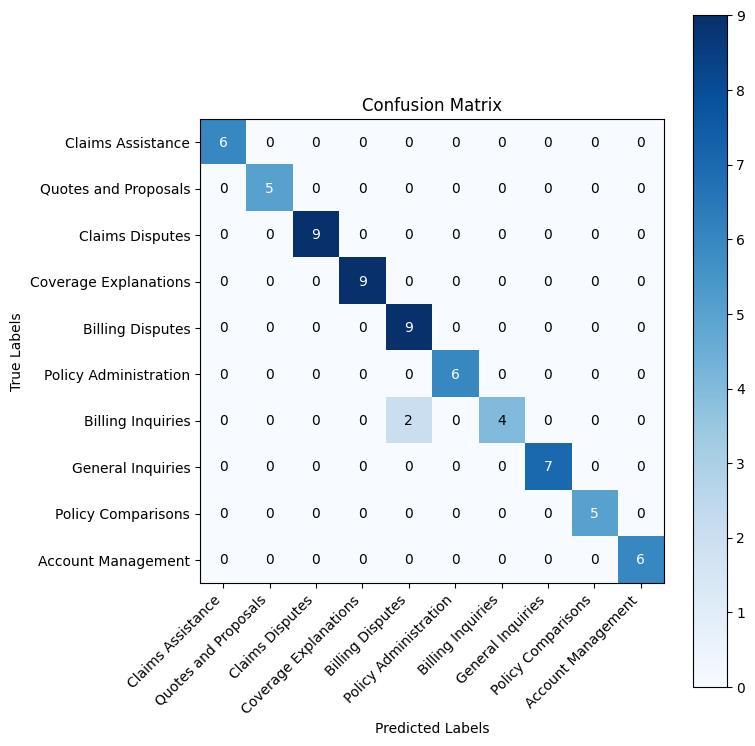
思维链结果分析
思维链推理将我们的准确率提升至 97%,解决了大多数对先前方法构成挑战的边缘情况。
渐进式改进总结:
- 随机基线:约 10% 准确率
- 简单分类器:约 70% 准确率
- RAG 分类器:94% 准确率
- RAG + 思维链:97% 准确率
通过显式地对每个分类决策进行推理,Claude 能更好地区分模糊情况。
使用 Promptfoo 扩展评估
在本指南中,我们展示了在提示工程中实证评估的重要性。我们没有依赖直觉,而是在每一步都测量了性能:
- 随机基线:~10% → 简单:~70% → RAG:94% → RAG + CoT:97%
这种数据驱动的方法准确地揭示了哪些技术(RAG、思维链)增加了价值以及增加了多少。关于此方法的更多信息,请参阅我们的提示工程指南。
超越 Notebook
虽然 Jupyter notebook 非常适合快速迭代和探索,但生产分类系统需要更强大的评估基础设施:
- 更大的测试集:你会希望在数百或数千个示例上进行评估,而不仅仅是 68 个
- 多种提示变体:对不同措辞、结构和方法的 A/B 测试
- 模型比较:在不同 Claude 模型(Haiku 与 Sonnet)或温度设置下进行测试
- 回归检测:确保提示更改不会意外损害准确性
- 版本控制:随着系统的发展,跟踪提示性能随时间的变化
这就是像 Promptfoo 这样的专用评估工具变得至关重要的地方。
运行 Promptfoo 评估
Promptfoo 是一个开源 LLM 评估工具包,可跨多种配置自动执行提示测试。在本指南中,我们设置了一个 Promptfoo 评估,测试所有三种方法(简单、RAG、带 CoT 的 RAG)在不同温度设置下的表现。
运行评估:
- 导航到评估目录:
cd ./evaluation - 按照
./evaluation/README.md中的设置说明进行操作 - 运行评估,然后返回此处分析下面的结果
结果将显示每个提示变体在整个测试集上的表现,揭示仅通过 notebook 测试可能不明显的模式。
import json

import pandas as pd

promptfoo_results = pd.read_csv("./data/results.csv")
examples_columns = promptfoo_results.columns[2:]

number_of_providers = 5
number_of_prompts = 3

prompts = ["Simple", "RAG", "RAG w/ CoT"]

columns = ["label", "text"] + [
    json.loads(examples_columns[prompt * number_of_providers + provider])["provider"]
    + " Prompt: "
    + str(prompts[prompt])
    for prompt in range(number_of_prompts)
    for provider in range(number_of_providers)
]

promptfoo_results.columns = columns

result = (
    promptfoo_results.iloc[:, 2:].astype(str).apply(lambda x: x.str.count("PASS")).sum()
    / len(promptfoo_results)
    * 100
).sort_values(ascending=False)

print(result)
使用 Promptfoo 进行系统性评估
上述结果展示了大规模系统性提示词评估的强大能力。虽然我们的 notebook 在开发过程中提供了快速迭代,但 Promptfoo 使我们能够跨多个维度严格测试提示词:
我们测试的内容
使用 Promptfoo,我们评估了所有三种提示词方法(Simple、RAG、RAG w/ CoT),涵盖:
- 多种温度设置(0.0、0.2、0.4、0.6、0.8):测试确定性分类(T=0.0)是否优于略微随机化的输出
- 相同的测试集(68 个示例):确保所有配置之间的公平比较
- 自动化通过/失败检查:每个预测都会自动与真实标签进行比较
关键发现
Promptfoo 的结果证实了我们 notebook 中的发现,同时揭示了额外的洞见:
- 温度对 CoT 的影响极小:RAG w/ CoT 在 T=0.0、0.2 和 0.8 下均稳定达到 95.59% 的准确率,表明思维链推理无论采样随机性如何都能稳定输出
- RAG 对温度变化具有鲁棒性:RAG 在大多数温度设置下表现强劲(89-94%),不过 T=0.0 表现最佳(94.12%)
- 简单提示词对温度不敏感:简单分类器无论温度如何,准确率都在 70% 左右徘徊,这证实了在没有 RAG 或 CoT 的情况下,模型主要依赖类别定义
- 生产环境建议:使用
temperature=0.0配合 RAG w/ CoT 以获得最大的一致性和准确率(95.59%)
如需自行运行这些评估,请参阅 ./evaluation/README.md 获取设置说明。
常见问题
常见错误:1)API 密钥未设置导致认证失败,需检查环境变量;2)速率限制触发 429 错误,应降低并发数或升级使用层级;3)向量数据库文件损坏,删除 vector_db.pkl 重新生成;4)分类结果包含额外文本,检查 stop_sequences 和预填充设置;5)相似度阈值过高导致检索不到示例,可调整 similarity_threshold 参数。排查方法:打印中间结果、检查 API 响应、使用小批量测试。生产优化:增加重试机制、使用异步请求、监控 API 延迟和错误率、定期更新向量数据库。
企业应用扩展
可扩展方向:1)支持多标签分类,处理工单涉及多个类别的情况;2)集成主动学习,将低置信度样本加入训练集迭代优化;3)使用更高效的嵌入模型或本地向量数据库(如 FAISS)降低成本;4)结合规则引擎处理明确规则,减少 LLM 调用;5)部署为微服务,提供 REST API 供其他系统调用;6)使用 Promptfoo 进行持续评估和回归测试,确保提示变更不会降低性能。
总结
本教程面向有编程基础的开发者,详细讲解如何利用 Claude 构建高精度保险支持工单分类器。通过结合提示工程、检索增强生成(RAG)和思维链推理,将分类准确率从随机基线的约10%逐步提升至97%。内容涵盖数据准备、评估框架搭建、向量数据库实现、分类器迭代优化,以及使用 Promptfoo 进行系统性评估。读者将掌握 LLM 分类系统的核心设计模式、代码实现细节、常见错误排查和生产环境优化策略,能够将类似方法迁移到其他复杂业务分类场景。
- --
内容来源与验证
- 内容等级:PREMIUM_A
- 质量等级:A
- 难度:中级
- 验证等级:V1
- 原文作者:GarvanD
- 原文日期:2024-05-19
- 来源许可:MIT
- 来源版本:
794c0f04eaaa0ef55781db97b63bc21ea33dd8df - 查看原文
站内还有更多完整实战教程
加入会员,解锁全部教程、完整代码与持续更新内容。
加入会员