浏览器作为工具:使用Google Colab进行网页自动化与数据提取
技术背景
LLM 本身不连接实时数据源,Google Search grounding 只能利用搜索索引,存在时效性与覆盖范围限制。当代理需要访问实时网页、JavaScript 渲染内容或私有内网时,必须把浏览器封装为可调用工具。该技术适用于实时问答、竞品监控、内网知识检索等场景,主要限制是依赖目标站点可抓取性、截图延迟与合规约束。
核心原理
核心是函数调用循环:模型根据系统指令决定调用工具,工具执行后以 FunctionResponse 回传结果。Live API 通过 stream.receive() 异步接收文本与 tool_call,再用 stream.send() 回传结果;回合制对话则把 function_response 与图像作为 Part 一起发回。图像不能用于函数调用返回值,必须作为普通 Content 发送,因此需手动处理。robots.txt 检查保证抓取合规。
架构分析
系统由四层组成:SDK 客户端层统一管理 Live 与 REST 模型;工具层包含 load_page(HTTP+markdownify)与 browse_url(Selenium 截图);编排层负责流式接收、工具分发与结果回传;合规层通过 can_crawl_url 做 robots.txt 校验。设计上把工具声明与执行分离,Live 模式预写流处理避免超时,截图采用固定 1024x2048 单次捕获以降低交互延迟。
完整实战教程
##### 版权所有 2026 Google LLC。
# @title Licensed under the Apache License, Version 2.0 (the "License");
# you may not use this file except in compliance with the License.
# You may obtain a copy of the License at
#
# https://www.apache.org/licenses/LICENSE-2.0
#
# Unless required by applicable law or agreed to in writing, software
# distributed under the License is distributed on an "AS IS" BASIS,
# WITHOUT WARRANTIES OR CONDITIONS OF ANY KIND, either express or implied.
# See the License for the specific language governing permissions and
# limitations under the License.
浏览器作为工具
<a target="_blank" href="https://colab.research.google.com/github/google-gemini/cookbook/blob/main/examples/Browser_as_a_tool.ipynb">
 </a>
</a>
LLM 是强大的工具,但它们并非天生就与实时数据源相连。像 Google Search grounding 这样的功能可以利用 Google 的搜索索引提供最新信息,但要提供真正实时的信息,你可以连接浏览器来提供最新数据和智能探索。
本 notebook 将引导你通过三个示例,展示如何将浏览器作为工具与 Gemini API 配合使用,同时涵盖 Live Multimodal API 和传统的回合制对话。
* 使用 Live API 和浏览器工具请求实时数据
* 从函数调用返回网页图像
* 使用浏览器工具连接到本地网络/内网
注意:对于大多数用例,你可以直接使用 Gemini 的工具,让它通过 Google Search 搜索内容、从 YouTube 获取视频或从 URL 获取上下文,而无需进行任何设置。查看 Grounding notebook 了解更多详情。
设置 SDK
本指南使用 google-genai Python SDK 连接 Gemini 模型。
%pip install -U -q 'google-genai'

from google import genai
genai.__version__
设置你的 API 密钥
要运行以下单元格,你的 API 密钥必须存储在名为 GEMINI_API_KEY 的 Colab Secret 中。如果你还没有 API 密钥,或者不确定如何创建 Colab Secret,请参阅
Authentication  快速入门示例。
import os
from google.colab import userdata

GEMINI_API_KEY = userdata.get('GEMINI_API_KEY')
创建 SDK 客户端
你将使用同一个 client 实例来同时进行 Live API 和经典 REST API 的交互,因此需要为它们分别定义模型。
from google.genai import types

client = genai.Client(api_key=GEMINI_API_KEY)

LIVE_MODEL = 'gemini-3.1-flash-live-preview'  # @param ['gemini-3.1-flash-live-preview'] {allow-input: true, isTemplate: true}

MODEL = "gemini-3.8-flash"  # @param ["gemini-3.1-pro-preview", "gemini-3.8-flash", "gemini-3.7-flash", "gemini-3.6-flash", "gemini-3.5-flash-lite", "gemini-2.5-pro"] {"allow-input": true, "isTemplate": true}
定义一些辅助函数
show_parts 辅助函数以适合 notebook 的方式渲染 API 返回的深层嵌套输出;处理文本、代码和工具调用。
can_crawl_url 辅助函数将执行 robots.txt 检查,以确保任何自动化请求都受到远程服务的欢迎。
import json
from urllib.robotparser import RobotFileParser
from urllib.parse import urlparse

from IPython.display import display, HTML, Markdown


def show_parts(r: types.GenerateContentResponse) -> None:
  """Helper for rendering a GenerateContentResponse object in IPython."""
  parts = r.candidates[0].content.parts
  if parts is None:
    finish_reason = r.candidates[0].finish_reason
    print(f'{finish_reason=}')
    return

  for part in parts:
    if part.text:
      display(Markdown(part.text))
    elif part.executable_code:
      display(Markdown(f'```python\n{part.executable_code.code}\n```'))
    else:
      print(json.dumps(part.model_dump(exclude_none=True), default=str, indent=2))

  grounding_metadata = r.candidates[0].grounding_metadata
  if grounding_metadata and grounding_metadata.search_entry_point:
    display(HTML(grounding_metadata.search_entry_point.rendered_content))


def can_crawl_url(url: str, user_agent: str = "*") -> bool:
    """Look up robots.txt for a URL and determine if crawling is permissable.

    Args:
        url: The full URL to check.
        user_agent: The user agent to check, defaults to any UA.

    Returns:
        True if the URL can be crawled, False otherwise.
    """
    try:
      parsed_url = urlparse(url)
      robots_url = f"{parsed_url.scheme}://{parsed_url.netloc}/robots.txt"
      rp = RobotFileParser(robots_url)
      rp.read()

      return rp.can_fetch(user_agent, url)

    except Exception as e:
      print(f"Error checking robots.txt: {e}")
      return False  # Be a good citizen: fail closed.
实时浏览
本示例将向您展示如何结合 Google 搜索工具使用多模态实时 API,然后对比展示一个自定义的网页浏览工具,用于实时检索网站内容。
将 Google 搜索用作工具
Live API 的流式特性要求流处理和函数处理代码必须提前编写。这允许流在不超时的情况下持续运行。
此示例使用文本作为输入模式,并以文本形式流式返回结果,但该技术适用于 Live API 支持的任何模式,包括音频。
config = {
    'response_modalities': ['TEXT'],
    'tools': [
        {'google_search': {}},
    ],
}


async def stream_response(stream, *, tool=None):
  """Handle a live streamed response, printing out text and issue tool calls."""
  all_responses = []

  async for msg in stream.receive():
    all_responses.append(msg)

    if text := msg.text:
      # Print streamed text responses.
      print(text, end='')

    elif tool_call := msg.tool_call:
      # Handle tool calls.
      for fc in tool_call.function_calls:
        print(f'< Tool call', fc.model_dump(exclude_none=True))

        if tool:
          # Call the tool.
          assert fc.name == tool.__name__, "Unknown tool call encountered"
          tool_result = tool(**fc.args)

        else:
          # Return 'ok' as a way to mock tool calls.
          tool_result = 'ok'

        tool_response = types.LiveClientToolResponse(
            function_responses=[types.FunctionResponse(
                name=fc.name,
                id=fc.id,
                response={'result': tool_result},
            )]
        )

        await stream.send(input=tool_response)

  return all_responses
现在定义并运行对话。
async def run():
  async with client.aio.live.connect(model=LIVE_MODEL, config=config) as stream:

    await stream.send(input="What is today's featured article on the English Wikipedia?", end_of_turn=True)
    await stream_response(stream)

await run()
根据你运行此操作的时间,你可能会注意到 Google 搜索索引中的内容与 Wikipedia 上当前实时内容之间存在差异。你可以自行查看 Wikipedia 的特色条目。或者,由于对时效性的要求,模型可能会决定不回答。
为了改善这种情况,可以添加一个浏览工具,使模型能够实时获取这些信息。
添加实时浏览器
此步骤定义了一个“浏览器”,它通过 HTTP(S) 请求 URL,将响应转换为 markdown 并返回。
此技术适用于以完整 HTML 形式提供内容的网站,因此依赖脚本提供内容的网站,例如没有 SSR 的 PWA,将无法工作。请查看后面使用全功能浏览器的可视化示例。
%pip install -q markdownify
import requests

import markdownify


def load_page(url: str) -> str:
  """
  Load the page contents as Markdown.
  """

  if not can_crawl_url(url):
    return f"URL {url} failed a robots.txt check."

  try:
    page = requests.get(url)
    return markdownify.markdownify(page.content)

  except Exception as e:
    return f"Error accessing URL: {e}"
现在使用新工具定义并运行对话。这里添加了一条扩展的系统指令,以强制模型立即调用该工具,从而避免它陷入难以在 notebook 中演示的开放式对话。
load_page_def = types.Tool(functionDeclarations=[
    types.FunctionDeclaration.from_callable(client=client, callable=load_page)]).model_dump(exclude_none=True)

config = {
    'response_modalities': ['TEXT'],
    'tools': [
        load_page_def,
    ],
    'system_instruction': """Your job is to answer the users query using the tools available.

First determine the address that will have the information and tell the user. Then immediately
invoke the tool. Then answer the user.
"""
}


async def run():
  async with client.aio.live.connect(model=LIVE_MODEL, config=config) as stream:

    await stream.send(input="What is today's featured article on the English Wikipedia?", end_of_turn=True)
    await stream_response(stream, tool=load_page)

await run()
可视化浏览页面
在前面的示例中,你使用了一个工具来获取页面的文本内容,并将其用于实时聊天上下文。然而,网页是一种丰富的多模态媒介,因此仅使用文本会导致部分信号丢失。使用功能完备的网页浏览器还可以让使用 JavaScript 渲染内容的网站正常工作,而像前面示例那样使用简单的 HTTP 请求则无法做到这一点。
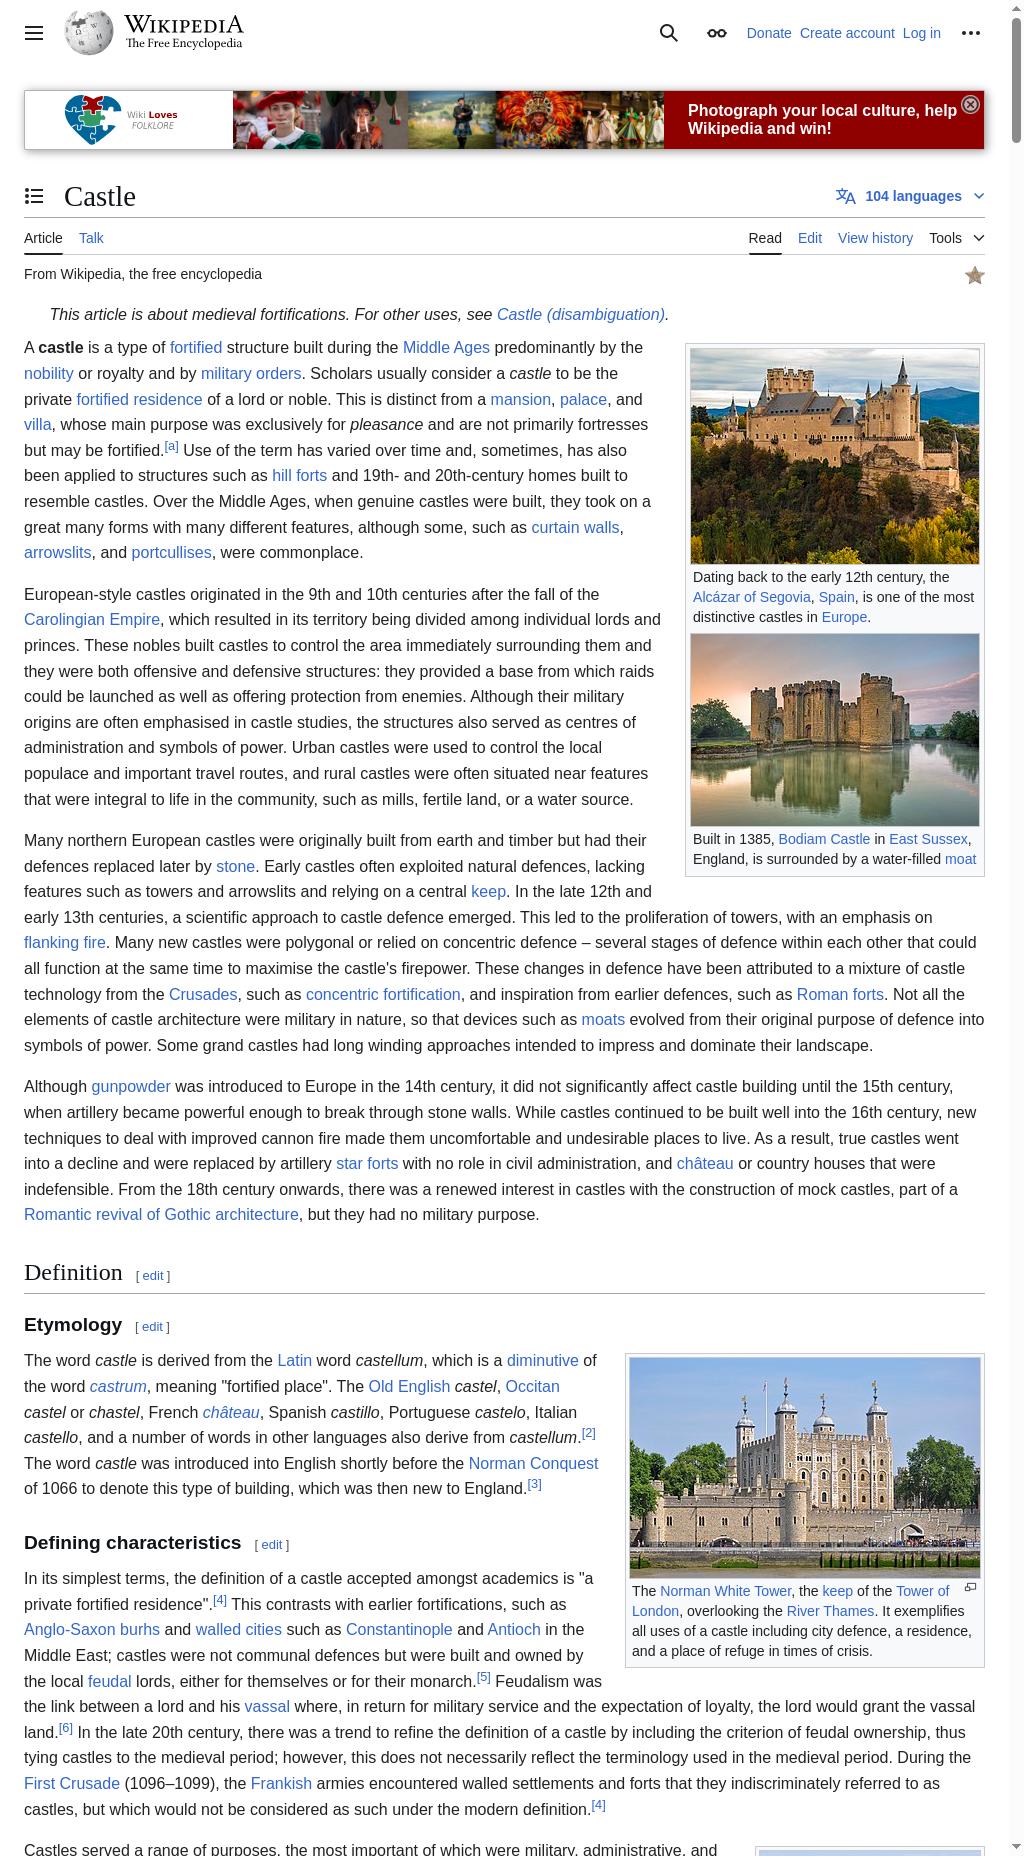
在本示例中,你将定义一个工具,用于对网页进行截图,并将图像传回给模型。
注意:本示例自动化了一个无头 Chromium 浏览器,因此相关说明针对 Linux 环境,并可在 Google Colab 上运行。请在 Colab 上尝试此示例,或查阅 Selenium 文档 以在你的环境中设置特定的浏览器。
!apt install -y chromium-browser
%pip install -q selenium webdriver-manager
定义图形化浏览器
在这里,你定义一个 browse_url 函数,它使用 Selenium 加载无头 Web 浏览器,导航到一个 URL 并截取屏幕截图。这种技术以固定尺寸截取单张屏幕截图。还有其他工具,例如 selenium-screenshot,可以通过反复滚动并捕获页面来获取全长图像。由于此工具旨在实时对话期间使用,因此本示例采用更快的单次截图方法。
import time
from selenium import webdriver
from webdriver_manager.chrome import ChromeDriverManager

SCREENSHOT_FILE = 'screenshot.png'


def browse_url(url: str) -> str:
    """Captures a screenshot of the webpage at the provided URL.

    A graphical browser will be used to connect to the URL provided,
    and generate a screenshot of the rendered web page.

    Args:
        url: The full absolute URL to browse/screenshot.

    Returns:
        "ok" if successfully captured, or any error messages.
    """
    if not can_crawl_url(url):
      return f"URL {url} failed a robots.txt check."

    try:
      chrome_options = webdriver.ChromeOptions()
      chrome_options.add_argument('--headless')
      chrome_options.add_argument('--no-sandbox')
      chrome_options.headless = True
      driver = webdriver.Chrome(options=chrome_options)

      # Take one large image, 2x high as it is wide. This should be enough to
      # capture most of a page's interesting info, and should capture anything
      # designed "above the fold", without going too deep into things like
      # footer links, infinitely scrolling pages, etc.
      # Otherwise multiple images are needed, which requires waiting, scrolling
      # and stitching, and introduces lag that slows down interactions.
      driver.set_window_size(1024, 2048)
      driver.get(url)

      # Wait for the page to fully load.
      time.sleep(5)
      driver.save_screenshot(SCREENSHOT_FILE)

      print(f"Screenshot saved to {SCREENSHOT_FILE}")
      return markdownify.markdownify(driver.page_source)

    except Exception as e:
      print(f"An error occurred: {e}")
      return str(e)

    finally:
      # Close the browser
      if driver:
        driver.quit()


url = "https://en.wikipedia.org/wiki/Castle"
browse_url(url);
查看截图以确认它是否生效。
from IPython.display import Image

Image('screenshot.png')
将浏览器连接到模型
将 browse_url 工具添加到模型并启动聊天会话。由于 LLM 本身并不直接具备互联网连接能力,像 Gemini 这样的现代模型被训练为告知用户它们无法访问互联网,而不是编造结果。为了覆盖这一行为,此步骤添加了一条系统指令,引导模型使用该工具来访问互联网。
sys_int = """You are a system with access to websites via the `browse_url` tool.
Use the `browse_url` tool to browse a URL and generate a screenshot that will be
returned for you to see and inspect, like using a web browser.

When a user requests information, first use your knowledge to determine a specific
page URL, tell the user the URL and then invoke the `browse_tool` with this URL. The
tool will supply the website, at which point you will examine the contents of the
screenshot to answer the user's questions. Do not ask the user to proceed, just act.

You will not be able to inspect the page HTML, so determine the most specific page
URL, rather than starting navigation from a site's homepage.
"""

# Because `browse_url` generates an image, and images can't be used in function calling
# (but can be used in regular Content/Parts), automatic function calling can't be used and
# the tool must be specified explicitly, and handled manually.
browse_tool = types.Tool(functionDeclarations=[
    types.FunctionDeclaration.from_callable(client=client, callable=browse_url)])

chat = client.chats.create(
    model=MODEL,
    config={'tools': [browse_tool], 'system_instruction': sys_int})

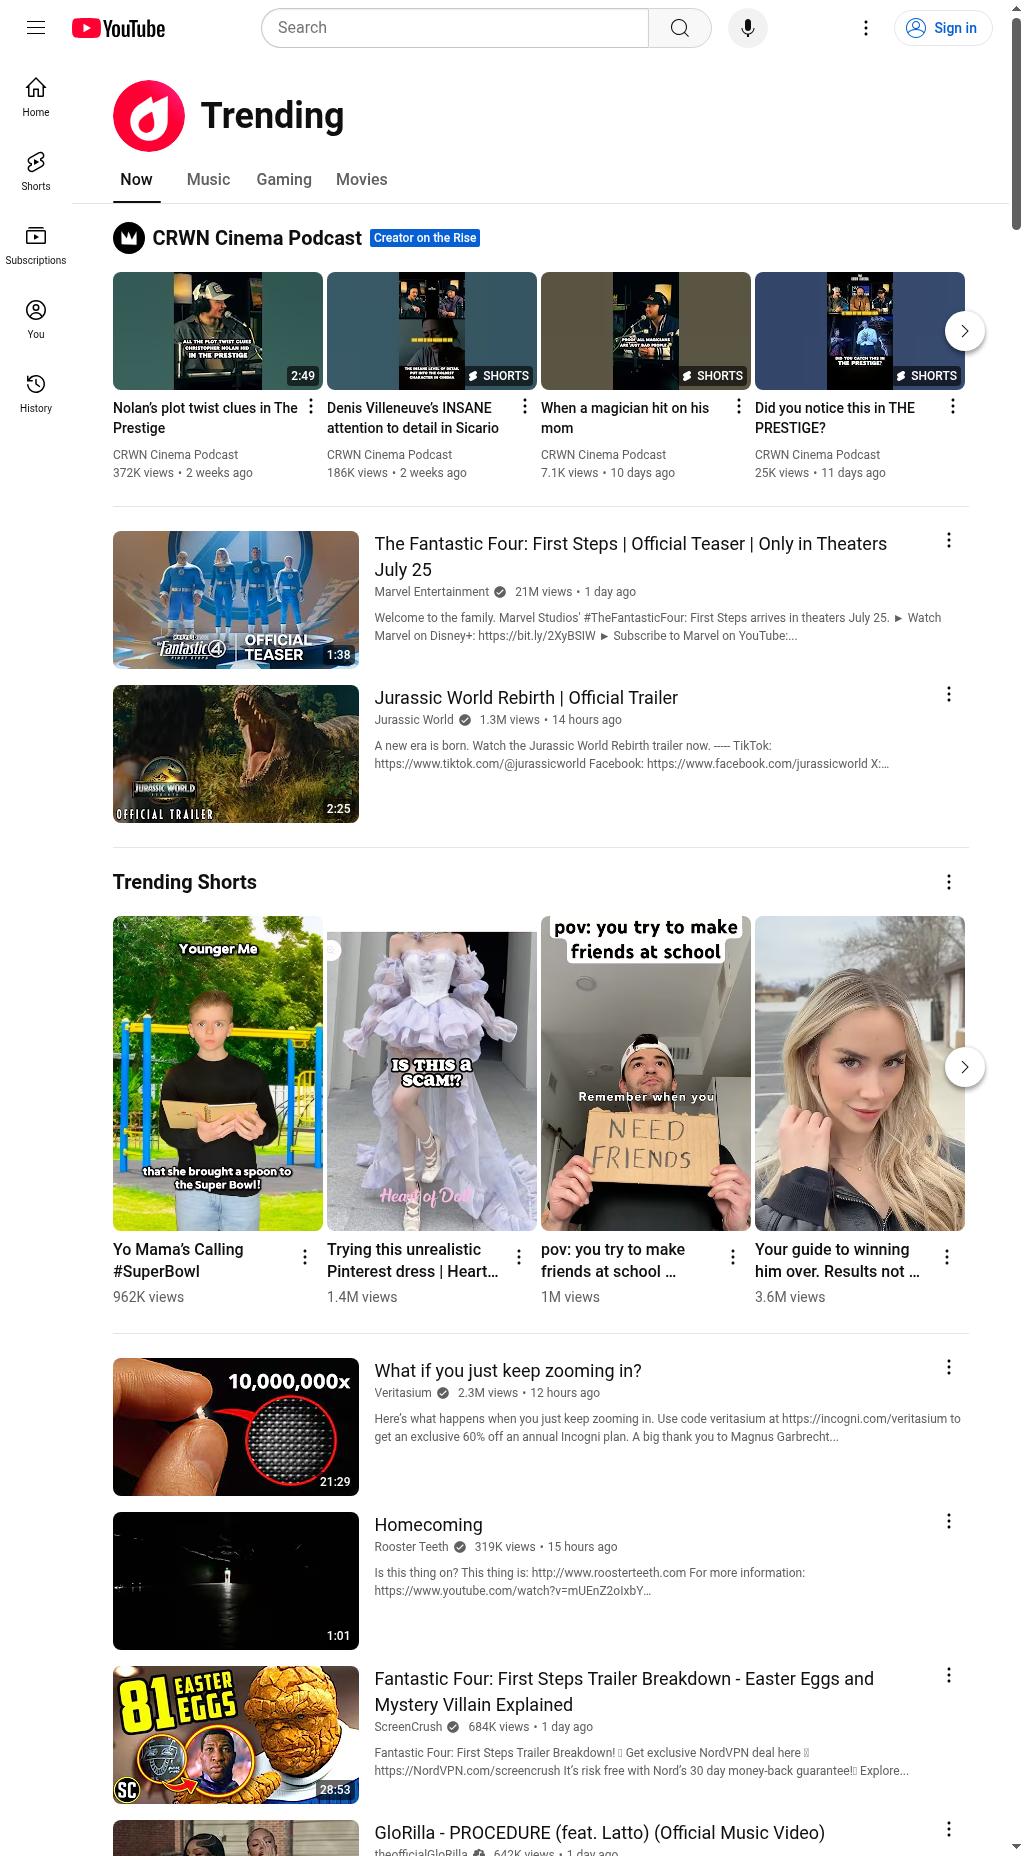
r = chat.send_message('What is trending on YouTube right now?')
show_parts(r)
你应该会在上面的响应中看到一个 function_call。一旦模型发出函数调用,就执行该工具,并保存 function_response 和图像,以供下一轮使用。
如果你没有看到 function_call,你可以重新运行该单元格,或者继续对话以回答模型提出的任何问题(例如 r = chat.send_message('Yes, please use the tool'))。
import PIL

response_parts = []

# For each function call, generate the response in two parts. Once for the
# function response, and one for the image as regular content. This simulates
# the function "returning" an image to the model as part of a function call.
for p in r.candidates[0].content.parts:
  if fn := p.function_call:
    assert fn.name == 'browse_url'

    url = fn.args['url']
    print(url)
    response = browse_url(url)
    print(response)

    img = PIL.Image.open(SCREENSHOT_FILE)

    fr = genai.types.Part(function_response=genai.types.FunctionResponse(
        name=fn.name,
        id=fn.id,
        response={'result': response},
    ))
    response_parts.extend([fr, img])
在将图像发送回模型之前先检查它。根据你运行此代码的位置,你可能会看到本地化的内容。如果你使用的是 Google Colab,可以运行 !curl ipinfo.io 来查看正在运行的内核的地理位置。
请注意,如果你看到半空白的图像,页面可能尚未完全加载。尝试调整 browse_url 中的 time.sleep,或者为你的应用程序中使用的页面提供合适的实现。
Image(SCREENSHOT_FILE)
r2 = chat.send_message(response_parts)
show_parts(r2)
浏览本地服务
通过提供一个在您自己的环境中运行的浏览工具,您可以将其连接到您自己的私有服务——例如您的家庭网络或内网。
此示例演示了如何将浏览工具连接到一个模拟的内网环境。
首先下载示例内网文件。
!wget -nv https://storage.googleapis.com/generativeai-downloads/data/intranet.zip
!unzip intranet.zip
设置一个 HTTP 服务器,在后台线程中提供这些文件,这样你就可以使用主前台线程访问它。
import http.server
import os
import socketserver
import threading


PORT = 80
DIRECTORY = "./intranet/"

class Handler(http.server.SimpleHTTPRequestHandler):
    def __init__(self, *args, **kwargs):
        super().__init__(*args, directory=DIRECTORY, **kwargs)


httpd = socketserver.TCPServer(("", PORT), Handler)
server_thread = threading.Thread(target=httpd.serve_forever)
server_thread.start()
设置一个主机别名,使其看起来更像一个真实的内部网络,并确认其正常工作。
!echo "127.0.0.1 papercorp" >> /etc/hosts
!curl http://papercorp:{PORT}/
截个图看看内网主页长什么样。
import PIL

print(browse_url(f"http://papercorp:{PORT}/"))
PIL.Image.open(SCREENSHOT_FILE)

最后,启动一个使用 load_page 工具的聊天。包含如何访问和浏览内网的说明。
注意:如果你提供给模型的数据涉及任何敏感信息,请务必阅读并理解 Gemini API 的条款与条件,特别是关于付费服务与未付费服务如何处理数据的条款。
config = {
    'system_instruction': """Use the tools you have to answer the user's questions about
the "PaperCorp" company.

You have access to web pages through the `load_page` tool, including access to the local
network and intranet, where you will find information about the company. The `load_page`
tool will return you the page contents as Markdown.

The intranet hostname is `papercorp`, and the home page can be accessed via
http://papercorp/.

Unless you know an address already, start navigating from the home page to find other
pages.
""",
    'tools': [load_page],
}

chat = client.chats.create(model=MODEL, config=config)
r = chat.send_message('What forms are available through HR?')
show_parts(r)
httpd.shutdown()
httpd.server_close()
延伸阅读
* 如需进一步了解如何使用接地工具(搜索接地、YouTube 链接和 URL 上下文),请查看 接地 notebook,或专门介绍搜索接地的 notebook。
* 如需了解 Live API 中函数调用的更多高级示例,请尝试绘图与地图 cookbook 配方。
或者浏览 Gemini API cookbook。
常见问题
常见错误包括:未设置 GEMINI_API_KEY 导致认证失败;robots.txt 读取异常时默认拒绝;Selenium 缺少 chromium 或驱动导致启动失败;截图半空白说明页面未加载完,应增大 time.sleep;模型不调用工具时需强化系统指令或追加确认消息;图像误放入 function_response 会被拒绝,应作为独立 Part 发送。生产环境建议加缓存、超时、重试与并发控制。
企业应用扩展
可扩展方向包括:用 selenium-screenshot 实现全长截图;接入 Playwright 提升渲染兼容性;为工具增加缓存与限流;将内网浏览封装为受控代理并审计日志;结合 Grounding 工具减少自定义抓取;在 Live API 中支持音频输入输出;对敏感数据遵循 Gemini API 条款,优先使用付费服务并做数据脱敏。
总结
本文面向有编程基础的开发者,系统讲解如何将浏览器作为工具接入 Gemini API,覆盖 Live Multimodal API 与传统回合制对话两种模式。通过三个递进示例——实时搜索、网页截图回传、内网浏览——演示函数调用、robots.txt 合规检查、Selenium 无头浏览器截图与图像回传等关键技术,并给出环境准备、代码分析与生产优化建议。
- --
内容来源与验证
- 内容等级:PREMIUM_A
- 质量等级:A
- 难度:中级
- 验证等级:V1
- 原文作者:
- 原文日期:
- 来源许可:Apache-2.0
- 来源版本:
d457d529524d8236cf693286d34014626cf225d3 - 查看原文
站内还有更多完整实战教程
加入会员,解锁全部教程、完整代码与持续更新内容。
加入会员