使用Qdrant和少样本学习微调OpenAI模型以实现检索增强生成(RAG)
技术背景
RAG(检索增强生成)结合检索系统与生成模型,能提升答案准确性并减少幻觉。但在特定领域,基础模型可能表现不佳。微调可让模型适应领域数据,而少样本学习通过示例引导模型行为。Qdrant作为向量搜索引擎,能高效检索相似示例,为少样本学习提供支持。本教程解决如何通过微调和少样本学习优化RAG性能,适用于需要高准确性问答的场景,如客服、教育等。
核心原理
RAG核心是检索相关文档作为上下文,生成模型基于上下文回答。微调通过领域数据调整模型参数,使其更适应特定任务。少样本学习在提示中提供少量示例,引导模型输出。Qdrant将问题嵌入向量,通过相似度搜索找到最相关的示例,构建少样本提示。数据流:问题→嵌入→Qdrant检索→构建提示→模型生成答案。关键设计:检索正例和负例(答案不存在)以平衡模型行为。
架构分析
系统分为数据准备、检索、生成和评估四部分。数据准备:加载SQuAD数据集,划分训练/验证集。检索:使用Qdrant存储训练集问题的嵌入,支持过滤条件(如is_impossible)。生成:调用OpenAI API,使用基础模型、微调模型或少样本提示。评估:比较生成答案与真实答案,分类为正确、跳过、错误、幻觉等。组件关系:Qdrant提供检索服务,OpenAI提供生成服务,评估模块量化性能。设计思想:通过检索增强生成,利用微调适应领域,少样本学习动态调整行为。
完整实战教程
为什么你应该阅读这篇博客?
你想学习如何
- 为特定用例微调OpenAI模型
- 使用Qdrant提升你的RAG模型性能
- 利用微调提高RAG模型的正确性并减少幻觉
首先,我们选择了一个保证检索完美的数据集。我们选取了SQuAD数据集的一个子集,该数据集包含关于维基百科文章的问答对。我们还加入了上下文中不包含答案的样本,以展示RAG如何处理这种情况。
目录
- 环境设置
A部分:零样本学习
- 数据准备:SQuADv2数据集
- 使用基础gpt-3.5-turbo-0613模型回答
- 使用微调模型进行微调和回答
- 评估:模型表现如何?
B部分:少样本学习
- 使用Qdrant改进RAG提示
- 使用Qdrant微调OpenAI模型
- 评估
- 结论
- 聚合结果
- 观察
术语、定义和参考
检索增强生成(RAG)?
检索增强生成(RAG)这一术语来自Facebook AI的Lewis等人最近的一篇论文。其思想是使用预训练的语言模型(LM)来生成文本,但使用单独的检索系统来查找相关文档,以作为LM的条件。
什么是Qdrant?
Qdrant是一个开源的向量搜索引擎,允许你在大型数据集中搜索相似的向量。它是用Rust构建的,在这里我们将使用Python客户端与其交互。这是RAG的检索部分。
什么是少样本学习?
少样本学习是一种机器学习类型,模型通过少量数据进行训练或微调来“改进”。在这种情况下,我们将使用它来在SQuAD数据集中的少量示例上微调RAG模型。这是RAG的增强部分。
什么是零样本学习?
零样本学习是一种机器学习类型,模型在没有任何数据集特定信息的情况下通过训练或微调来“改进”。
什么是微调?
微调是一种机器学习类型,模型通过少量数据进行训练或微调来“改进”。在这种情况下,我们将使用它来在SQuAD数据集中的少量示例上微调RAG模型。LLM是RAG的生成部分。
1. 环境搭建
安装与导入依赖
!pip install pandas openai tqdm tenacity scikit-learn tiktoken python-dotenv seaborn --upgrade --quiet
import json
import os
import time

import pandas as pd
from openai import OpenAI
import tiktoken
import seaborn as sns
from tenacity import retry, wait_exponential
from tqdm import tqdm
from collections import defaultdict
import numpy as np
import matplotlib.pyplot as plt
import numpy as np
from sklearn.metrics import confusion_matrix

import warnings
warnings.filterwarnings('ignore')

tqdm.pandas()

client = OpenAI(api_key=os.environ.get("OPENAI_API_KEY", "<your OpenAI API key if not set as env var>"))
设置你的密钥
在此处获取你的 OpenAI 密钥,并在此处创建免费集群后获取 Qdrant 密钥。
os.environ["QDRANT_URL"] = "https://xxx.cloud.qdrant.io:6333"
os.environ["QDRANT_API_KEY"] = "xxx"
Section A
2. 数据准备:SQuADv2 数据子集
为了演示目的,我们将从 SQuADv2 数据集的训练集和验证集中抽取小片段。该数据集包含问题和上下文中不存在答案的情况,以帮助我们评估 LLM 如何处理这种情况。
我们将从 JSON 文件中读取数据,并创建一个包含以下列的数据框:question、context、answer、is_impossible。
下载数据
# !mkdir -p local_cache
# !wget https://rajpurkar.github.io/SQuAD-explorer/dataset/train-v2.0.json -O local_cache/train.json
# !wget https://rajpurkar.github.io/SQuAD-explorer/dataset/dev-v2.0.json -O local_cache/dev.json
将 JSON 读取为 DataFrame
def json_to_dataframe_with_titles(json_data):
    qas = []
    context = []
    is_impossible = []
    answers = []
    titles = []

    for article in json_data['data']:
        title = article['title']
        for paragraph in article['paragraphs']:
            for qa in paragraph['qas']:
                qas.append(qa['question'].strip())
                context.append(paragraph['context'])
                is_impossible.append(qa['is_impossible'])

                ans_list = []
                for ans in qa['answers']:
                    ans_list.append(ans['text'])
                answers.append(ans_list)
                titles.append(title)

    df = pd.DataFrame({'title': titles, 'question': qas, 'context': context, 'is_impossible': is_impossible, 'answers': answers})
    return df

def get_diverse_sample(df, sample_size=100, random_state=42):
    """
    Get a diverse sample of the dataframe by sampling from each title
    """
    sample_df = df.groupby(['title', 'is_impossible']).apply(lambda x: x.sample(min(len(x), max(1, sample_size // 50)), random_state=random_state)).reset_index(drop=True)

    if len(sample_df) < sample_size:
        remaining_sample_size = sample_size - len(sample_df)
        remaining_df = df.drop(sample_df.index).sample(remaining_sample_size, random_state=random_state)
        sample_df = pd.concat([sample_df, remaining_df]).sample(frac=1, random_state=random_state).reset_index(drop=True)

    return sample_df.sample(min(sample_size, len(sample_df)), random_state=random_state).reset_index(drop=True)

train_df = json_to_dataframe_with_titles(json.load(open('local_cache/train.json')))
val_df = json_to_dataframe_with_titles(json.load(open('local_cache/dev.json')))

df = get_diverse_sample(val_df, sample_size=100, random_state=42)
3. 使用基础 gpt-3.5-turbo-0613 模型进行回答
3.1 零样本提示
让我们从使用基础 gpt-3.5-turbo-0613 模型回答问题开始。这个提示是问题和上下文的简单拼接,中间用分隔符 \n\n 隔开。提示中有一个简单的指令部分:
仅根据上下文回答以下问题。只从上下文中回答。如果你不知道答案,就说“我不知道”。
其他提示也是可能的,但这是一个好的起点。我们将使用这个提示来回答验证集中的问题。
# Function to get prompt messages
def get_prompt(row):
    return [
        {"role": "system", "content": "You are a helpful assistant."},
        {
            "role": "user",
            "content": f"""Answer the following Question based on the Context only. Only answer from the Context. If you don't know the answer, say 'I don't know'.
    Question: {row.question}\n\n
    Context: {row.context}\n\n
    Answer:\n""",
        },
    ]
3.2 使用零样本提示进行回答
接下来,你需要一些可复用的函数来调用 OpenAI API 并返回答案。你将使用 API 的 ChatCompletion.create 端点,它接收一个提示并返回补全的文本。
# Function with tenacity for retries
@retry(wait=wait_exponential(multiplier=1, min=2, max=6))
def api_call(messages, model):
    return client.chat.completions.create(
        model=model,
        messages=messages,
        stop=["\n\n"],
        max_tokens=100,
        temperature=0.0,
    )


# Main function to answer question
def answer_question(row, prompt_func=get_prompt, model="gpt-3.5-turbo"):
    messages = prompt_func(row)
    response = api_call(messages, model)
    return response.choices[0].message.content
⏰ 运行时间:约 3 分钟,🛜 需要互联网连接
# Use progress_apply with tqdm for progress bar
df["generated_answer"] = df.progress_apply(answer_question, axis=1)
df.to_json("local_cache/100_val.json", orient="records", lines=True)
df = pd.read_json("local_cache/100_val.json", orient="records", lines=True)
df
4. 使用微调模型进行微调和回答
完整的微调流程,请参考 OpenAI 微调文档。
4.1 准备微调数据
我们需要准备用于微调的数据。我们将使用与之前相同数据集训练集中的几个样本,但会在上下文中加入答案。这将帮助模型学会从上下文中检索答案。
我们的指令提示与之前相同,系统提示也相同。
def dataframe_to_jsonl(df):
    def create_jsonl_entry(row):
        answer = row["answers"][0] if row["answers"] else "I don't know"
        messages = [
            {"role": "system", "content": "You are a helpful assistant."},
            {
                "role": "user",
                "content": f"""Answer the following Question based on the Context only. Only answer from the Context. If you don't know the answer, say 'I don't know'.
            Question: {row.question}\n\n
            Context: {row.context}\n\n
            Answer:\n""",
            },
            {"role": "assistant", "content": answer},
        ]
        return json.dumps({"messages": messages})

    jsonl_output = df.apply(create_jsonl_entry, axis=1)
    return "\n".join(jsonl_output)

train_sample = get_diverse_sample(train_df, sample_size=100, random_state=42)

with open("local_cache/100_train.jsonl", "w") as f:
    f.write(dataframe_to_jsonl(train_sample))
提示:💡 验证微调数据
你可以查看这个 cookbook 以了解有关如何准备微调数据的更多详细信息。
4.2 微调 OpenAI 模型
如果你是 OpenAI 模型微调的新手,请参阅 如何微调 Chat 模型 notebook。你也可以参阅 OpenAI 微调文档 以了解更多详细信息。
class OpenAIFineTuner:
    """
    Class to fine tune OpenAI models
    """
    def __init__(self, training_file_path, model_name, suffix):
        self.training_file_path = training_file_path
        self.model_name = model_name
        self.suffix = suffix
        self.file_object = None
        self.fine_tuning_job = None
        self.model_id = None

    def create_openai_file(self):
        self.file_object = client.files.create(
            file=open(self.training_file_path, "rb"),
            purpose="fine-tune",
        )

    def wait_for_file_processing(self, sleep_time=20):
        while self.file_object.status != 'processed':
            time.sleep(sleep_time)
            self.file_object.refresh()
            print("File Status: ", self.file_object.status)

    def create_fine_tuning_job(self):
        self.fine_tuning_job = client.fine_tuning.jobs.create(
            training_file=self.file_object.id,
            model=self.model_name,
            suffix=self.suffix,
        )

    def wait_for_fine_tuning(self, sleep_time=45):
        while True:
            # Retrieve the latest fine-tuning job status
            self.fine_tuning_job = client.fine_tuning.jobs.retrieve(self.fine_tuning_job.id)
            print("Job Status:", self.fine_tuning_job.status)
            if self.fine_tuning_job.status in {'succeeded', 'failed', 'cancelled'}:
                break
            time.sleep(sleep_time)

    def retrieve_fine_tuned_model(self):
        self.model_id = client.fine_tuning.jobs.retrieve(self.fine_tuning_job.id).fine_tuned_model
        return self.model_id

    def fine_tune_model(self):
        self.create_openai_file()
        self.wait_for_file_processing()
        self.create_fine_tuning_job()
        self.wait_for_fine_tuning()
        return self.retrieve_fine_tuned_model()

fine_tuner = OpenAIFineTuner(
        training_file_path="local_cache/100_train.jsonl",
        model_name="gpt-3.5-turbo",
        suffix="100trn20230907"
    )
⏰ 运行时间:约 10-20 分钟,🛜 需要互联网连接
model_id = fine_tuner.fine_tune_model()
model_id
4.2.1 试用微调后的模型
让我们在之前相同的验证集上试用微调后的模型。你将使用与之前相同的提示,但这次使用的是微调后的模型,而不是基础模型。在开始之前,你可以先进行一次简单的调用,以了解微调模型的表现如何。
completion = client.chat.completions.create(
    model=model_id,
    messages=[
        {"role": "system", "content": "You are a helpful assistant."},
        {"role": "user", "content": "Hello!"},
        {"role": "assistant", "content": "Hi, how can I help you today?"},
        {
            "role": "user",
            "content": "Can you answer the following question based on the given context? If not, say, I don't know:\n\nQuestion: What is the capital of France?\n\nContext: The capital of Mars is Gaia. Answer:",
        },
    ],
)

print(completion.choices[0].message)
4.3 使用微调后的模型进行回答
这与之前相同,但您将使用微调后的模型而非基础模型。
⏰ 运行时间:约 5 分钟,🛜 需要互联网连接
df["ft_generated_answer"] = df.progress_apply(answer_question, model=model_id, axis=1)
5. 评估:模型表现如何?
为了评估模型的表现,将预测答案与实际答案进行比较——如果预测答案中包含任何一个实际答案,则视为匹配。我们还创建了错误类别,以帮助您了解模型在哪些方面存在困难。
当我们知道上下文中存在正确答案时,我们可以衡量模型的表现,有 3 种可能的结果:
- ✅ 正确回答:模型给出了正确答案。它可能还包含了上下文中不存在的其他答案。
- ❎ 跳过:当答案存在于上下文中时,模型回答“我不知道”(IDK)。这比给出错误答案要好。对于模型来说,说“我不知道”比给出错误答案更好。在我们的设计中,我们知道存在真实答案,因此能够衡量这一点——但情况并非总是如此。*这是模型错误*。我们将其从总体错误率中排除。
- ❌ 错误:模型给出了不正确的答案。这是模型错误。
当我们知道上下文中不存在正确答案时,我们可以衡量模型的表现,有 2 种可能的结果:
- ❌ 幻觉:当预期回答“我不知道”时,模型却给出了一个答案。这是模型错误。
- ✅ 我不知道:模型回答“我不知道”(IDK),且答案不在上下文中。这是模型成功。
import pandas as pd
import seaborn as sns
import matplotlib.pyplot as plt

class Evaluator:
    def __init__(self, df):
        self.df = df
        self.y_pred = pd.Series()  # Initialize as empty Series
        self.labels_answer_expected = ["✅ Answered Correctly", "❎ Skipped", "❌ Wrong Answer"]
        self.labels_idk_expected = ["❌ Hallucination", "✅ I don't know"]

    def _evaluate_answer_expected(self, row, answers_column):
        generated_answer = row[answers_column].lower()
        actual_answers = [ans.lower() for ans in row["answers"]]
        return (
            "✅ Answered Correctly" if any(ans in generated_answer for ans in actual_answers)
            else "❎ Skipped" if generated_answer == "i don't know"
            else "❌ Wrong Answer"
        )

    def _evaluate_idk_expected(self, row, answers_column):
        generated_answer = row[answers_column].lower()
        return (
            "❌ Hallucination" if generated_answer != "i don't know"
            else "✅ I don't know"
        )

    def _evaluate_single_row(self, row, answers_column):
        is_impossible = row["is_impossible"]
        return (
            self._evaluate_answer_expected(row, answers_column) if not is_impossible
            else self._evaluate_idk_expected(row, answers_column)
        )

    def evaluate_model(self, answers_column="generated_answer"):
        self.y_pred = pd.Series(self.df.apply(self._evaluate_single_row, answers_column=answers_column, axis=1))
        freq_series = self.y_pred.value_counts()

        # Counting rows for each scenario
        total_answer_expected = len(self.df[self.df['is_impossible'] == False])
        total_idk_expected = len(self.df[self.df['is_impossible'] == True])

        freq_answer_expected = (freq_series / total_answer_expected * 100).round(2).reindex(self.labels_answer_expected, fill_value=0)
        freq_idk_expected = (freq_series / total_idk_expected * 100).round(2).reindex(self.labels_idk_expected, fill_value=0)
        return freq_answer_expected.to_dict(), freq_idk_expected.to_dict()

    def print_eval(self):
        answer_columns=["generated_answer", "ft_generated_answer"]
        baseline_correctness, baseline_idk = self.evaluate_model()
        ft_correctness, ft_idk = self.evaluate_model(self.df, answer_columns[1])
        print("When the model should answer correctly:")
        eval_df = pd.merge(
            baseline_correctness.rename("Baseline"),
            ft_correctness.rename("Fine-Tuned"),
            left_index=True,
            right_index=True,
        )
        print(eval_df)
        print("\n\n\nWhen the model should say 'I don't know':")
        eval_df = pd.merge(
            baseline_idk.rename("Baseline"),
            ft_idk.rename("Fine-Tuned"),
            left_index=True,
            right_index=True,
        )
        print(eval_df)

    def plot_model_comparison(self, answer_columns=["generated_answer", "ft_generated_answer"], scenario="answer_expected", nice_names=["Baseline", "Fine-Tuned"]):

        results = []
        for col in answer_columns:
            answer_expected, idk_expected = self.evaluate_model(col)
            if scenario == "answer_expected":
                results.append(answer_expected)
            elif scenario == "idk_expected":
                results.append(idk_expected)
            else:
                raise ValueError("Invalid scenario")


        results_df = pd.DataFrame(results, index=nice_names)
        if scenario == "answer_expected":
            results_df = results_df.reindex(self.labels_answer_expected, axis=1)
        elif scenario == "idk_expected":
            results_df = results_df.reindex(self.labels_idk_expected, axis=1)

        melted_df = results_df.reset_index().melt(id_vars='index', var_name='Status', value_name='Frequency')
        sns.set_theme(style="whitegrid", palette="icefire")
        g = sns.catplot(data=melted_df, x='Frequency', y='index', hue='Status', kind='bar', height=5, aspect=2)

        # Annotating each bar
        for p in g.ax.patches:
            g.ax.annotate(f"{p.get_width():.0f}%", (p.get_width()+5, p.get_y() + p.get_height() / 2),
                        textcoords="offset points",
                        xytext=(0, 0),
                        ha='center', va='center')
        plt.ylabel("Model")
        plt.xlabel("Percentage")
        plt.xlim(0, 100)
        plt.tight_layout()
        plt.title(scenario.replace("_", " ").title())
        plt.show()


# Compare the results by merging into one dataframe
evaluator = Evaluator(df)
# evaluator.evaluate_model(answers_column="ft_generated_answer")
# evaluator.plot_model_comparison(["generated_answer", "ft_generated_answer"], scenario="answer_expected", nice_names=["Baseline", "Fine-Tuned"])
# Optionally, save the results to a JSON file
df.to_json("local_cache/100_val_ft.json", orient="records", lines=True)
df = pd.read_json("local_cache/100_val_ft.json", orient="records", lines=True)
evaluator.plot_model_comparison(["generated_answer", "ft_generated_answer"], scenario="answer_expected", nice_names=["Baseline", "Fine-Tuned"])
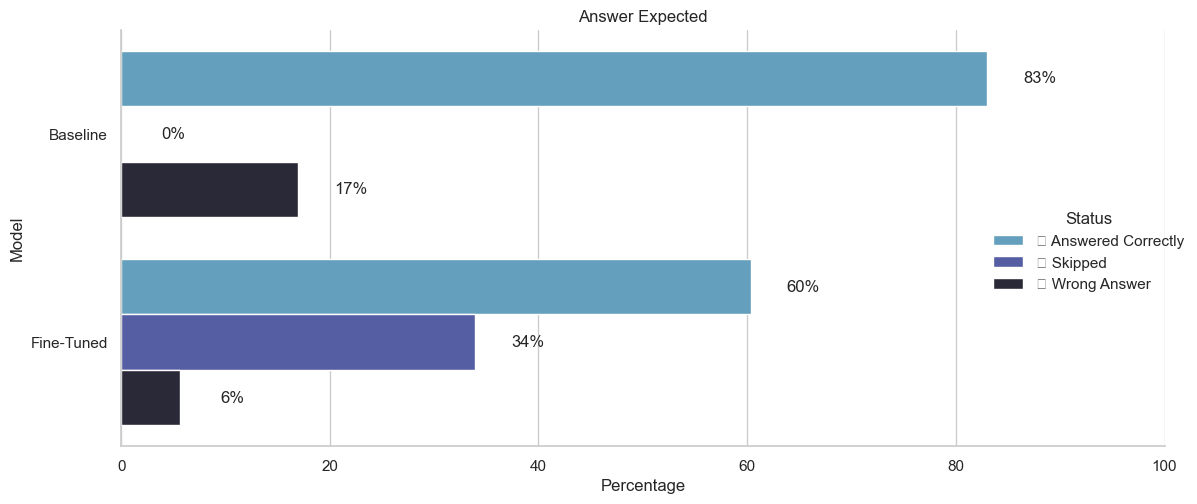
注意,微调后的模型更频繁地跳过问题——并且犯的错误更少。这是因为微调后的模型更加保守,当它不确定时会跳过问题。
evaluator.plot_model_comparison(["generated_answer", "ft_generated_answer"], scenario="idk_expected", nice_names=["Baseline", "Fine-Tuned"])
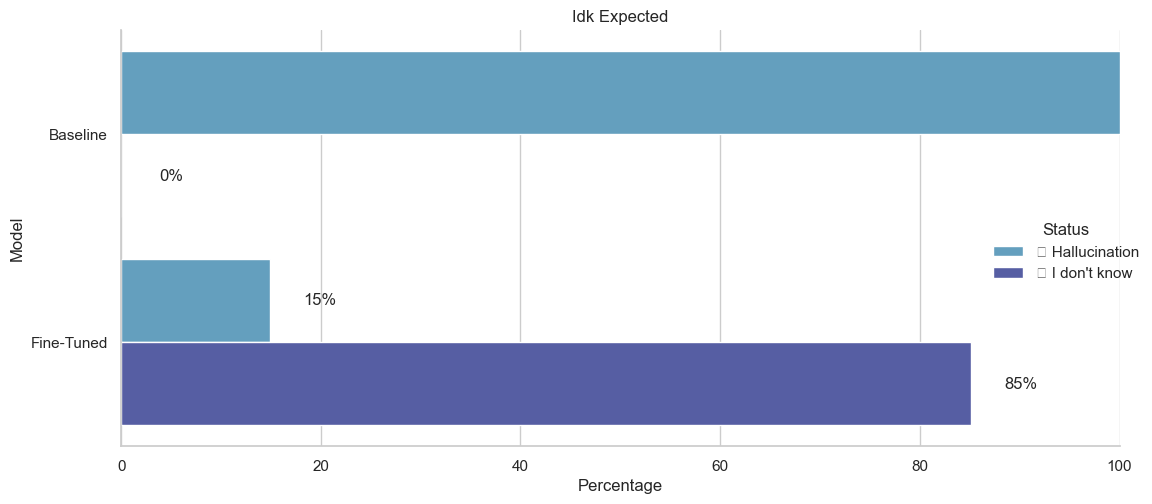
注意,微调后的模型比提示词更好地学会了说“我不知道”。或者说,模型已经擅长跳过问题。
观察结果
- 微调后的模型更擅长说“我不知道”
- 通过微调,幻觉从 100% 下降到 15%
- 通过微调,错误答案从 17% 下降到 6%
通过微调,正确答案也从 83% 下降到 60%——这是因为微调后的模型更加保守,更频繁地说“我不知道”。这是一件好事,因为说“我不知道”比给出错误答案更好。
话虽如此,我们希望提高模型的正确性,即使这会增加幻觉。我们正在寻找一个既正确又保守的模型,在两者之间取得平衡。我们将使用 Qdrant 和少样本学习来实现这一目标。
💪 你已经完成了三分之二!继续阅读!
第 B 部分:少样本学习
我们将从数据集中选取几个示例,包括答案不在上下文中的情况。然后,我们将使用这些示例来创建一个提示,用于微调模型。接着,我们将衡量微调后模型的性能。
接下来是什么?
- 使用 Qdrant 微调 OpenAI 模型
- 1 嵌入微调数据
- 2 嵌入问题
- 使用 Qdrant 改进 RAG 提示
- 评估
6. 使用 Qdrant 微调 OpenAI 模型
到目前为止,我们一直在使用 OpenAI 模型回答问题,而没有使用答案示例。上一步让它在上下文示例上表现更好,而这一步则帮助它泛化到未见过的数据,并尝试学习何时说“我不知道”以及何时给出答案。
这就是少样本学习的用武之地!
少样本学习是一种迁移学习,它允许我们回答那些答案不在上下文中的问题。我们可以通过提供几个我们正在寻找的答案示例来实现这一点,模型将学会回答那些答案不在上下文中的问题。
5.1 嵌入训练数据
嵌入是一种将句子表示为浮点数数组的方法。我们将使用嵌入来找到与我们要查找的问题最相似的问题。
import os
from qdrant_client import QdrantClient
from qdrant_client.http import models
from qdrant_client.http.models import PointStruct
from qdrant_client.http.models import Distance, VectorParams
现在我们已经完成了 Qdrant 的导入,
qdrant_client = QdrantClient(
    url=os.getenv("QDRANT_URL"), api_key=os.getenv("QDRANT_API_KEY"), timeout=6000, prefer_grpc=True
)

collection_name = "squadv2-cookbook"

# # Create the collection, run this only once
# qdrant_client.recreate_collection(
#     collection_name=collection_name,
#     vectors_config=VectorParams(size=384, distance=Distance.COSINE),
# )
from fastembed.embedding import DefaultEmbedding
from typing import List
import numpy as np
import pandas as pd
from tqdm.notebook import tqdm

tqdm.pandas()

embedding_model = DefaultEmbedding()
5.2 嵌入问题
接下来,你将嵌入整个训练集的问题。你将利用问题与问题之间的相似性,来找到与我们正在寻找的问题最相似的问题。这是一种在 RAG 中常用的工作流程,旨在利用 OpenAI 模型的上下文学习能力,通过更多示例来提升效果。这就是我们所说的 Few Shot Learning(少样本学习)。
❗️⏰ 重要提示:此步骤可能需要长达 3 小时才能完成。请耐心等待。如果你遇到内存不足错误或内核崩溃,请将批量大小减小到 32,重启内核并重新运行 notebook。此代码只需运行一次。
generate_points_from_dataframe 函数详解
- 初始化:
batch_size = 512和total_batches为一次处理多少个问题奠定了基础。这是为了防止内存问题。如果你的机器能处理更多,可以随意增加批量大小。如果内核崩溃,请将批量大小减小到 32 并重试。 - 进度条:
tqdm为你提供一个漂亮的进度条,这样你就不会睡着了。 - 批量循环:for 循环遍历批次。
start_idx和end_idx定义了要处理的 DataFrame 切片。 - 生成嵌入:
batch_embeddings = embedding_model.embed(batch, batch_size=batch_size)—— 奇迹发生的地方。你的问题被转换为嵌入。 - 生成 PointStruct:使用
.progress_apply,它将每一行转换为一个PointStruct对象。这包括一个 ID、嵌入向量和其他元数据。
返回 PointStruct 对象的列表,可用于在 Qdrant 中创建集合。
def generate_points_from_dataframe(df: pd.DataFrame) -> List[PointStruct]:
    batch_size = 512
    questions = df["question"].tolist()
    total_batches = len(questions) // batch_size + 1

    pbar = tqdm(total=len(questions), desc="Generating embeddings")

    # Generate embeddings in batches to improve performance
    embeddings = []
    for i in range(total_batches):
        start_idx = i * batch_size
        end_idx = min((i + 1) * batch_size, len(questions))
        batch = questions[start_idx:end_idx]

        batch_embeddings = embedding_model.embed(batch, batch_size=batch_size)
        embeddings.extend(batch_embeddings)
        pbar.update(len(batch))

    pbar.close()

    # Convert embeddings to list of lists
    embeddings_list = [embedding.tolist() for embedding in embeddings]

    # Create a temporary DataFrame to hold the embeddings and existing DataFrame columns
    temp_df = df.copy()
    temp_df["embeddings"] = embeddings_list
    temp_df["id"] = temp_df.index

    # Generate PointStruct objects using DataFrame apply method
    points = temp_df.progress_apply(
        lambda row: PointStruct(
            id=row["id"],
            vector=row["embeddings"],
            payload={
                "question": row["question"],
                "title": row["title"],
                "context": row["context"],
                "is_impossible": row["is_impossible"],
                "answers": row["answers"],
            },
        ),
        axis=1,
    ).tolist()

    return points

points = generate_points_from_dataframe(train_df)
将嵌入上传至 Qdrant
请注意,配置 Qdrant 不在本笔记本的讨论范围内。更多信息请参阅 Qdrant。我们为上传设置了 600 秒的超时时间,并使用 gRPC 压缩来加速上传。
operation_info = qdrant_client.upsert(
    collection_name=collection_name, wait=True, points=points
)
print(operation_info)
6. 使用 Qdrant 改进 RAG 提示词
现在我们已经将嵌入上传到 Qdrant,我们可以使用 Qdrant 来找到与我们正在寻找的问题最相似的问题。我们将使用最相似的前 5 个问题来创建一个提示词,用于微调模型。然后,我们将在相同的验证集上衡量微调后模型的性能,但使用少样本提示!
我们的主函数 get_few_shot_prompt 是生成少样本学习提示词的核心工具。它通过使用嵌入模型从 Qdrant(一个向量搜索引擎)中检索相似问题来实现这一点。以下是高层工作流程:
- 从 Qdrant 中检索上下文中存在答案的相似问题
- 从 Qdrant 中检索上下文中不可能找到答案的相似问题,即预期答案为“我不知道”
- 使用检索到的问题创建提示词
- 使用提示词微调模型
- 使用相同的提示技术,在验证集上评估微调后的模型
def get_few_shot_prompt(row):

    query, row_context = row["question"], row["context"]

    embeddings = list(embedding_model.embed([query]))
    query_embedding = embeddings[0].tolist()

    num_of_qa_to_retrieve = 5

    # Query Qdrant for similar questions that have an answer
    q1 = qdrant_client.search(
        collection_name=collection_name,
        query_vector=query_embedding,
        with_payload=True,
        limit=num_of_qa_to_retrieve,
        query_filter=models.Filter(
            must=[
                models.FieldCondition(
                    key="is_impossible",
                    match=models.MatchValue(
                        value=False,
                    ),
                ),
            ],
        )
    )

    # Query Qdrant for similar questions that are IMPOSSIBLE to answer
    q2 = qdrant_client.search(
        collection_name=collection_name,
        query_vector=query_embedding,
        query_filter=models.Filter(
            must=[
                models.FieldCondition(
                    key="is_impossible",
                    match=models.MatchValue(
                        value=True,
                    ),
                ),
            ]
        ),
        with_payload=True,
        limit=num_of_qa_to_retrieve,
    )


    instruction = """Answer the following Question based on the Context only. Only answer from the Context. If you don't know the answer, say 'I don't know'.\n\n"""
    # If there is a next best question, add it to the prompt

    def q_to_prompt(q):
        question, context = q.payload["question"], q.payload["context"]
        answer = q.payload["answers"][0] if len(q.payload["answers"]) > 0 else "I don't know"
        return [
            {
                "role": "user",
                "content": f"""Question: {question}\n\nContext: {context}\n\nAnswer:"""
            },
            {"role": "assistant", "content": answer},
        ]

    rag_prompt = []

    if len(q1) >= 1:
        rag_prompt += q_to_prompt(q1[1])
    if len(q2) >= 1:
        rag_prompt += q_to_prompt(q2[1])
    if len(q1) >= 1:
        rag_prompt += q_to_prompt(q1[2])


    rag_prompt += [
        {
            "role": "user",
            "content": f"""Question: {query}\n\nContext: {row_context}\n\nAnswer:"""
        },
    ]

    rag_prompt = [{"role": "system", "content": instruction}] + rag_prompt
    return rag_prompt
# ⏰ Time: 2 min
train_sample["few_shot_prompt"] = train_sample.progress_apply(get_few_shot_prompt, axis=1)
7. 使用 Qdrant 微调 OpenAI 模型
7.1 将微调数据上传至 OpenAI
# Prepare the OpenAI File format i.e. JSONL from train_sample
def dataframe_to_jsonl(df):
    def create_jsonl_entry(row):
        messages = row["few_shot_prompt"]
        return json.dumps({"messages": messages})

    jsonl_output = df.progress_apply(create_jsonl_entry, axis=1)
    return "\n".join(jsonl_output)

with open("local_cache/100_train_few_shot.jsonl", "w") as f:
    f.write(dataframe_to_jsonl(train_sample))
7.2 微调模型
⏰ 运行时间:约 15-30 分钟
fine_tuner = OpenAIFineTuner(
        training_file_path="local_cache/100_train_few_shot.jsonl",
        model_name="gpt-3.5-turbo",
        suffix="trnfewshot20230907"
    )

model_id = fine_tuner.fine_tune_model()
model_id
# Let's try this out
completion = client.chat.completions.create(
    model=model_id,
    messages=[
        {"role": "system", "content": "You are a helpful assistant."},
        {
            "role": "user",
            "content": "Can you answer the following question based on the given context? If not, say, I don't know:\n\nQuestion: What is the capital of France?\n\nContext: The capital of Mars is Gaia. Answer:",
        },
        {
            "role": "assistant",
            "content": "I don't know",
        },
        {
            "role": "user",
            "content": "Question: Where did Maharana Pratap die?\n\nContext: Rana Pratap's defiance of the mighty Mughal empire, almost alone and unaided by the other Rajput states, constitute a glorious saga of Rajput valour and the spirit of self sacrifice for cherished principles. Rana Pratap's methods of guerrilla warfare was later elaborated further by Malik Ambar, the Deccani general, and by Emperor Shivaji.\nAnswer:",
        },
        {
            "role": "assistant",
            "content": "I don't know",
        },
        {
            "role": "user",
            "content": "Question: Who did Rana Pratap fight against?\n\nContext: In stark contrast to other Rajput rulers who accommodated and formed alliances with the various Muslim dynasties in the subcontinent, by the time Pratap ascended to the throne, Mewar was going through a long standing conflict with the Mughals which started with the defeat of his grandfather Rana Sanga in the Battle of Khanwa in 1527 and continued with the defeat of his father Udai Singh II in Siege of Chittorgarh in 1568. Pratap Singh, gained distinction for his refusal to form any political alliance with the Mughal Empire and his resistance to Muslim domination. The conflicts between Pratap Singh and Akbar led to the Battle of Haldighati. Answer:",
        },
        {
            "role": "assistant",
            "content": "Akbar",
        },
        {
            "role": "user",
            "content": "Question: Which state is Chittorgarh in?\n\nContext: Chittorgarh, located in the southern part of the state of Rajasthan, 233 km (144.8 mi) from Ajmer, midway between Delhi and Mumbai on the National Highway 8 (India) in the road network of Golden Quadrilateral. Chittorgarh is situated where National Highways No. 76 & 79 intersect. Answer:",
        },
    ],
)
print("Correct Answer: Rajasthan\nModel Answer:")
print(completion.choices[0].message)
⏰ 运行时间:5-15 分钟
df["ft_generated_answer_few_shot"] = df.progress_apply(answer_question, model=model_id, prompt_func=get_few_shot_prompt, axis=1)
df.to_json("local_cache/100_val_ft_few_shot.json", orient="records", lines=True)
8. 评估
但模型的表现如何?让我们比较一下目前看过的 3 个不同模型的结果:
evaluator = Evaluator(df)
evaluator.plot_model_comparison(["generated_answer", "ft_generated_answer", "ft_generated_answer_few_shot"], scenario="answer_expected", nice_names=["Baseline", "Fine-Tuned", "Fine-Tuned with Few-Shot"])
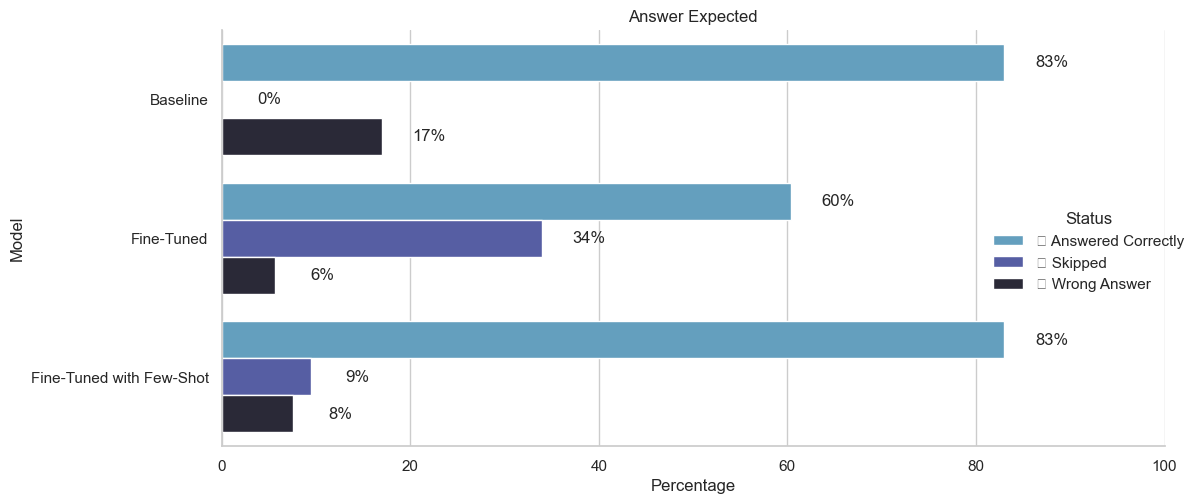
这相当令人惊叹——我们能够兼得两者的优势!我们能够让模型既准确又保守:
- 模型有 83% 的时间是正确的——这与基础模型相同
- 模型只有 8% 的时间给出错误答案——相比基础模型的 17% 有所下降
接下来,让我们看看幻觉问题。我们希望减少幻觉,但不能以牺牲正确性为代价。我们希望在两者之间取得平衡。我们在这里取得了良好的平衡:
- 模型有 53% 的时间产生幻觉——相比基础模型的 100% 有所下降
- 模型有 47% 的时间说“我不知道”——相比基础模型的从不如此有所上升
evaluator.plot_model_comparison(["generated_answer", "ft_generated_answer", "ft_generated_answer_few_shot"], scenario="idk_expected", nice_names=["Baseline", "Fine-Tuned", "Fine-Tuned with Few-Shot"])
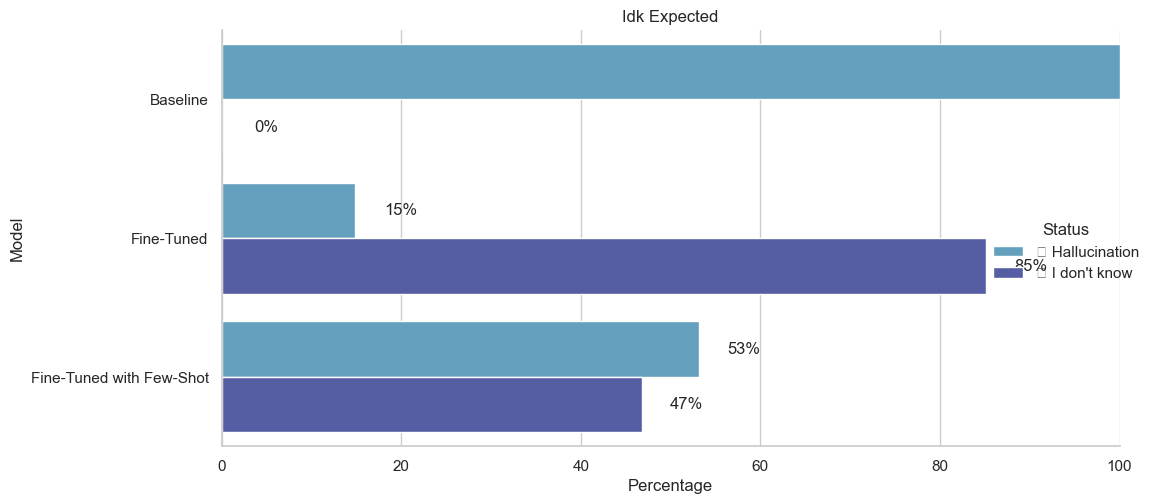
使用 Qdrant 进行 Few Shot 微调是控制和引导 RAG 系统性能的好方法。在这里,我们通过使用 Qdrant 查找相似问题,使模型相比零样本更少保守、更加自信。
你也可以使用 Qdrant 让模型更加保守。我们通过提供上下文中不存在答案的问题示例来实现这一点。
这会使模型更倾向于说“我不知道”。
同样,也可以使用 Qdrant 通过提供上下文中存在答案的问题示例,让模型更加自信。这会使模型更倾向于给出答案。代价是模型也会更频繁地产生幻觉。
你可以通过调整训练数据来权衡这一点:问题和示例的分布,以及从 Qdrant 中检索的示例种类和数量。
9. 结论
在本 notebook 中,我们演示了如何针对特定用例微调 OpenAI 模型。我们还演示了如何使用 Qdrant 和 Few-Shot Learning 来提高模型性能。
汇总结果
到目前为止,我们分别查看了每个场景的结果,即每个场景的总和为 100。让我们从汇总的角度查看结果,以更全面地了解模型的表现:
| 类别 | 基础 | 微调 | 使用 Qdrant 微调 |
| --- | --- | --- | --- |
| 正确 | 44% | 32% | 44% |
| 跳过 | 0% | 18% | 5% |
| 错误 | 9% | 3% | 4% |
| 幻觉 | 47% | 7% | 25% |
| 我不知道 | 0% | 40% | 22% |
观察结果
与基础模型相比
- 使用 Qdrant 进行少样本微调的模型在回答上下文中存在答案的问题时,与基础模型表现相当。
- 使用 Qdrant 进行少样本微调的模型在上下文中不存在答案时,更擅长说“我不知道”。
- 使用 Qdrant 进行少样本微调的模型更擅长减少幻觉。
与微调模型相比
- 使用 Qdrant 进行少样本微调的模型比微调模型获得更多正确答案:83% 的问题被正确回答,而微调模型为 60%
- 使用 Qdrant 进行少样本微调的模型在上下文中不存在答案时,更擅长决定何时说“我不知道”。普通微调模式的跳过率为 34%,而使用 Qdrant 进行少样本微调的模型为 9%
现在,你应该能够:
- 注意到正确答案数量与幻觉之间的权衡——以及训练数据集选择如何影响这一点!
- 针对特定用例微调 OpenAI 模型,并使用 Qdrant 提升 RAG 模型的性能
- 开始了解如何评估 RAG 模型的性能
常见问题
常见错误:1. API密钥未设置或无效;2. Qdrant连接超时,检查URL和API密钥;3. 内存不足,减小批量大小;4. 微调数据格式错误,确保JSONL格式正确;5. 模型生成答案不符合预期,调整提示或温度参数。排查方法:检查环境变量、日志输出、数据样本。生产优化:使用异步请求、缓存嵌入、批量处理、监控API用量和成本。
企业应用扩展
可扩展方向:1. 使用更高效的嵌入模型(如text-embedding-3-small);2. 结合其他向量数据库(如Pinecone、Weaviate);3. 实现动态少样本选择,根据问题类型调整示例;4. 加入重排序模块提升检索质量;5. 自动化评估流水线,持续监控模型性能;6. 探索多模态RAG,处理图像和文本。
总结
本教程面向有编程基础的开发者,详细讲解如何通过微调OpenAI模型和利用Qdrant向量搜索引擎提升RAG系统性能。内容涵盖环境搭建、数据准备、零样本与少样本学习、模型微调、评估及优化。通过SQuAD数据集实践,展示如何减少幻觉、提高答案准确性,并平衡正确性与保守性。读者将掌握RAG工程化的核心步骤与调优技巧。
- --
内容来源与验证
- 内容等级:PREMIUM_A
- 质量等级:A
- 难度:中级
- 验证等级:V1
- 原文作者:NirantK
- 原文日期:2023-09-04
- 来源许可:MIT
- 来源版本:
52b10e24c8b9aada6201def23eb67f7cd06acd1d - 查看原文
站内还有更多完整实战教程
加入会员,解锁全部教程、完整代码与持续更新内容。
加入会员