GPT Image教程:用API生成和编辑图像
技术背景
传统图像生成模型(如 DALL·E 2/3)在指令遵循和照片级真实感方面存在明显不足,开发者往往需要反复调整提示词才能获得可用结果。GPT Image(gpt-image-1)作为具备世界知识的大语言模型驱动的图像生成模型,能够理解复杂、详细的自然语言指令,并生成高度符合描述的真实感图像。它解决了从文本到图像、从图像到图像编辑的工程化需求,适用于内容创作、电商素材生成、游戏角色设计、UI 资源制作等场景。主要限制包括:API 调用成本、生成延迟、对蒙版精度的依赖,以及透明背景仅支持 PNG/WEBP 格式。
核心原理
GPT Image 基于多模态大语言模型架构,将文本提示和可选输入图像编码为统一表示,通过扩散或类似生成机制输出图像。核心数据流为:客户端构造请求(prompt、size、quality、output_format 等参数)→ OpenAI API 接收并处理 → 模型生成图像 → 返回 base64 编码的 b64_json → 客户端解码为字节流 → 使用 PIL 打开、缩放、压缩并保存。编辑模式下,image 数组最多传入 10 张图像,mask 参数应用于第一张图像,模型仅编辑未被蒙版覆盖的区域。蒙版需包含 alpha 通道,白色区域表示保留,黑色区域表示可编辑。关键设计决策包括:默认返回 base64 而非 URL,便于直接处理;支持 output_compression 控制文件大小;background 参数支持透明背景。
架构分析
系统采用客户端-服务端架构。客户端使用 openai Python SDK 封装 HTTP 请求,通过 client.images.generate 和 client.images.edit 两个核心接口分别处理生成与编辑任务。生成接口接收 prompt、model、size、quality、output_format、output_compression、background 等参数;编辑接口额外接收 image(单张或多张)和 mask。服务端由 OpenAI 托管,负责模型推理与图像编码。客户端侧使用 PIL 进行图像解码、缩放(LANCZOS 重采样)、格式转换(JPEG/PNG)和压缩,使用 BytesIO 处理内存中的字节流,使用 IPython.display 在 Notebook 中展示结果。整体设计强调轻量级集成,开发者无需管理 GPU 或模型部署,只需关注提示词工程和参数调优。
完整实战教程
使用GPT Image生成和编辑图像
在本指南中,你将学习如何使用 GPT Image——我们全新的具备图像生成能力的大语言模型。
该模型拥有世界知识,能够利用这种对世界的广泛理解来生成图像。
与我们上一代图像模型 DallE 2 和 3 相比,它在指令遵循和生成照片级真实感图像方面也出色得多。
要了解更多关于图像生成的内容,请参阅我们的指南。
设置
%pip install pillow openai -U
import base64
import os
from openai import OpenAI
from PIL import Image
from io import BytesIO
from IPython.display import Image as IPImage, display
client = OpenAI()
# Set your API key if not set globally
#client = OpenAI(api_key=os.environ.get("OPENAI_API_KEY", "<your OpenAI API key if not set as env var>"))
# Create imgs/ folder
folder_path = "imgs"
os.makedirs(folder_path, exist_ok=True)
生成图像
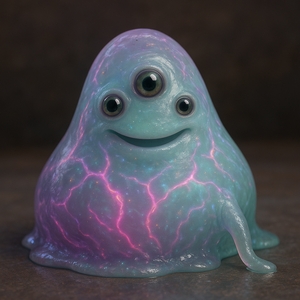
GPT Image 1 非常擅长遵循指令,这意味着你可以通过非常详细的指令提示模型生成图像。
prompt1 = """
Render a realistic image of this character:
Blobby Alien Character Spec Name: Glorptak (or nickname: "Glorp")
Visual Appearance Body Shape: Amorphous and gelatinous. Overall silhouette resembles a teardrop or melting marshmallow, shifting slightly over time. Can squish and elongate when emotional or startled.
Material Texture: Semi-translucent, bio-luminescent goo with a jelly-like wobble. Surface occasionally ripples when communicating or moving quickly.
Color Palette:
- Base: Iridescent lavender or seafoam green
- Accents: Subsurface glowing veins of neon pink, electric blue, or golden yellow
- Mood-based color shifts (anger = dark red, joy = bright aqua, fear = pale gray)
Facial Features:
- Eyes: 3–5 asymmetrical floating orbs inside the blob that rotate or blink independently
- Mouth: Optional—appears as a rippling crescent on the surface when speaking or emoting
- No visible nose or ears; uses vibration-sensitive receptors embedded in goo
- Limbs: None by default, but can extrude pseudopods (tentacle-like limbs) when needed for interaction or locomotion. Can manifest temporary feet or hands.
Movement & Behavior Locomotion:
- Slides, bounces, and rolls.
- Can stick to walls and ceilings via suction. When scared, may flatten and ooze away quickly.
Mannerisms:
- Constant wiggling or wobbling even at rest
- Leaves harmless glowing slime trails
- Tends to absorb nearby small objects temporarily out of curiosity
"""

img_path1 = "imgs/glorptak.jpg"
# Generate the image
result1 = client.images.generate(
    model="gpt-image-1",
    prompt=prompt1,
    size="1024x1024"
)
# Save the image to a file and resize/compress for smaller files
image_base64 = result1.data[0].b64_json
image_bytes = base64.b64decode(image_base64)

# Adjust this if you want a high-quality Glorptak
image = Image.open(BytesIO(image_bytes))
image = image.resize((300, 300), Image.LANCZOS)
image.save(img_path1, format="JPEG", quality=80, optimize=True)
# Show the result
display(IPImage(img_path1))
自定义输出
你可以自定义以下输出属性:
- 质量可以是
low、medium、high或auto(默认值) - 尺寸可以是
1024x1024(正方形)、1536x1024(纵向)、1024x1536(横向)或auto(默认) - 你可以调整 JPEG 和 WEBP 格式的压缩级别(从 0-100%)
- 你可以选择生成具有透明背景的图像(仅适用于 PNG 或 WEBP)
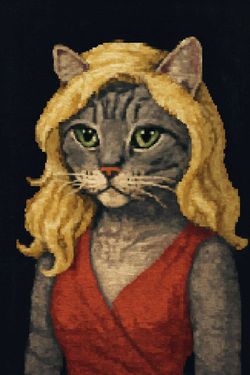
prompt2 = "generate a portrait, pixel-art style, of a grey tabby cat dressed as a blond woman on a dark background."
img_path2 = "imgs/cat_portrait_pixel.jpg"
# Generate the image
result2 = client.images.generate(
    model="gpt-image-1",
    prompt=prompt2,
    quality="low",
    output_compression=50,
    output_format="jpeg",
    size="1024x1536"
)
# Save the image to a file and resize/compress for smaller files
image_base64 = result2.data[0].b64_json
image_bytes = base64.b64decode(image_base64)

image = Image.open(BytesIO(image_bytes))
image = image.resize((250, 375), Image.LANCZOS)
image.save(img_path2, format="JPEG", quality=80, optimize=True)
# Show the result
display(IPImage(img_path2))
透明背景
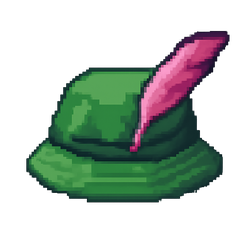
你可以使用 background 属性来请求透明背景,但如果你在提示词中说明想要透明背景,它默认会被设置为 transparent。
prompt3 = "generate a pixel-art style picture of a green bucket hat with a pink quill on a transparent background."
img_path3 = "imgs/hat.png"
result3 = client.images.generate(
    model="gpt-image-1",
    prompt=prompt3,
    quality="low",
    output_format="png",
    size="1024x1024"
)
image_base64 = result3.data[0].b64_json
image_bytes = base64.b64decode(image_base64)
# Save the image to a file and resize/compress for smaller files
image_base64 = result3.data[0].b64_json
image_bytes = base64.b64decode(image_base64)

image = Image.open(BytesIO(image_bytes))
image = image.resize((250, 250), Image.LANCZOS)
image.save(img_path3, format="PNG")
# Show the result
display(IPImage(img_path3))
编辑图像
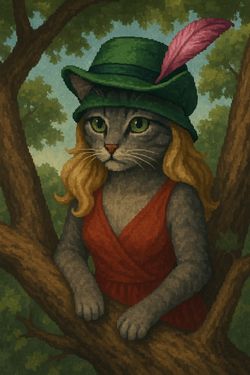
GPT Image 也可以接受图像输入,并利用它们创建新图像。如果你不希望模型更改输入图像的特定部分,还可以提供蒙版。
你最多可以使用 10 张输入图像,如果使用蒙版,它将应用于 image 数组中提供的第一个图像。
prompt_edit = """
Combine the images of the cat and the hat to show the cat wearing the hat while being perched in a tree, still in pixel-art style.
"""
img_path_edit = "imgs/cat_with_hat.jpg"
img1 = open(img_path2, "rb")
img2 = open(img_path3, "rb")
# Generate the new image
result_edit = client.images.edit(
    model="gpt-image-1",
    image=[img1,img2],
    prompt=prompt_edit,
    size="1024x1536"
)
# Save the image to a file and resize/compress for smaller files
image_base64 = result_edit.data[0].b64_json
image_bytes = base64.b64decode(image_base64)

image = Image.open(BytesIO(image_bytes))
image = image.resize((250, 375), Image.LANCZOS)
image.save(img_path_edit, format="JPEG", quality=80, optimize=True)
# Show the result
display(IPImage(img_path_edit))
使用蒙版编辑图像
你还可以在输入图像的同时提供一个蒙版(如果有多个输入图像,蒙版将应用于第一个图像),以便仅编辑输入图像中未被蒙版覆盖的部分。请注意,模型仍可能编辑蒙版内的部分图像,但会尽量避免。
重要提示:蒙版应包含 alpha 通道。如果你是手动生成蒙版,例如使用图像编辑软件,请确保包含此 alpha 通道。
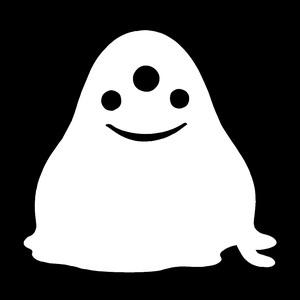
生成掩码
在这个例子中,我们将使用我们的模型自动为我们生成掩码。掩码可能不精确,但对于我们的目的来说已经足够了。
如果你需要精确的掩码,可以随意使用图像分割模型。
img_path_mask = "imgs/mask.png"
prompt_mask = "generate a mask delimiting the entire character in the picture, using white where the character is and black for the background. Return an image in the same size as the input image."
img_input = open(img_path1, "rb")

# Generate the mask
result_mask = client.images.edit(
    model="gpt-image-1",
    image=img_input,
    prompt=prompt_mask
)
# Save the image to a file and resize/compress for smaller files
image_base64 = result_mask.data[0].b64_json
image_bytes = base64.b64decode(image_base64)

image = Image.open(BytesIO(image_bytes))
image = image.resize((300, 300), Image.LANCZOS)
image.save(img_path_mask, format="PNG")
# Show the mask
display(IPImage(img_path_mask))
创建 Alpha 通道
此步骤是可选的,如果你想将黑白图像转换为带有 Alpha 通道的蒙版,以便在 Image Edit API 中使用。
# 1. Load your black & white mask as a grayscale image
mask = Image.open(img_path_mask).convert("L")

# 2. Convert it to RGBA so it has space for an alpha channel
mask_rgba = mask.convert("RGBA")

# 3. Then use the mask itself to fill that alpha channel
mask_rgba.putalpha(mask)

# 4. Convert the mask into bytes
buf = BytesIO()
mask_rgba.save(buf, format="PNG")
mask_bytes = buf.getvalue()
# Save the resulting file
img_path_mask_alpha = "imgs/mask_alpha.png"
with open(img_path_mask_alpha, "wb") as f:
    f.write(mask_bytes)
使用蒙版进行编辑
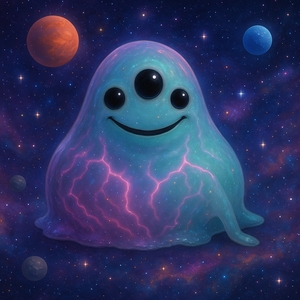
使用蒙版时,提示词必须描述整个生成的图像,而不仅仅是编辑区域。
prompt_mask_edit = "A strange character on a colorful galaxy background, with lots of stars and planets."
mask = open(img_path_mask_alpha, "rb")
result_mask_edit = client.images.edit(
    model="gpt-image-1",
    prompt=prompt_mask_edit,
    image=img_input,
    mask=mask,
    size="1024x1024"
)
# Display result

img_path_mask_edit = "imgs/mask_edit.png"

image_base64 = result_mask_edit.data[0].b64_json
image_bytes = base64.b64decode(image_base64)

image = Image.open(BytesIO(image_bytes))
image = image.resize((300, 300), Image.LANCZOS)
image.save(img_path_mask_edit, format="JPEG", quality=80, optimize=True)

display(IPImage(img_path_mask_edit))
总结
在本指南中,我们了解了如何使用新的图像生成模型 GPT Image 从头生成新图像,或使用参考图像。我们还介绍了如何创建带有 alpha 通道的蒙版并将其应用于输入图像,从而进一步引导图像编辑。
欢迎将此作为起点,探索其他用例。如果你需要一些灵感,请查看我们文档中的图像库。
祝你构建愉快!
常见问题
常见错误包括:1)API Key 未设置或无效,需检查环境变量 OPENAI_API_KEY 或显式传入 api_key;2)蒙版缺少 alpha 通道导致编辑失败,需使用 PIL 的 putalpha 方法将灰度蒙版转换为 RGBA;3)多图编辑时蒙版应用于第一张图像,若顺序错误会导致编辑区域不符预期;4)透明背景请求未生效,需确保 output_format 为 png 或 webp;5)生成图像尺寸与预期不符,需检查 size 参数是否在支持列表中;6)文件保存失败,需确认 imgs/ 目录已创建且具有写权限。排查方法:打印 API 返回的 error 字段、检查 base64 解码是否成功、验证 PIL 打开的图像模式。生产环境优化建议:使用异步请求提高吞吐量、缓存常用提示词结果、对生成图像进行后处理压缩、设置重试机制应对限流、监控 API 调用成本。
企业应用扩展
可进一步探索的方向包括:1)结合图像分割模型(如 SAM)生成精确蒙版,替代模型自动生成的不精确蒙版;2)将 GPT Image 集成到自动化工作流中,如批量生成电商产品图、游戏素材或社交媒体内容;3)使用多图输入实现风格迁移、图像融合和一致性角色生成;4)结合提示词工程优化生成质量,如使用结构化描述、负面提示词和迭代优化;5)探索透明背景图像在 UI 设计、图标制作和合成中的应用;6)将生成结果接入向量数据库或内容管理系统,实现图像资产的检索与复用;7)参考 OpenAI 官方图像库获取更多灵感,并关注模型版本更新带来的新能力。
总结
本教程面向有编程基础的开发者,系统讲解 OpenAI GPT Image(gpt-image-1)的图像生成与编辑能力。内容涵盖环境搭建、API 调用、参数定制(质量、尺寸、压缩、透明背景)、多图输入编辑、蒙版生成与 Alpha 通道处理等完整流程。通过可执行代码示例,帮助读者掌握从零生成图像、基于参考图编辑以及使用蒙版精确控制编辑区域的核心方法,并补充常见错误排查与生产环境优化建议,适合希望将图像生成能力集成到实际 AI 工程中的开发者学习。
- --
内容来源与验证
- 内容等级:PREMIUM_A
- 质量等级:A
- 难度:初级
- 验证等级:V1
- 原文作者:katiagg
- 原文日期:2025-04-23
- 来源许可:MIT
- 来源版本:
29a46cd86c574fe843a885ae08b8fd354b68b862 - 查看原文
站内还有更多完整实战教程
加入会员,解锁全部教程、完整代码与持续更新内容。
加入会员