基于MCP的智能语音代理框架
技术背景
随着LLM应用的普及,代理(Agent)成为编排复杂工作流的关键。然而,工具碎片化、集成复杂性和后端系统编排需求使得构建健壮、可扩展的语音代理充满挑战。MCP作为开放协议,标准化了AI模型与外部工具、数据源和上下文提供者的交互,解决了代理逻辑与工具实现的耦合问题,支持安全、模块化、可组合的架构。语音交互作为自然的人机界面,在客户支持、内部帮助台等场景需求旺盛,但需要低延迟和高质量响应。本文以保险业为例,展示如何利用MCP和语音技术构建面向客户的智能助手,满足知识检索、数据库查询和网络搜索等多样化需求。
核心原理
MCP充当中间件,连接AI模型与外部世界,通过标准化协议发送结构化请求。核心组件包括MCP服务器(托管工具服务)和MCP客户端(代理侧)。自定义服务器通过FastMCP接口定义工具,如RAG检索和网络搜索;预定义服务器(如SQLite)通过命令行启动。Planner代理负责解析用户请求,决定调用哪些工具,并综合结果生成响应。语音处理采用链式流程:语音输入→STT转录→Planner处理→TTS输出。关键设计决策包括:使用gpt-4.1-mini平衡推理与延迟;RAG输出先总结再传给Planner以提升简洁性;语音配置中silence_threshold用于端点检测。
架构分析
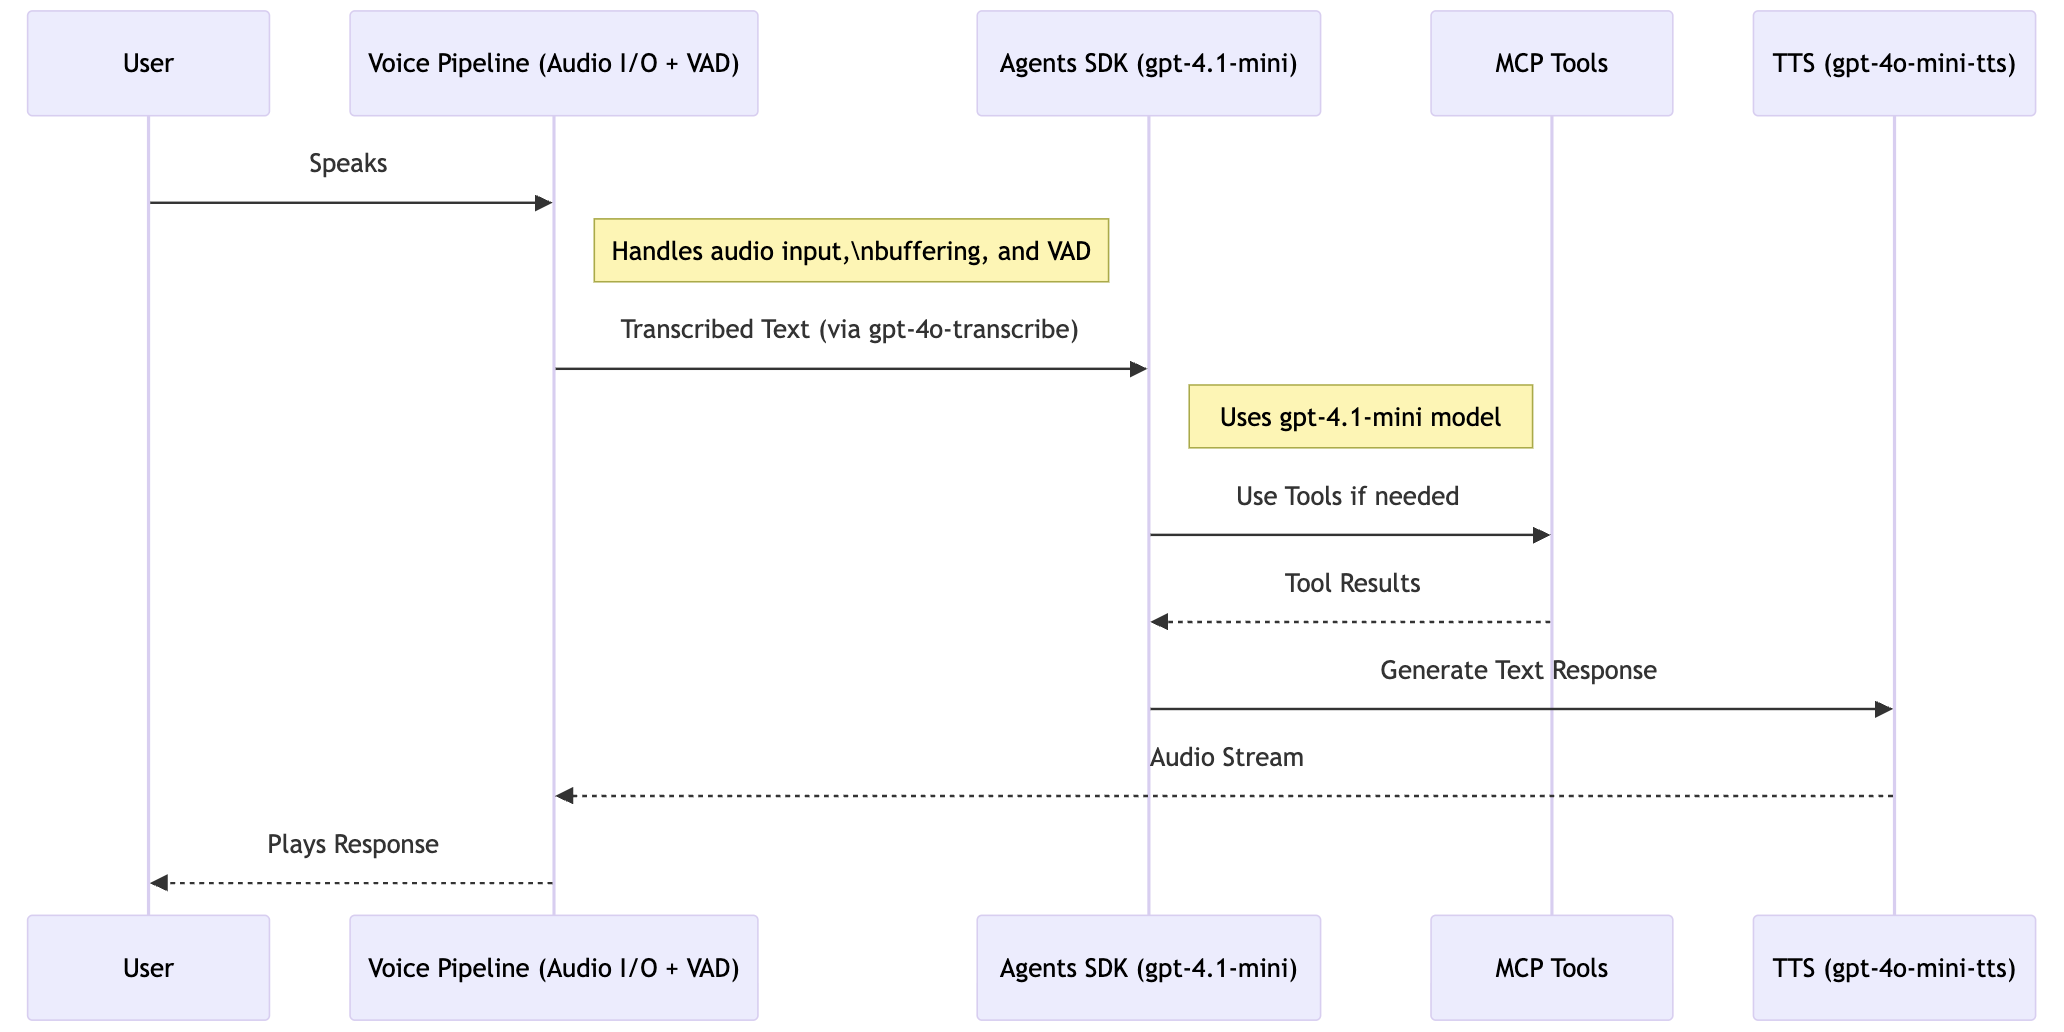
系统采用模块化架构,分为语音输入输出层、代理编排层和工具服务层。语音层使用OpenAI Voice库处理STT/TTS,通过AudioStreamManager管理音频流。代理层使用OpenAI Agents SDK定义Planner代理,通过MCP客户端连接工具服务。工具服务层包括自定义MCP服务器(RAG+Web搜索)和预定义SQLite服务器。服务器进程通过ServerProcess上下文管理器启动,支持SSE传输。数据流:用户语音→STT→文本→Planner→MCP工具调用→结果综合→TTS→语音输出。设计思想强调解耦、可扩展性和低延迟,通过追踪仪表板监控性能。
完整实战教程
代理(Agents)
代理正成为我们编排各种(通常是专门的)LLM应用相互协作的事实标准。许多实际应用需要使用外部工具来为基于LLM的代理创建复杂的工作流。
模型上下文协议(MCP)已迅速成为构建代理系统的开放标准。该协议提供了常见工具服务的轻松集成以及AI生态系统中模型之间的互操作性。
什么是MCP?
模型上下文协议(MCP)是一种开放协议,旨在标准化AI模型(尤其是大型语言模型LLM)如何以安全、模块化和可组合的方式与外部工具、数据源和上下文提供者交互。MCP提供了一个统一框架,用于从代理或应用程序向一组“工具服务”(如数据库、API或自定义逻辑模块)发送结构化请求。通过采用MCP,开发人员可以:
* 将代理逻辑与工具实现解耦:代理可以使用标准协议调用工具(如数据库或搜索服务),而不是依赖硬编码的集成。
* 强制执行一致的安全和治理:MCP定义了模型与外部资源之间的身份验证、授权和数据边界控制。
* 支持模块化、可重用的代理架构:工具可以被替换、更新或扩展,而无需更改代理代码,从而轻松演进复杂的工作流。
* 在本地或远程运行工具:无论工具在客户环境中运行还是在云中运行,相同的协议都适用,支持隐私和数据驻留要求。
MCP充当“中间件”,连接AI模型与外部世界,实现将真实世界的上下文和能力安全、灵活、可维护地集成到对话式或自主代理中。
企业中的代理
在当今的企业环境中,对话式代理(尤其是语音驱动的代理)正迅速成为客户支持、内部帮助台和任务自动化的标准。然而,由于工具碎片化、集成复杂性以及对后端系统可靠编排的需求,构建健壮、可扩展的语音代理具有挑战性。企业环境中常见的模式是开发由知识库(结构化和非结构化)支持的代理。这些机器人分为几类:
- 用于内部使用的副驾驶(copilots),以及
- 面向客户的助手。
后一种用例(即面向客户的助手)通常对准确性、可用性和设计有更高的要求。此外,面向客户的聊天机器人的一个常见需求是添加语音作为用户界面的模态(例如用于电话呼叫自动化)。
这些问答聊天机器人适用于广泛的行业,包括医疗保健、政府和法律服务,这些行业需要一种简便的方式来检索知识。
其中一个行业是保险业,我们看到了该领域客户所获得的巨大价值。保险单很复杂,保单持有人可能难以导航系统。
本手册内容
在本手册中,我们提供了一个端到端的模块化方案,利用MCP结合OpenAI Agents SDK构建支持语音的智能体。特别地,我们演示了如何将其用于动态上下文管理和智能体工具调用。我们针对上述保险用例展示了此类系统的能力。在此示例中,我们演示了MCP在您可能需要的各种工具中的应用。具体来说,我们展示了自定义MCP服务器(用于文本检索和网络搜索)以及使用预定义MCP服务器(用于SQLite)的用法。
端到端流程
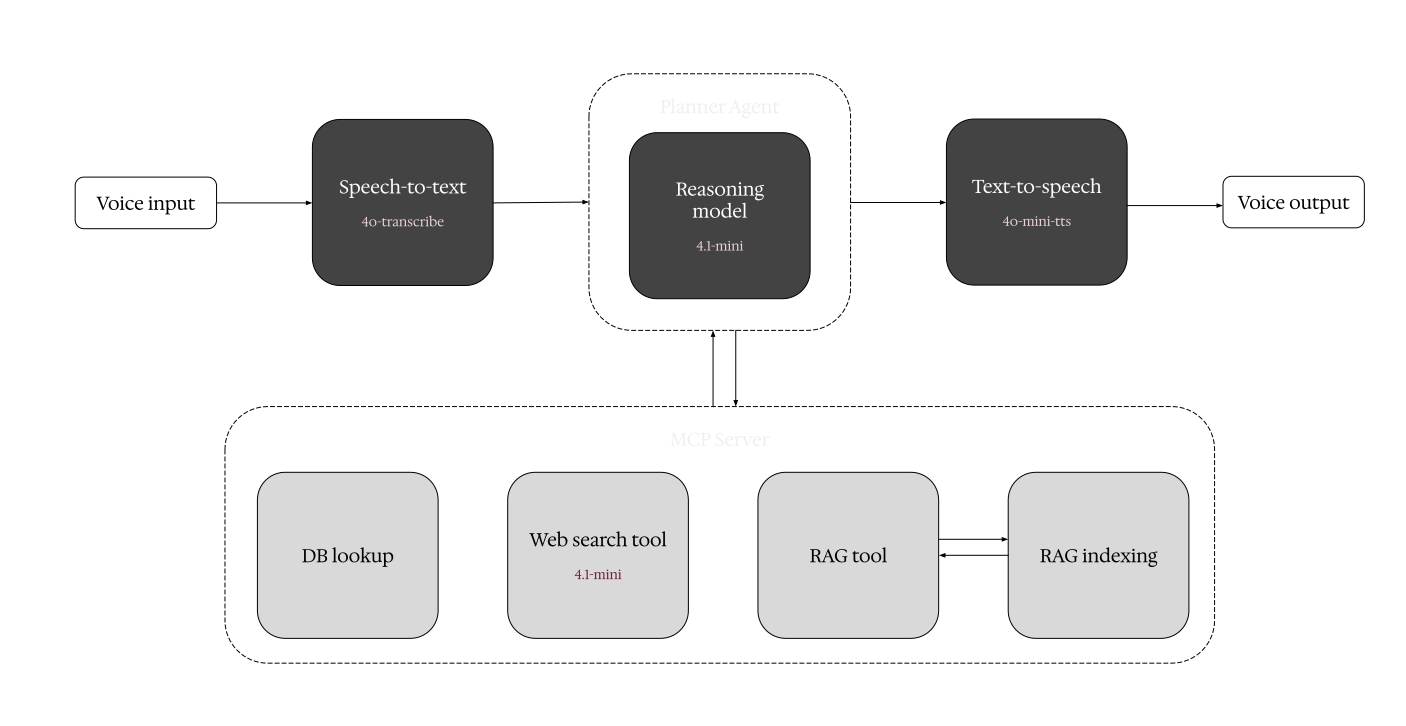
本节概述了在 MCP 框架内为工具部署微服务的简单设置,特别关注 RAG、数据库查询和网络搜索功能。MCP 服务器不仅负责托管这些服务,还负责执行 RAG 索引以支持后端操作。
我们在整个系统中采用“链式”方法进行语音输入和输出。在推理过程中,工作流首先捕获用户的语音输入,通过语音转文本系统将其转录为文本。然后将转录的文本发送给 Planner 代理,该代理决定调用哪些工具并向相应的微服务发出请求。检索到工具输出后,Planner 代理综合出连贯且上下文适当的响应。随后,该文本响应通过文本转语音系统转换为音频,向用户传递最终的语音响应。
端到端工作流总结如下图所示:
安装依赖
首先,我们安装项目的库依赖。
注意:你的机器上可能需要安装一个特定的依赖,即ffmpeg。如果你使用的是 Mac,你需要单独使用brew install ffmpeg来安装它。
#install dependencies
%pip install asyncio ffmpeg ffprobe mcp openai openai-agents pydub scipy sounddevice uv --quiet
%pip install "openai-agents[voice]" --quiet
环境设置
要执行本教程,你需要安装以下软件包,这些软件包提供了对 OpenAI API、Agents SDK、MCP 以及音频处理库的访问。此外,你可以通过 set_default_openai_key 函数设置你的 OpenAI API 密钥,供智能体使用。
import socket
import time
import warnings
from typing import List, Optional, AsyncGenerator

from numpy.typing import NDArray


warnings.filterwarnings("ignore", category=SyntaxWarning)


async def wait_for_server_ready(port: int = 8000, timeout: float = 10) -> None:
    """Wait for SSE server to be ready"""
    start = time.time()
    while time.time() - start < timeout:
        try:
            with socket.create_connection(("localhost", port), timeout=1):
                print("✅ SSE server TCP port is accepting connections.")
                return
        except OSError as e:
            if time.time() - start > timeout - 1:  # Only print on last attempt
                print(f"Waiting for server... ({e})")
            time.sleep(0.5)
    raise RuntimeError("❌ SSE server did not become ready in time.")
通过自定义 MCP 服务定义工具使用型代理
首先,我们使用 FastMCP 接口定义一个自定义 MCP 服务,该服务托管 RAG 和网络搜索工具。具体来说,我们为以下功能添加 @mcp.tool 函数:
- 从 RAG 服务检索信息
- 使用 OpenAI 的
web_search搜索更广泛的互联网信息
为了本食谱的目的,我们将在同一服务下运行这两个工具。
以下代码已在同一目录下的 search_server.py 中提供。运行代码以启动服务器。当服务器运行时,您的文件将被索引并存储在向量存储中。
您可以通过运行以下命令来运行 search_server.py 文件:
uv run python search_server.py
服务器运行后,您可以分别在 https://platform.openai.com/storage/files 和 https://platform.openai.com/storage/vector_stores 访问向量存储和文件,然后继续运行笔记本中的下一个单元格。
# search_server.py
import os
from mcp.server.fastmcp import FastMCP
from openai import OpenAI
from agents import set_tracing_export_api_key

# Create server
mcp = FastMCP("Search Server")
_vector_store_id = ""

def _run_rag(query: str) -> str:
    """Do a search for answers within the knowledge base and internal documents of the user.
    Args:
        query: The user query
    """
    results = client.vector_stores.search(
        vector_store_id=_vector_store_id,
        query=query,
        rewrite_query=True,  # Query rewriting generally improves results
    )
    return results.data[0].content[0].text


def _summarize_rag_response(rag_output: str) -> str:
    """Summarize the RAG response using GPT-4
    Args:
        rag_output: The RAG response
    """
    response = client.responses.create(
        model="gpt-4.1-mini",
        tools=[{"type": "web_search_preview"}],
        input="Summarize the following text concisely: \n\n" + rag_output,
    )
    return response.output_text


@mcp.tool()
def generate_rag_output(query: str) -> str:
    """Generate a summarized RAG output for a given query.
    Args:
        query: The user query
    """
    print("[debug-server] generate_rag_output: ", query)
    rag_output = _run_rag(query)
    return _summarize_rag_response(rag_output)


@mcp.tool()
def run_web_search(query: str) -> str:
    """Run a web search for the given query.
    Args:
        query: The user query
    """
    print("[debug-server] run_web_search:", query)
    response = client.responses.create(
        model="gpt-4.1-mini",
        tools=[{"type": "web_search_preview"}],
        input=query,
    )
    return response.output_text


def index_documents(directory: str):
    """Index the documents in the given directory to the vector store
    Args:
        directory: The directory to index the documents from
    """
    # OpenAI supported file extensions for retrieval (see docs)
    SUPPORTED_EXTENSIONS = {'.pdf', '.txt', '.md', '.docx', '.pptx', '.csv', '.rtf', '.html', '.json', '.xml'}
    # Collect all files in the specified directory
    files = [os.path.join(directory, f) for f in os.listdir(directory)]
    # Filter files for supported extensions only
    supported_files = []
    for file_path in files:
        _, ext = os.path.splitext(file_path)
        if ext.lower() in SUPPORTED_EXTENSIONS:
            supported_files.append(file_path)
        else:
            print(f"[warning] Skipping unsupported file for retrieval: {file_path}")

    vector_store = client.vector_stores.create( # Create vector store
        name="Support FAQ",
    )
    global _vector_store_id
    _vector_store_id = vector_store.id

    for file_path in supported_files:
        # Upload each file to the vector store, ensuring the file handle is closed
        with open(file_path, "rb") as fp:
            client.vector_stores.files.upload_and_poll(
                vector_store_id=vector_store.id,
                file=fp
            )
        print(f"[debug-server] uploading file: {file_path}")


if __name__ == "__main__":
    oai_api_key = os.environ.get("OPENAI_API_KEY")
    if not oai_api_key:
        raise ValueError("OPENAI_API_KEY environment variable is not set")
    set_tracing_export_api_key(oai_api_key)
    client = OpenAI(api_key=oai_api_key)

    current_dir = os.path.dirname(os.path.abspath(__file__))
    samples_dir = os.path.join(current_dir, "sample_files")
    index_documents(samples_dir)

    mcp.run(transport="sse")
如上所示,我们还将RAG索引作为此工作流的一部分。在实际应用中,并非每次运行都需要此步骤,如果您有大量数据语料库,可以将其放在单独的进程中。
除了简单的RAG检索外,我们还增加了一个步骤来总结RAG输出。此步骤并非总是必需的,但我们发现这可以为规划器提供更简洁的响应。是否执行此步骤取决于您的系统和延迟要求。
使用预定义的MCP服务器
虽然实现自定义MCP服务器相对简单,但MCP的强大之处在于能够使用其他人构建和维护的预定义服务器。使用现有实现可以加快开发速度,与其他工具保持一致的接口,并使数据集成更加无缝。
对于我们的数据库查找工具,我们使用了预构建的SQLite服务器实现。如下所示,我们只需通过命令行提示并提供包含数据的*.db文件即可实现此功能。
定义规划器代理
接下来,我们可以定义MCP服务器如何生成有意义的响应。规划器代理是MCP代理编排管道中的关键组件。其主要功能是将用户请求分解为可操作的步骤,并决定在每个阶段应调用哪些工具、API或代理。给定文本输入,规划器解析并分析请求,在多个轮次中保持上下文。基于对话状态,它通过MCP服务器的编排层调度工具调用来调用MCP工具服务。然后,代理收集中间结果,综合响应,并引导对话走向解决。
一个关键的设计考虑是规划器的模型选择。虽然像4.1这样的大型模型提供卓越的推理能力,但在语音驱动的应用中,低端到端延迟至关重要。因此,我们选择4.1-mini模型,它在推理能力和响应速度之间取得了很好的平衡。
from agents import Agent, trace
from agents.mcp import MCPServer, MCPServerSse, MCPServerStdio
from agents.extensions.handoff_prompt import prompt_with_handoff_instructions

voice_system_prompt = """[Voice Output Guidelines]
Your responses will be delivered via voice, so please:
1. Use conversational, natural language that sounds good when spoken
2. Keep responses concise - ideally 1-2 sentences per point
3. Avoid technical jargon unless necessary, and explain terms simply
4. Pause naturally between topics using brief sentences
5. Be warm and personable in tone
"""


async def create_insurance_agents(mcp_servers: list[MCPServer]) -> Agent:
    """Create the insurance agent workflow with voice optimization"""

    # Main insurance agent with MCP tools
    insurance_agent = Agent(
        name="InsuranceAssistant",
        instructions=voice_system_prompt + prompt_with_handoff_instructions("""
            #Identity
            You an a helpful chatbot that answers questions about our insurance plans.
            #Task
            Use the tools provided to answer the questions.
            #Instructions
            * Information about plans and policies are best answered with sqlite or rag_output tools.
            * web_search should be used for answering generic health questions that are not directly related to our insurance plans.
            * Evaluate the quality of the answer after the tool call.
            * Assess whether you are confident in the answer generated.
            * If your confidence is low, try use another tool.
        """),
        mcp_servers=mcp_servers,
        model="gpt-4.1-mini",
    )

    return insurance_agent
在智能体定义中,我们明确指定了每个工具的使用时机。这确保了对响应的更好控制,并提高了答案的相关性。我们还为语音智能体提供了指导方针,以设定其回复所需的语气和精确度。
为语音定义配置
接下来,我们为语音模块定义配置,包括语音转文本(STT)和文本转语音(TTS)。我们使用OpenAI Agent Voice库来处理语音的输入和输出。默认情况下,此API分别调用gpt-4o-transcribe和gpt-4o-mini-tts进行STT和TTS。
有关定义语音助手的更多内容,请参阅此Cookbook。
import numpy as np
import sounddevice as sd


from agents.voice import (
    AudioInput,
    SingleAgentVoiceWorkflow,
    VoicePipeline,
    VoicePipelineConfig,
    TTSModelSettings
)

AudioBuffer = List[NDArray[np.int16]]

AUDIO_CONFIG = {
    "samplerate": 24000,
    "channels": 1,
    "dtype": "int16",
    "blocksize": 2400,
    "silence_threshold": 500,
    "silence_duration": 1.5,
    "min_speech_duration": 0.5,
}

insurance_tts_settings = TTSModelSettings(
    instructions=(
        "Personality: Professional, knowledgeable, and helpful insurance advisor"
        "Tone: Friendly, clear, and reassuring, making customers feel confident about their insurance choices"
        "Pronunciation: Clear and articulate, ensuring insurance terms are easily understood"
        "Tempo: Moderate pace with natural pauses, especially when explaining complex insurance concepts"
        "Emotion: Warm and supportive, conveying trust and expertise in insurance matters"
    )
)

class AudioStreamManager:
    """Context manager for handling audio streams"""
    def __init__(self, input_stream: sd.InputStream, output_stream: sd.OutputStream):
        self.input_stream = input_stream
        self.output_stream = output_stream

    async def __aenter__(self):
        try:
            self.input_stream.start()
            self.output_stream.start()
            return self
        except sd.PortAudioError as e:
            raise RuntimeError(f"Failed to start audio streams: {e}")

    async def __aexit__(self, exc_type, exc_val, exc_tb):
        try:
            if self.input_stream:
                self.input_stream.stop()
                self.input_stream.close()
            if self.output_stream:
                self.output_stream.stop()
                self.output_stream.close()
        except Exception as e:
            print(f"Warning: Error during audio stream cleanup: {e}")
在企业场景中,音频响应的语气和风格对系统可用性至关重要。语音输出应始终体现专业性,并与公司的品牌形象保持一致。对于大多数应用而言,这意味着生成逼真的声音,模仿呼叫中心代表通常表现出的礼貌、亲切的态度。借助TTS,我们可以利用提示工程引导模型生成更符合特定客户用例和品牌价值的音频。
处理语音输入/输出
配置好语音设置后,下一步是实现处理传入音频和生成语音响应的函数。请特别注意配置中的 silence_threshold 参数——它在准确检测用户何时说完话以及帮助进行语音端点检测方面起着关键作用。
import asyncio

async def continuous_voice_conversation(agent: Agent):
    """Run a continuous voice conversation with automatic speech detection"""

    voice_config = VoicePipelineConfig(
        tts_settings=insurance_tts_settings,
    )

    pipeline = VoicePipeline(
        workflow=SingleAgentVoiceWorkflow(agent),
        config=voice_config
    )

    audio_queue: asyncio.Queue[NDArray[np.int16]] = asyncio.Queue()
    is_agent_speaking = False

    def audio_callback(indata: NDArray[np.int16], frames: int, time_info: dict, status: sd.CallbackFlags) -> None:
        """Callback for continuous audio input"""
        if status:
            print(f"Audio input status: {status}")
        if not is_agent_speaking:  # Only record when agent isn't speaking
            audio_queue.put_nowait(indata.copy())

    input_stream = sd.InputStream(
        samplerate=AUDIO_CONFIG["samplerate"],
        channels=AUDIO_CONFIG["channels"],
        dtype=AUDIO_CONFIG["dtype"],
        callback=audio_callback,
        blocksize=AUDIO_CONFIG["blocksize"]
    )

    output_stream = sd.OutputStream(
        samplerate=AUDIO_CONFIG["samplerate"],
        channels=AUDIO_CONFIG["channels"],
        dtype=AUDIO_CONFIG["dtype"]
    )

    print("🎙️ Insurance Voice Assistant Ready!")
    print("Start speaking at any time. Say 'goodbye' to exit.")
    print("-" * 50)

    async with AudioStreamManager(input_stream, output_stream):
        silence_threshold = AUDIO_CONFIG["silence_threshold"]
        silence_duration = 0
        max_silence = AUDIO_CONFIG["silence_duration"]
        audio_buffer: AudioBuffer = []

        while True:
            try:
                chunk = await asyncio.wait_for(audio_queue.get(), timeout=0.1)

                if np.abs(chunk).mean() > silence_threshold:
                    audio_buffer.append(chunk)
                    silence_duration = 0
                elif audio_buffer:
                    silence_duration += 0.1
                    audio_buffer.append(chunk)

                    if silence_duration >= max_silence:
                        try:
                            full_audio = np.concatenate(audio_buffer, axis=0)

                            if len(full_audio) > AUDIO_CONFIG["samplerate"] * AUDIO_CONFIG["min_speech_duration"]:
                                print("\n🤔 Processing speech...")

                                is_agent_speaking = True

                                audio_input = AudioInput(buffer=full_audio)

                                with trace("Insurance Voice Query"):
                                    result = await pipeline.run(audio_input)

                                    print("💬 Assistant responding...")
                                    async for event in result.stream():
                                        if event.type == "voice_stream_event_audio":
                                            output_stream.write(event.data)
                                        elif event.type == "voice_stream_event_transcript":
                                            print(f"   > {event.text}", end="", flush=True)

                                    print("\n")

                        except Exception as e:
                            print(f"\n❌ Error processing speech: {e}")
                        finally:
                            is_agent_speaking = False
                            audio_buffer = []
                            silence_duration = 0

            except asyncio.TimeoutError:
                continue
            except KeyboardInterrupt:
                print("\n\n👋 Goodbye!")
                break
            except Exception as e:
                print(f"\n❌ Unexpected error: {e}")
                if isinstance(e, (sd.PortAudioError, RuntimeError)):
                    raise
设置服务器进程
接下来,我们添加一个简单的便捷函数,用于在本地启动服务器:
import shutil
import subprocess
import nest_asyncio


class ServerProcess:
    """Context manager for handling the SSE server process"""
    def __init__(self, server_file: str):
        self.server_file = server_file
        self.process: Optional[subprocess.Popen] = None

    async def __aenter__(self):
        if not shutil.which("uv"):
            raise RuntimeError(
                "uv is not installed. Please install it: https://docs.astral.sh/uv/getting-started/installation/"
            )

        print("Starting SSE server at http://localhost:8000/sse ...")
        self.process = subprocess.Popen(["uv", "run", self.server_file])
        try:
            await wait_for_server_ready()
            nest_asyncio.apply()
            print("SSE server started. Starting voice assistant...\n")
            return self
        except Exception as e:
            if self.process:
                self.process.terminate()
            raise RuntimeError(f"Failed to start SSE server: {e}")

    async def __aexit__(self, exc_type, exc_val, exc_tb):
        if self.process:
            try:
                self.process.terminate()
                self.process.wait(timeout=5)
                if self.process.poll() is None:
                    self.process.kill()
            except Exception as e:
                print(f"Warning: Error during server shutdown: {e}")
指定 MCP 工具服务
在我们的 main 函数中,我们可以启动我们感兴趣的各种工具使用服务。
对于我们的自定义服务器(用于 RAG 和网络搜索),我们可以使用 MCPServerSse 函数来启动一个服务器(此处为本地)。要启动标准的 MCP SQLite 服务,我们调用 MCPServerStdio,并提供简单的参数,此处为本地 database.db 文件。
import os

async def main():
    """Main function to run the voice assistant"""
    this_dir=os.getcwd()
    #this_dir = os.path.dirname(os.path.abspath(__file__))
    server_file= os.path.join(this_dir, "search_server.py")
    #server_file = os.path.join(this_dir, "search_server.py")

    async with ServerProcess(server_file):
        # Initialize MCP servers
        async with MCPServerSse(
            name="SSE Python Server",
            params={
                "url": "http://localhost:8000/sse",
                "timeout": 15.0,
            },
            client_session_timeout_seconds=15.0,
        ) as search_server:
            async with MCPServerStdio(
                cache_tools_list=True,
                params={"command": "uvx", "args": ["mcp-server-sqlite", "--db-path", "./database.db"]},
            ) as sql_server:
                # Create insurance agent with MCP tools
                agent = await create_insurance_agents([search_server, sql_server])

                # Run the voice assistant
                try:
                    await continuous_voice_conversation(agent)
                except Exception as e:
                    print(f"\nError in voice conversation: {e}")
                    raise
总结流程
现在我们已经把各个部分都准备好了,可以退一步来可视化我们系统的整体工作流程:
整合所有部分
最后,我们可以实例化自定义工具使用服务器并启动服务:
import asyncio

try:
    asyncio.get_running_loop().create_task(main())
except RuntimeError:
    # For Jupyter, use nest_asyncio and run main as a task
    import nest_asyncio
    nest_asyncio.apply()
    task = asyncio.create_task(main())
    try:
        await task
    except KeyboardInterrupt:
        print("\nShutting down gracefully...")
    except Exception as e:
        print(f"\nFatal error: {e}")
        raise
示例输出
现在我们已经端到端地构建了系统,就可以用它来回答问题。在这里,我们使用系统根据保单信息文档为一些常见的保险问题提供答案。以下是我们智能体根据用户的一些常见问题生成的语音输出示例:
本计划如何覆盖处方药?(使用检索)
from IPython.display import display, Audio
import os

# Get the absolute path to the audio file
audio_path = os.path.join(os.getcwd(), "sample_output", "rag.mp3")

# Check if the file exists before trying to play it
if os.path.exists(audio_path):
    display(Audio(audio_path))
else:
    print(f"Audio file not found at: {audio_path}")
哪些保单的月保费低于300美元?(使用SQL进行数据库查询)
display(Audio("sample_output/sqlite.mp3"))
什么是糖尿病的有效治疗方法?(使用网络搜索)
display(Audio("sample_output/web_search.mp3"))
检查追踪
默认情况下,我们的应用程序中使用的模型和工具调用会开箱即用地添加到追踪仪表板中。这些追踪提供了有意义的洞察,让我们了解用户在使用我们的代理时的体验。
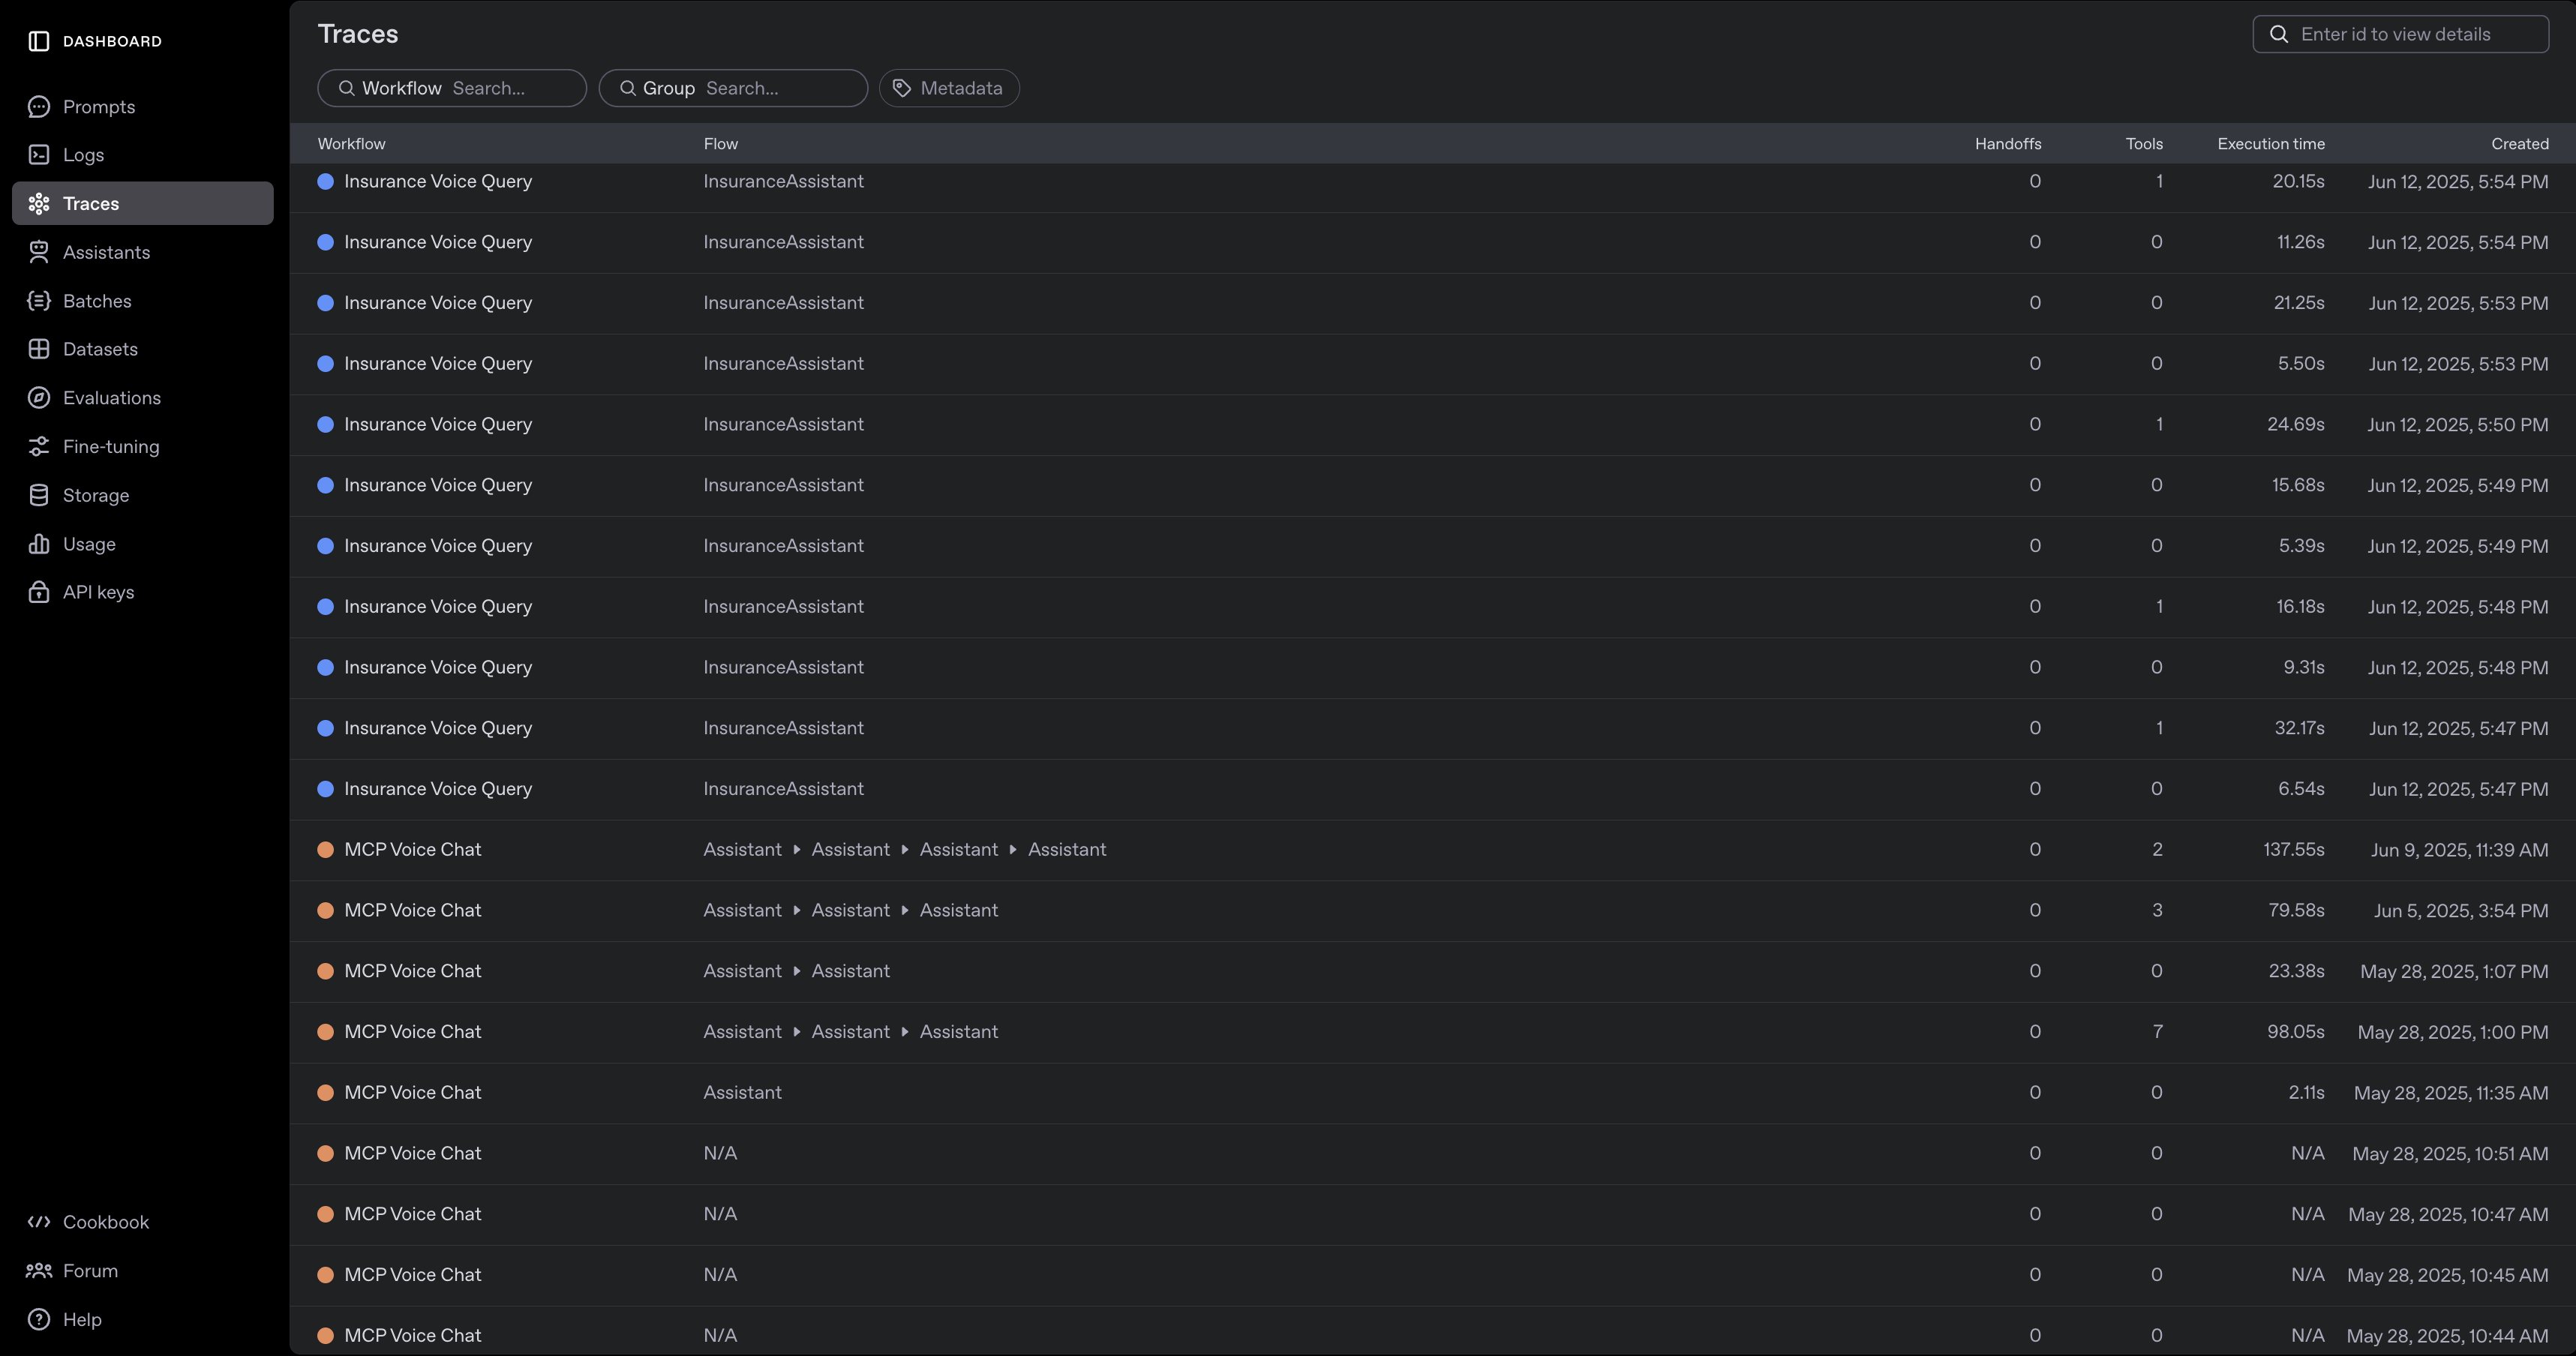
除了智能体的性能之外,构建语音智能体的一个关键方面是响应的延迟。通过 Traces 仪表板,我们能够查看每个步骤的墙钟时间分解,以帮助调试并找到延迟改进的领域:
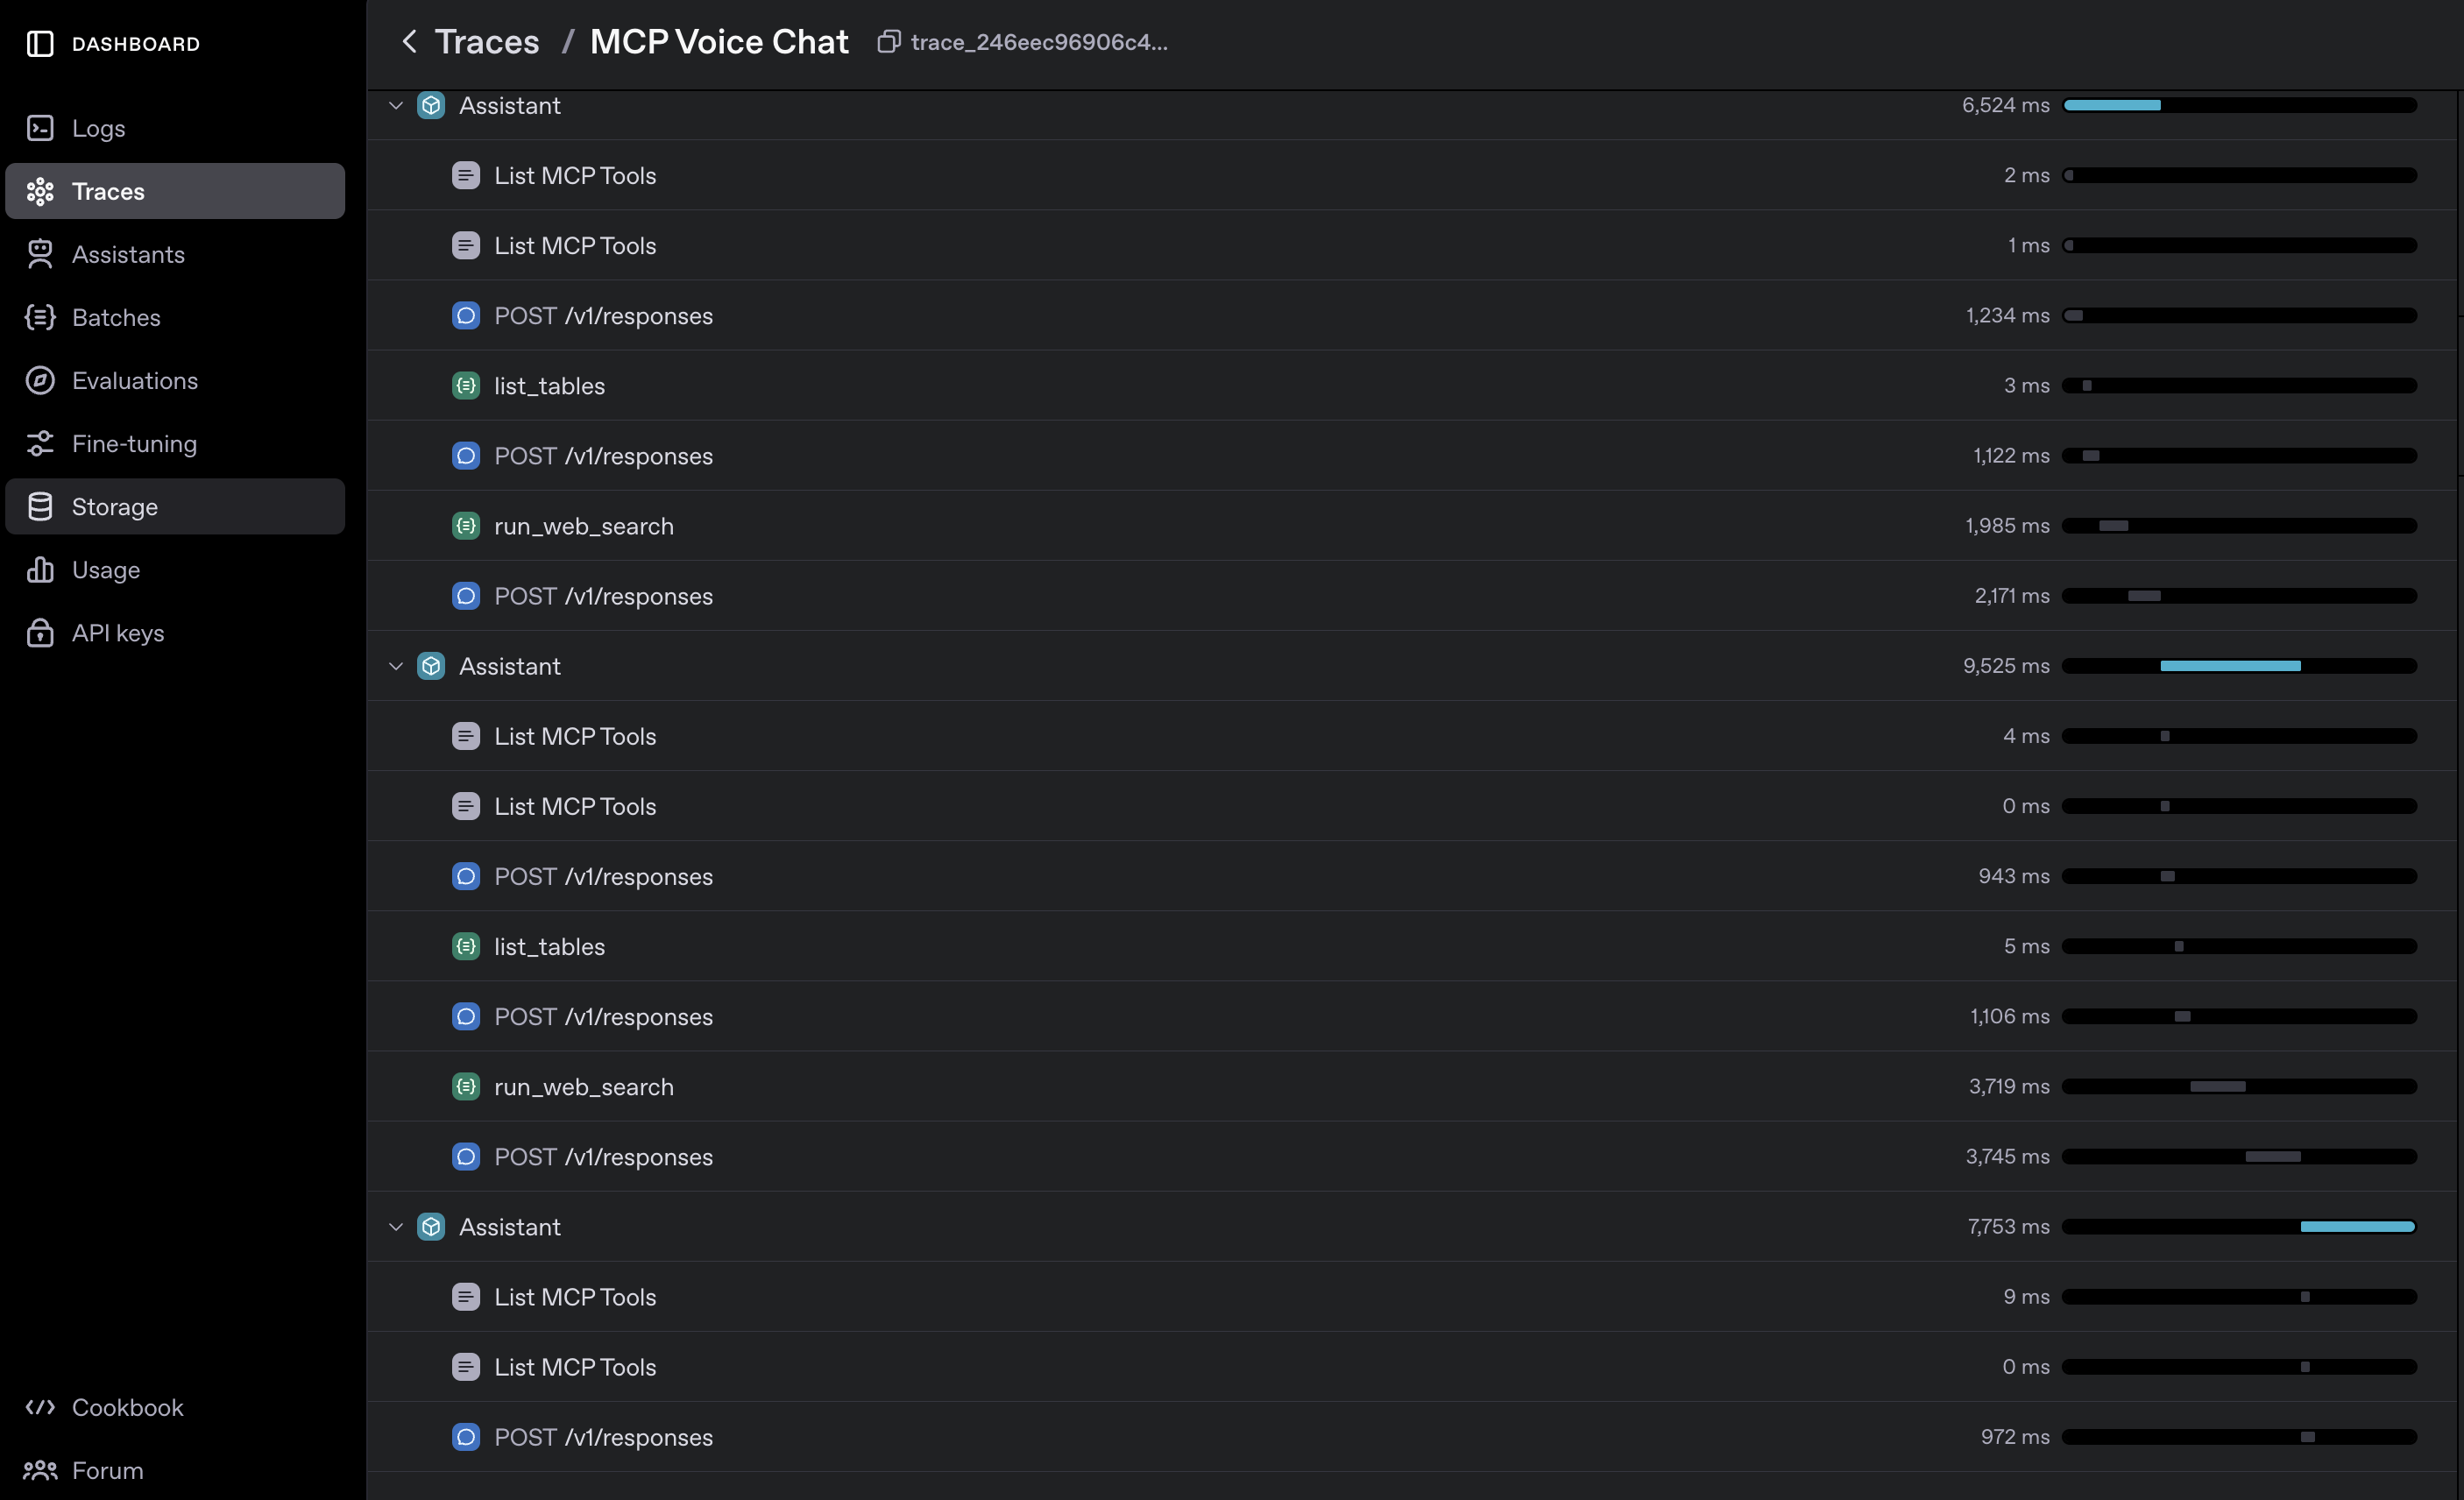
如下所示,探索单个追踪记录,查看每次函数调用及其输出。
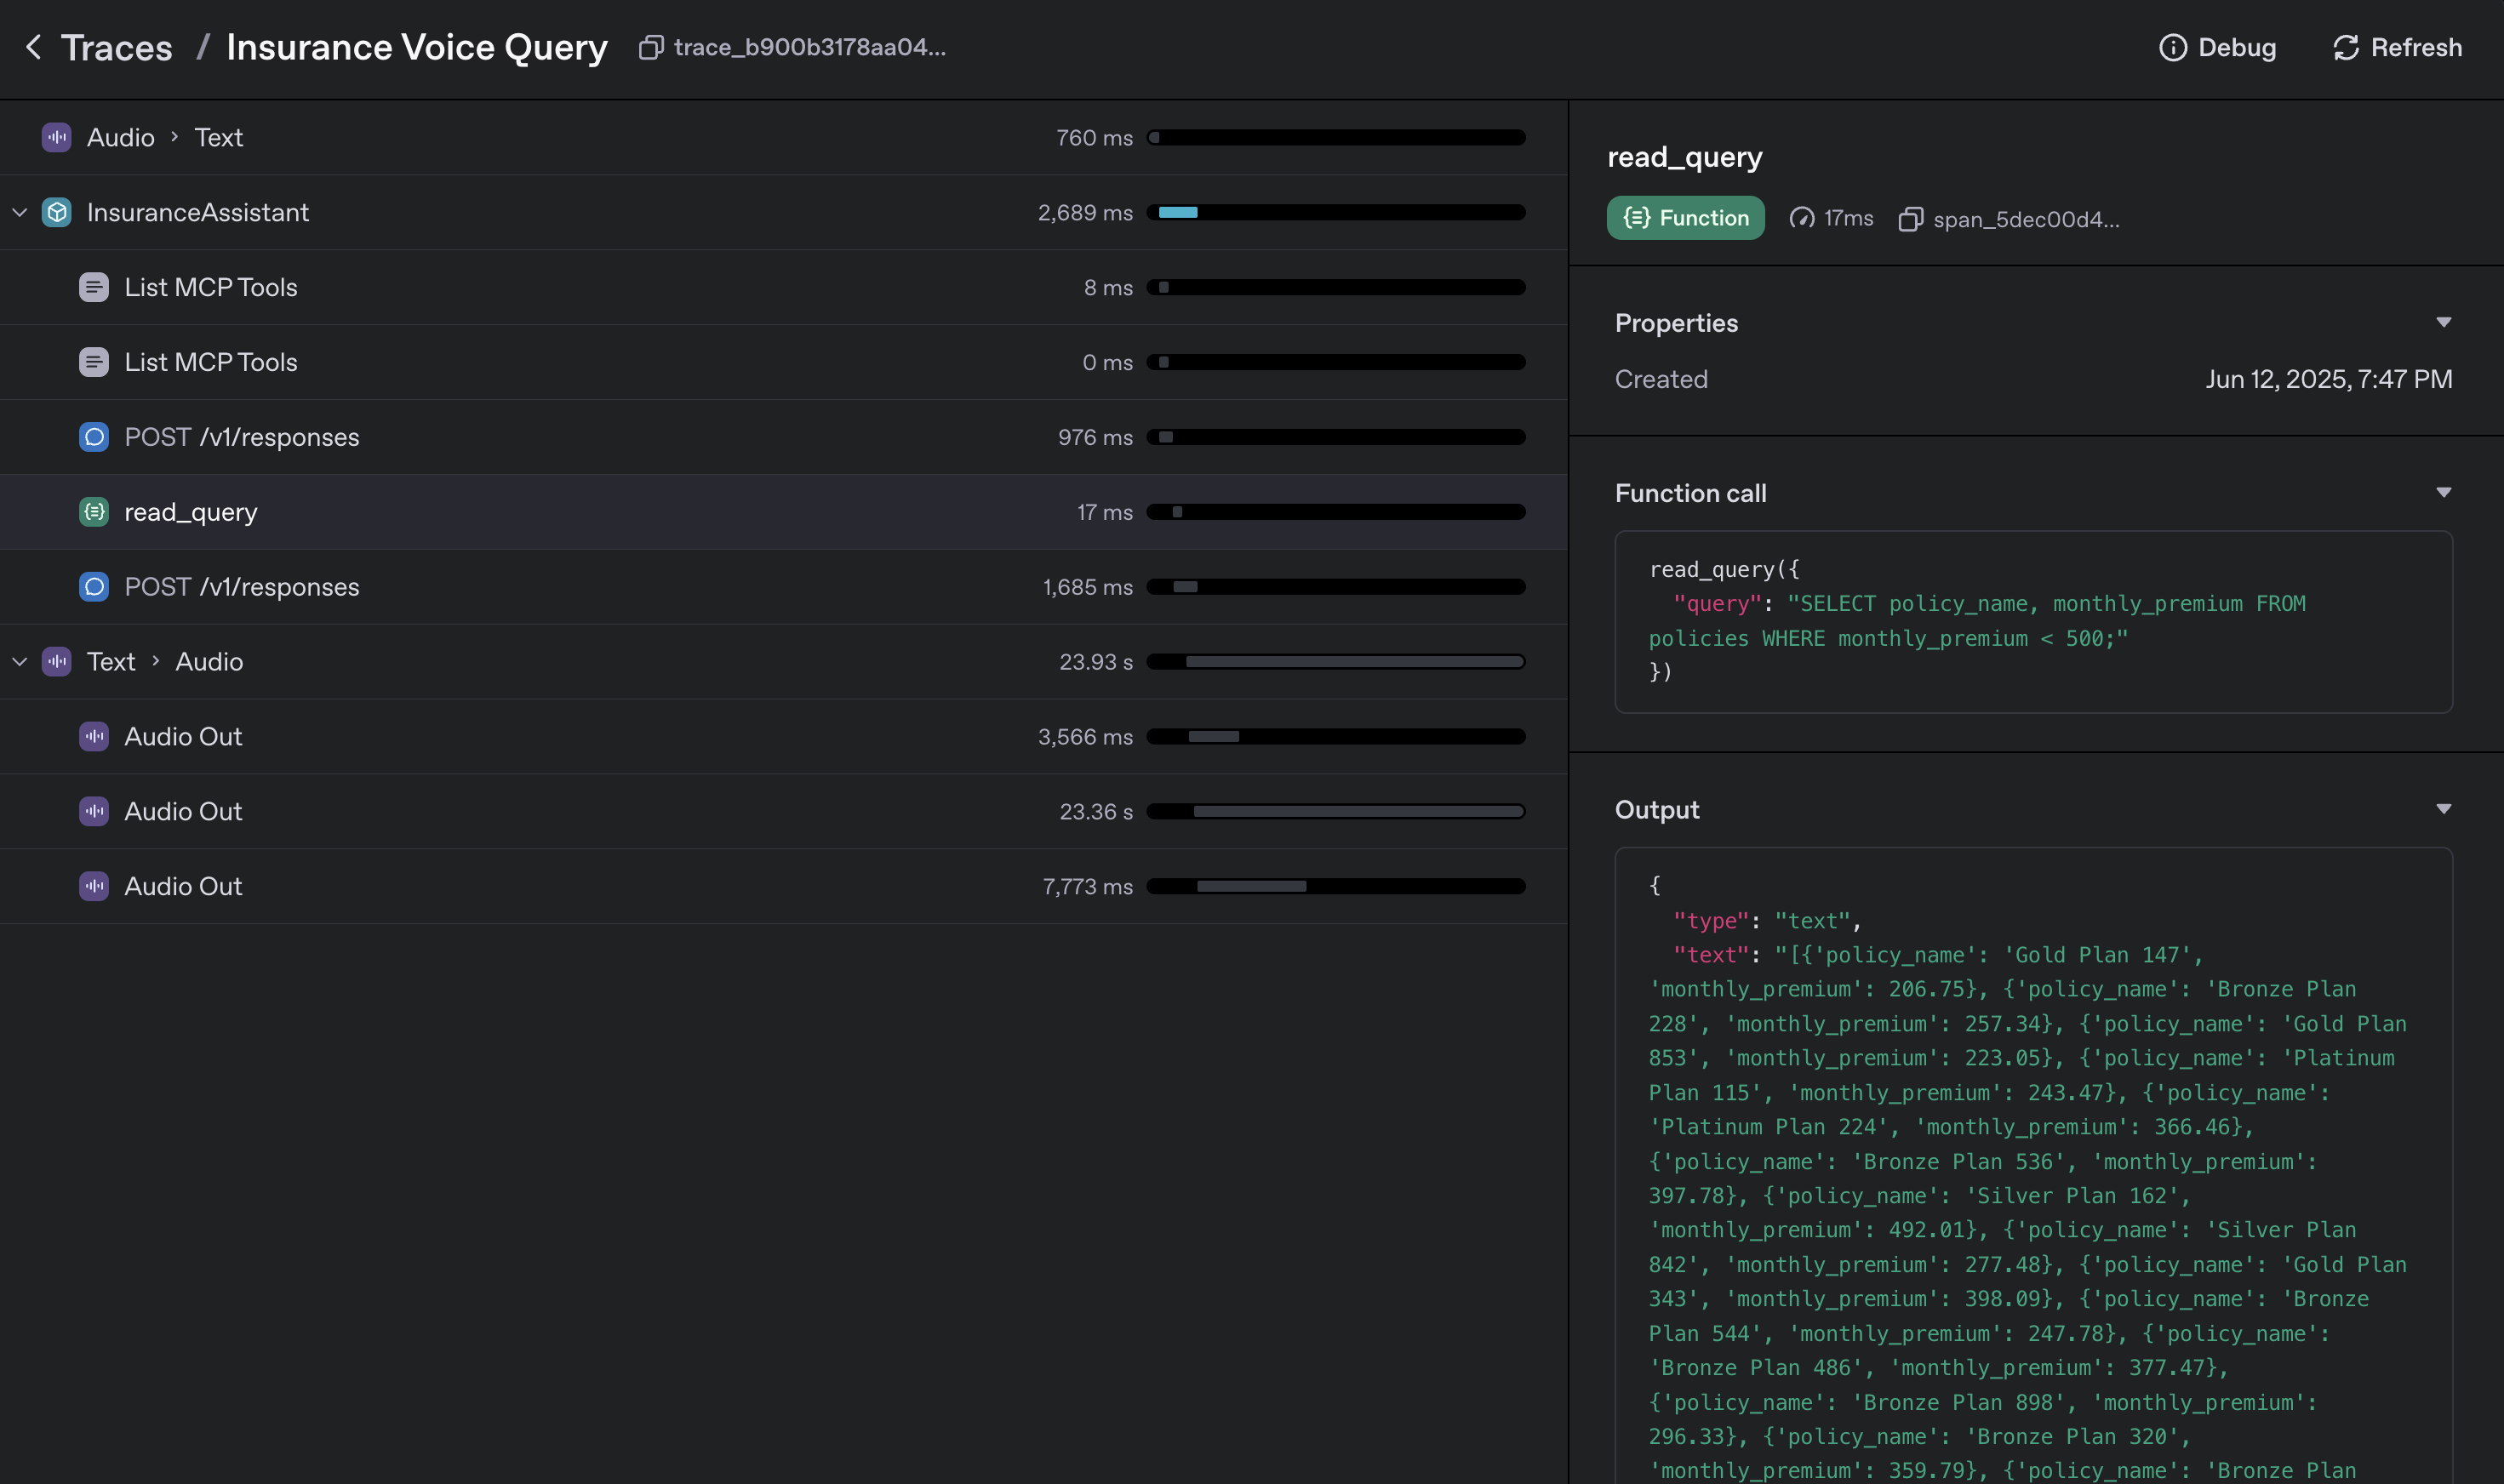 追踪提供了对函数调用及其执行时间的细粒度可见性,使得识别延迟来源(例如上面的网络搜索工具)变得容易。分析每次工具调用的响应时间变异性,有助于你在生产系统中定位瓶颈和优化机会。
结论
本指南引导您构建了一个完整的智能体解决方案,充分利用了 MCP 平台的灵活性和强大功能。通过集成 Voice Agents SDK,我们展示了如何利用这些技术开发出面向消费者的产品。我们演示了如何将 OpenAI 的工具和 Agents API 与 MCP 有效结合,以交付有影响力的应用。
我们希望本指南既提供了实用指导,也带来了灵感,帮助您创建适合自身需求的、由 MCP 驱动的语音智能体。
贡献者
本手册由 OpenAI 与 Brain Co 联合编写。
常见问题
常见错误:1) 未安装ffmpeg导致音频处理失败,需通过brew install ffmpeg安装。2) OPENAI_API_KEY未设置,服务器启动时报错,需在环境变量中配置。3) SSE服务器未就绪,wait_for_server_ready超时,检查端口占用和服务器启动日志。4) 音频流冲突,is_agent_speaking标志未正确管理导致回声,确保在代理说话时暂停录音。5) 工具调用失败,检查MCP服务器连接和工具参数。排查方法:使用追踪仪表板查看函数调用和延迟,检查服务器日志,逐步测试各组件。生产优化:将RAG索引独立进程,使用缓存工具列表,调整silence_threshold减少误触发,选择更快的模型或量化。
企业应用扩展
可扩展方向:1) 增加更多MCP服务器,如数据库、CRM系统,丰富工具集。2) 实现多代理协作,通过handoff机制处理复杂任务。3) 优化语音体验,使用自定义TTS声音或情感控制。4) 集成流式处理,减少端到端延迟。5) 部署到云端,使用Kubernetes管理服务器进程,实现自动扩展。6) 添加用户身份验证和权限控制,确保数据安全。7) 利用追踪数据训练模型,改进工具选择策略。
总结
本文介绍如何利用模型上下文协议(MCP)与OpenAI Agents SDK构建支持语音的智能代理,实现动态上下文管理和工具调用。通过自定义MCP服务器集成RAG和网络搜索,使用预定义SQLite服务器进行数据库查询,并采用链式语音处理流程(STT→Planner→TTS)。文章提供完整代码示例、环境配置、实践步骤及性能优化建议,适合有编程基础的开发者学习AI工程实践。
- --
内容来源与验证
- 内容等级:PREMIUM_A
- 质量等级:A
- 难度:中级
- 验证等级:V1
- 原文作者:shikhar-cyber, Cece Z, Sibon li
- 原文日期:2025-06-17
- 来源许可:MIT
- 来源版本:
a161e4fba4848a06949799f2d32af05ddcdc4a1b - 查看原文
站内还有更多完整实战教程
加入会员,解锁全部教程、完整代码与持续更新内容。
加入会员