Gemini代码执行教程:用Python完成计算与数据分析
技术背景
大语言模型在数学计算、数据分析和精确字符串处理上容易出错,纯文本推理无法保证结果正确。代码执行让模型把推理转化为可运行的 Python 代码,由沙箱执行后把真实结果回传,从而获得可验证、可迭代的输出。它适用于数值计算、数据可视化、算法模拟等场景,但受限于沙箱环境、文件类型偏好(.csv/.txt)、模型响应延迟以及代码执行与函数调用之间的取舍。
核心原理
调用时在 GenerateContentConfig 中传入 tools=[types.Tool(code_execution=types.ToolCodeExecution)],模型返回的 parts 可能包含 text、executable_code、code_execution_result 和 inline_data。模型先生成代码,沙箱执行后把结果作为新上下文继续推理,直到给出最终答案。辅助函数 display_code_execution_result 遍历 parts,分别用 Markdown、HTML、Image 渲染文本、代码、结果和图表,是理解数据流的关键。
架构分析
整体由客户端 SDK、Gemini 模型、代码执行沙箱和文件服务组成。客户端负责初始化、上传文件与发起请求;模型决定何时生成代码;沙箱执行代码并返回结果;File API 提供数据集引用。设计上把工具声明与模型选择解耦,模型在每次调用时指定,便于切换;聊天模式通过 system_instruction 约束行为,流式模式要求开发者自行拼接同类型连续片段。
完整实战教程
##### 版权所有 2026 Google LLC。
# @title Licensed under the Apache License, Version 2.0 (the "License");
#
# Licensed under the Apache License, Version 2.0 (the "License");
# you may not use this file except in compliance with the License.
# You may obtain a copy of the License at
#
#     https://www.apache.org/licenses/LICENSE-2.0
#
# Unless required by applicable law or agreed to in writing, software
# distributed under the License is distributed on an "AS IS" BASIS,
# WITHOUT WARRANTIES OR CONDITIONS OF ANY KIND, either express or implied.
# See the License for the specific language governing permissions and
# limitations under the License.
Gemini API:代码执行
<a target="_blank" href="https://colab.research.google.com/github/google-gemini/cookbook/blob/main/quickstarts/Code_Execution.ipynb">
 </a>
</a>
Gemini API 的代码执行功能使模型能够根据你提供的纯文本指令生成并运行 Python 代码,甚至还能输出图表。它可以从结果中迭代学习,直到得出最终输出。
本 notebook 将带你逐步了解:
* 理解如何开始使用 Gemini API 的代码执行功能
* 学习如何在单次 Gemini API 调用中使用代码执行
* 通过文件 I/O 使用本地文件(或上传到 Gemini File API 的文件)运行场景
* 在聊天交互中使用代码执行
* 在多模态场景中执行代码
设置
安装 SDK
从 PyPI 安装 SDK。
# %pip install -q -U "google-genai>=2.9.0"
设置你的 API 密钥
要运行以下单元格,你的 API 密钥必须存储在名为 GEMINI_API_KEY 的 Colab Secret 中。如果你还没有 API 密钥,或者不确定如何创建 Colab Secret,请参阅
Authentication  例如。
例如。
# === AUTO-PATCH: Replace Colab userdata with env vars ===
import os
import sys
import types

# Ensure 'google' module exists
if 'google' not in sys.modules:
    import google
    if 'google' not in sys.modules:
        sys.modules['google'] = types.ModuleType('google')

google_mod = sys.modules['google']

# Create colab submodule if needed
if not hasattr(google_mod, 'colab'):
    colab_mod = types.ModuleType('google.colab')
    google_mod.colab = colab_mod
    sys.modules['google.colab'] = colab_mod
else:
    colab_mod = google_mod.colab

# Create userdata submodule
userdata_mod = types.ModuleType('google.colab.userdata')
def _get(key): return os.environ.get(key, '')
userdata_mod.get = _get
colab_mod.userdata = userdata_mod
sys.modules['google.colab.userdata'] = userdata_mod

os.environ['GEMINI_API_KEY'] = os.environ.get('GEMINI_API_KEY', '')
print('Colab userdata patched ✅')
from google.colab import userdata

GEMINI_API_KEY = userdata.get('GEMINI_API_KEY')
初始化 SDK 客户端
使用新版 SDK,你现在只需使用 API 密钥(如果使用 Vertex AI,则使用 OAuth)初始化客户端即可。模型现在在每次调用时设置。
from google import genai

client = genai.Client(api_key=GEMINI_API_KEY)
选择模型
现在,请选择本指南中您想要使用的模型,可以从列表中选择一个,或者将其写下来。请记住,某些模型(例如 2.5 系列)是思考型模型,因此响应时间会稍长一些(更多详情请参阅思考笔记本,尤其要了解如何关闭思考功能)。
有关所有 Gemini 模型的更多信息,请查看文档,以获取每个模型的详细信息。
MODEL_ID = "gemini-3.8-flash" # @param ["gemini-3.1-pro-preview", "gemini-3.8-flash", "gemini-3.7-flash", "gemini-3.6-flash", "gemini-3.5-flash-lite", "gemini-2.5-pro"] {"allow-input": true, "isTemplate": true}
辅助函数
当使用代码执行作为工具时,模型会返回一个包含 text、executable_code、execution_result 和 inline_data 部分的列表。使用下面的函数可以帮助你可视化并更好地展示代码执行结果。以下是关于结果中不同字段的一些细节:
* text:模型生成的内联文本。
* executable_code:模型生成的、需要被执行的代码。
* code_execution_result:executable_code 的执行结果。
* inline_data:模型生成的内联媒体。
from IPython.display import Image, Markdown, Code, HTML

def display_code_execution_result(response):
  for part in response.candidates[0].content.parts:
    if part.text is not None:
      display(Markdown(part.text))
    if part.executable_code is not None:
      code_html = f'<pre style="background-color: green;">{part.executable_code.code}</pre>' # Change code color
      display(HTML(code_html))
    if part.code_execution_result is not None:
      display(Markdown(part.code_execution_result.output))
    if part.inline_data is not None:
      display(Image(data=part.inline_data.data, width=800, format="png"))
    display(Markdown("---"))
使用单次调用的 code_execution
在初始化模型时,将 code_execution 作为 tool 传入,以告知模型允许其生成并运行代码。
from google.genai import types

prompt = """
    What is the sum of the first 50 prime numbers?
    Generate and run code for the calculation, and make sure you get all 50.
"""

response = client.models.generate_content(
    model=MODEL_ID,
    contents=prompt,
    config=types.GenerateContentConfig(
        tools=[types.Tool(
            code_execution=types.ToolCodeExecution
            )]
        )
    )

display_code_execution_result(response)
使用文件 I/O 执行代码
本指南中你将使用的数据集来自卡内基梅隆大学统计系的 StatLib。该数据集由 scikit-learn 在 3-Clause BSD 许可下提供。
它提供了加利福尼亚州各个街区(block)的 2 万条信息,包括位置(经度/纬度)、平均收入、房屋平均年龄、平均房间数、平均卧室数、人口、平均occupation。
以下是各列及其属性含义的说明:
* MedInc:街区组收入中位数
* HouseAge:街区组房屋年龄中位数
* AveRooms:每户平均房间数
* AveBedrms:每户平均卧室数
* Population:街区组人口
* AveOccup:平均家庭成员数
* Latitude:街区组纬度
* Longitude:街区组经度
注意:代码执行功能最适合与 .csv 或 .txt 文件配合使用。
import pandas as pd
from sklearn.datasets import fetch_california_housing

california_housing = fetch_california_housing(as_frame=True)
california_housing.frame.to_csv('houses.csv', index=False)
# Read the CSV file into a pandas DataFrame
houses_data = pd.read_csv('houses.csv', nrows=5000) # only keeping the first 5000 entries to keep the request light (still 500k tokens). Use pro models to ingest the full dataset.
houses_data.to_csv('houses.csv', index=False)
houses_data.head()
# Upload diving_data.csv file using the File API
houses_file = client.files.upload(
    file='houses.csv',
    config=types.FileDict(display_name='Blocks Data')
)

print(f"Uploaded file '{houses_file.display_name}' as: {houses_file.uri}")
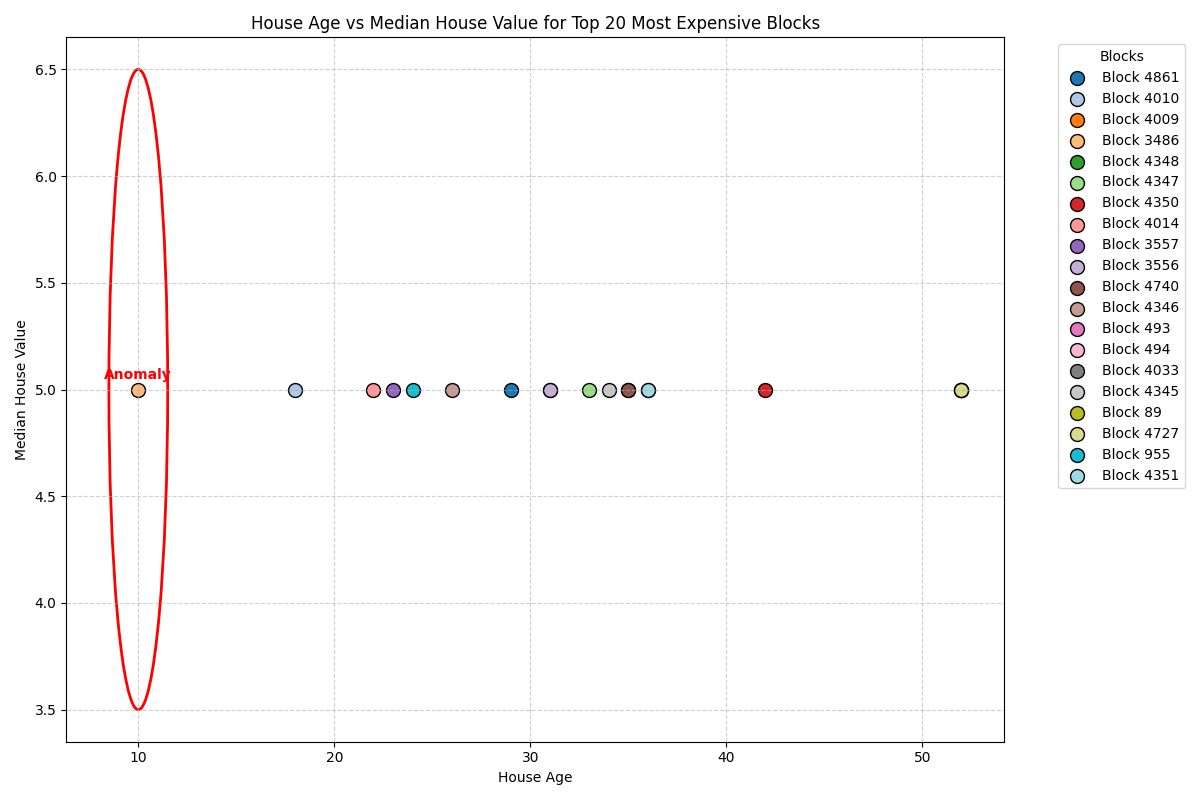
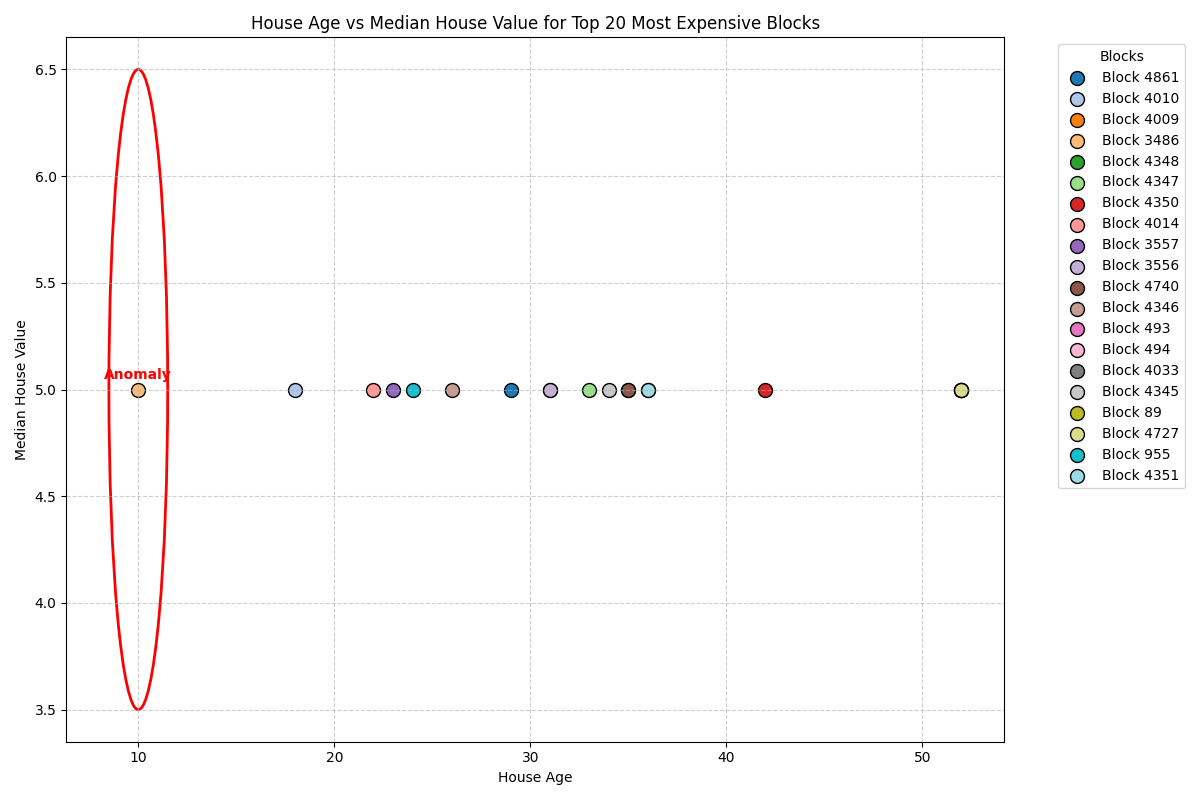
让我们尝试几个关于你拥有的数据集的查询。首先,查看最昂贵的区块并检查是否存在异常数据会很有趣。
response = client.models.generate_content(
    model=MODEL_ID,
    contents=[
        "This dataset provides information on various blocks in Californina.",
        "Generate a scatterplot comparing the houses age with the median house value for the top-20 most expensive blocks.",
        "Use each black as a different color, and include a legend of what each color represents.",
        "Plot the age as the x-axis, and the median house value as the y-axis.",
        "In addition, point out on the graph which points could be anomalies? Circle the anomaly in red on the graph."
        "Then save the plot as an image file and display the image.",
        houses_file
    ],
    config=types.GenerateContentConfig(
        tools=[types.Tool(code_execution=types.ToolCodeExecution)]
    )
)

display_code_execution_result(response)
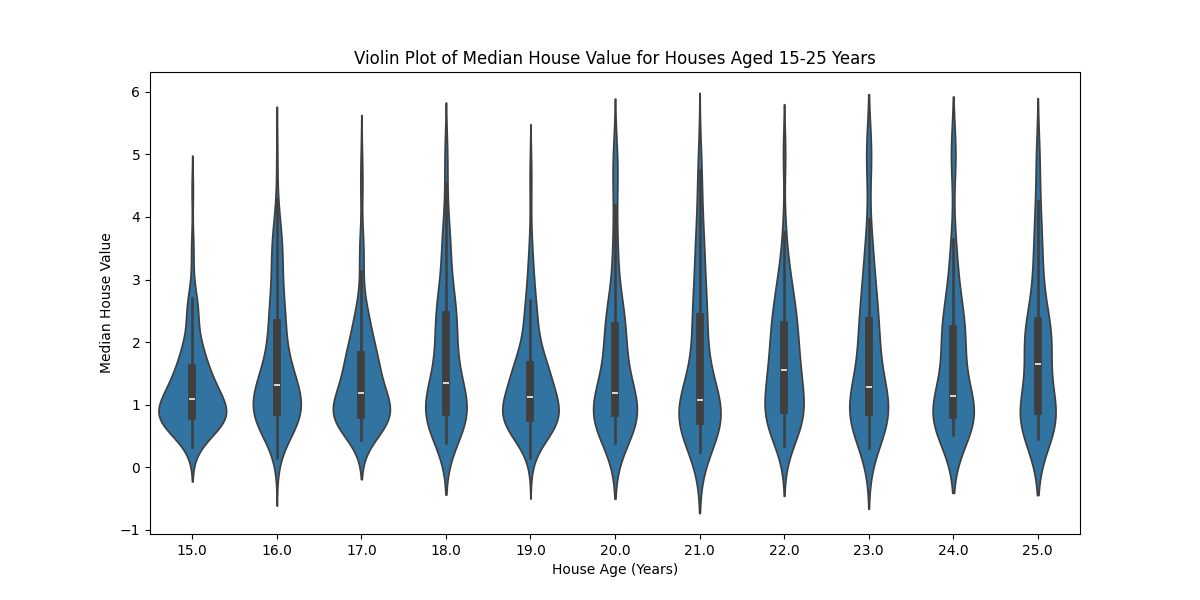
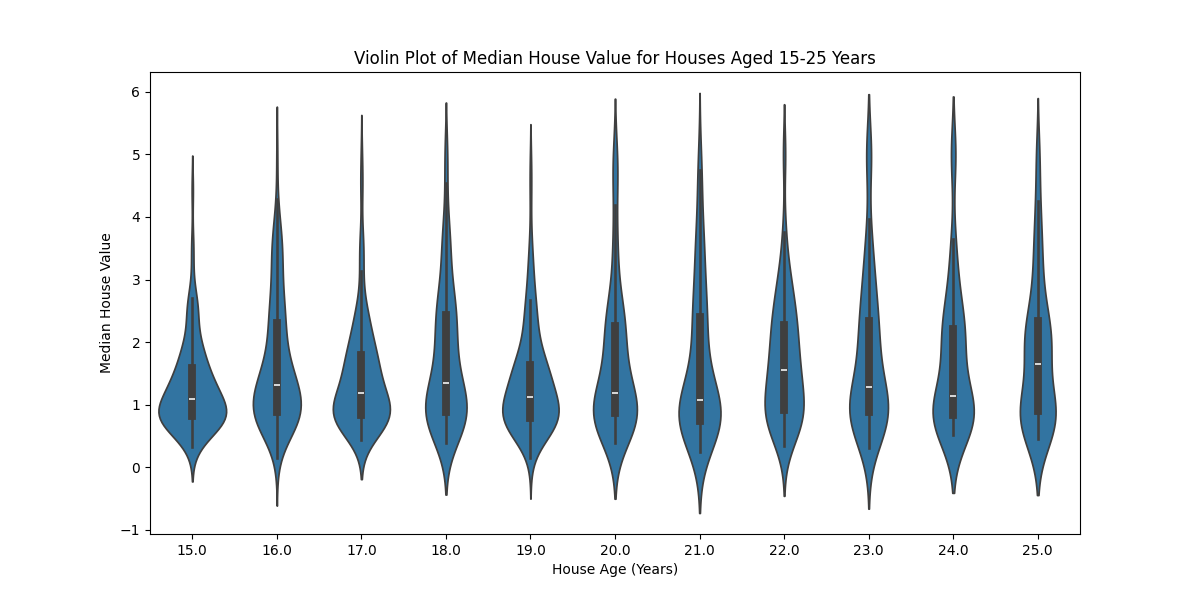
继续数据调查,你现在可以分析数据集中的数据方差:
response = client.models.generate_content(
    model=MODEL_ID,
    contents=[
        "This dataset provides information on various blocks in Californina.",
        "Calculate the variance of the house price for houses between 15 and 25 Years old",
        "Plot the variance using a violinplot",
        "I would like you to use the x-axis for the house age, and house price for the y-axis",
        "Then save the plot as an image file and display the image.",
        houses_file
    ],
    config=types.GenerateContentConfig(
        tools=[types.Tool(code_execution=types.ToolCodeExecution)]
    )
)

display_code_execution_result(response)
下面是另一个例子——计算单词中重复的字母(这是一个常见的例子,LLM 有时难以得出正确结果)。
response = client.models.generate_content(
    model=MODEL_ID,
    contents="Calculate how many letter r in the word strawberry and show the code used to do it",
    config=types.GenerateContentConfig(
        tools=[types.Tool(code_execution=types.ToolCodeExecution)]
    )
)
display_code_execution_result(response)
聊天
使用 chat 时的工作方式相同,它允许你与模型进行多轮对话。你还可以设置 system_instructions,从而进一步引导模型的行为。
system_instruction = """
  You are an expert software developer and a helpful coding assistant.
  You are able to generate high-quality code in any programming language.
"""

chat = client.chats.create(
    model=MODEL_ID,
    config=types.GenerateContentConfig(
        system_instruction=system_instruction,
        tools=[types.Tool(code_execution=types.ToolCodeExecution)],
    ),
)
这次,你将要求模型使用 Bogo-sort 算法对一个数字列表进行排序。
response = chat.send_message("Run the bogo-sort algorithm with this list of numbers as input until it is sorted: [2,34,1,65,4]")
display_code_execution_result(response)
这段代码看起来令人满意,因为它完成了任务。不过,你可以通过在模型下方发送以下消息来进一步更新代码,从而减轻一些随机性。
response = chat.send_message("Run an alternate implementation of the bogo-sort algorithm with the same input")
display_code_execution_result(response)

response = chat.send_message("How many iterations did it take this time? Compare it with the first try.")
display_code_execution_result(response)
多次运行上一个单元格,你会看到迭代次数不同,这表明 Gemini API 确实运行了代码,并且由于算法的特性而获得了不同的结果。
多模态提示
你可以将媒体对象作为提示的一部分传入,模型可以查看这些对象,但无法在代码中使用它们。
在本示例中,你将通过代码执行与 Gemini API 交互,来运行蒙提霍尔问题的模拟。
! cp cat.png montey_hall.png
import PIL
montey_hall_image = PIL.Image.open("montey_hall.png")
montey_hall_image

prompt="""
    Run a simulation of the Monty Hall Problem with 1,000 trials.

    The answer has always been a little difficult for me to understand when people
    solve it with math - so run a simulation with Python to show me what the
    best strategy is.
"""
result = client.models.generate_content(
    model=MODEL_ID,
    contents=[
        prompt,
        montey_hall_image
    ],
    config=types.GenerateContentConfig(
        tools=[types.Tool(code_execution=types.ToolCodeExecution)]
    )
)

display_code_execution_result(result)
流式传输
流式传输与代码执行兼容,你可以利用它在响应生成时实时传递。只需注意,同一类型(text、executable_code 或 execution_result)的连续部分应当拼接在一起,你需要自行将输出缝合起来:
result = client.models.generate_content_stream(
    model=MODEL_ID,
    contents=[
        prompt,
        montey_hall_image
    ],
    config=types.GenerateContentConfig(
        tools=[types.Tool(code_execution=types.ToolCodeExecution)]
    )
)

for chunk in result:
  display_code_execution_result(chunk)
后续步骤
有用的 API 参考:
查看代码执行文档以了解该功能的更多详细信息,特别是关于何时使用它而非函数调用的建议。
继续探索 Gemini API
请查看 Cookbook 中的其他指南,以获取有关如何使用 Gemini 的更多示例,特别是这个示例,它展示了如何在 Live API 中使用不同的工具(包括代码执行)。
搜索接地指南中还有一个混合了接地和代码执行的示例,值得一看。
要了解代码执行如何与 Gemini 1.5 一起使用,请查看旧版代码执行示例。
常见问题
常见问题包括:GEMINI_API_KEY 未设置导致认证失败;Colab userdata 在非 Colab 环境不可用,需用环境变量补丁;上传文件过大导致 token 超限,应先用 nrows 截取;模型不支持代码执行或工具配置错误;流式输出片段未拼接导致显示断裂;图表未保存为图片而无法展示。排查时先检查密钥与模型 ID,再确认 tools 配置,最后检查文件上传返回的 uri 是否被正确传入 contents。
企业应用扩展
生产环境建议:使用 Vertex AI OAuth 替代 API 密钥;对上传数据做脱敏与大小限制;为代码执行设置超时与资源配额;把流式片段按类型缓冲后再渲染;对关键计算增加结果校验;根据任务在代码执行与函数调用之间选择;结合搜索接地与 Live API 工具扩展能力;用 system_instruction 固定输出格式,降低随机性。
总结
本教程面向有编程基础的开发者,系统讲解 Gemini API 的代码执行功能:模型可根据自然语言指令生成并运行 Python 代码,并返回文本、可执行代码、执行结果与内联媒体。内容涵盖 SDK 安装与 API 密钥配置、单次调用、文件 I/O、聊天多轮交互、多模态提示与流式传输,并分析辅助函数、数据流与组件关系,给出常见错误排查与生产优化建议。
- --
内容来源与验证
- 内容等级:PREMIUM_A
- 质量等级:A
- 难度:中级
- 验证等级:V1
- 原文作者:
- 原文日期:
- 来源许可:Apache-2.0
- 来源版本:
b70d2092412bfda325dccdc12c44e063d7c3fc2b - 查看原文
站内还有更多完整实战教程
加入会员,解锁全部教程、完整代码与持续更新内容。
加入会员